Home →
CIT (UK) Own Brand Services →
Printer Friendly Version
CIT (UK) Own Brand Services
This book contains a number of help articles for some of the services that we offer including email, web, FTP and computer support contracts.
1. CCTV
1.1. iVMS-4500 Configuration
iVMS-4500 Configuration
1. Download the iVMS-4500 App from either the App Store or Google play on your Apple or Android device.
2. Once the app has been downloaded open it. You will be greeted with a page similar to the one in the image below. Simply tap on the white circle on the left hand side to reveal the applications menu.

3. Click on the devices menu.
4. Tap the Plus button on the top righthand side and then select the Manual Adding option.
5. Using the connection details provided to you by one of our technical team, please fill out the device details in the order shown. Once these have been entered simply click on the floppy disk image on the top right to save and apply the settings.
NOTE: Please ensure that Register Mode is set to Ip/Domain
6. Click Start Live View at the bottom of the screen to start the connection.
2. Using Email on your Computer (Kerio)
2.1. Central IT Email Server Address Details
Please use the following details when setting up email account.
ActiveSync or Microsoft Exchange
mymail.cit-services.co.uk
Using port 80 or 82. Secure connection on port 443.
POP & IMAP Incoming Mail Server Address
mail.cit-services.co.uk
POP3 port 110. Secure POP3 995. IMAP Port 143. Secure IMAP 993.
SMTP Outgoing Mail Server Address
mail.cit-services.co.uk
Port 25 or 2525. Secure SMTP uses 465. SMTP Submission uses 587.
Our servers support all standard ports and authentication methods.
2.2. Configuring a Microsoft Exchange Internet account on Mac OS X
Adding an Exchange Internet account
-
In System Preferences, select Internet Accounts.
-
In the right window pane, select Exchange.
-
Type your email address and password.
-
Verify the information and click Continue.
-
Select the applications you want to configure and click Done.
Exchange account limitations
-
Public and shared folders are not synchronized in Mail. You can use IMAP or Kerio Connect Client.
-
Public and shared calendars (without Delegation) are not synchronized in Calendar. You can use CalDAV or Kerio Connect Client.
-
Public and shared contacts are not synchronized in Contacts. The Global Address List can be queried. You can use CardDAV or Kerio Connect Client.
-
You cannot move or create folders within specially designated folders (e.g Inbox, Drafts, Sent, Trash, Junk)
-
Only one reminder can be synchronized with an event.
2.3. Kerio Connect Account Assistant
About Kerio Connect Account Assistant
Kerio Connect Account Assistant is a single autoconfig tool which enables one-time auto-configuration of the following applications:
-
Apple Mail & Notes (secure IMAP, SMTP Submission)
-
Apple Calendar & Reminders (CalDAV)
-
Apple Contacts (CardDAV)
-
Apple Messages (XMPP)
-
Microsoft Outlook for Mac (Exchange Web Services)
-
Microsoft Entourage (WebDAV)
Using Kerio Connect Account Assistant
Kerio Connect Account Assistant is unique for each user. Download it from your own integration page.
-
Open the Mac integration page (e.g. http://mymail.cit-services.co.uk). Ask us for the correct address if you haven't been provided with one.
You can also click your name in Kerio Connect Client and select Integration with Mac.
-
Click on Set up my Mac and download Kerio Connect Account Assistant to your computer.
-
Once the download finishes, the installation program gets started confirm installation and run it.
-
Select which products installed on your computer to configure (you can configure any of them later) and click Continue.
-
Enter your Kerio Connect Client password and click Continue.
Now the configuration application verifies your identity and server connection.
-
Click Configure to run the configuration of the selected applications.
Now the configured applications are available and ready.
2.4. Setting up the Kerio connector on Windows
About Kerio Outlook Connector
Kerio Outlook Connector (Offline Edition) is a Microsoft Outlook extension that you can use to manage your Kerio Connect email, events, contacts, and tasks in Microsoft Outlook.
The Offline Edition synchronizes all changes with Kerio Connect once you reconnect.
Downloading Kerio Outlook Connector (Offline Edition)
To download the installation package, follow these steps:
-
Open the Integration with Windows page in your browser:
-
on the Kerio Connect client login page, click on the Integration with Windows link, or
-
click your name in Kerio Connect client and select Integration with Windows.

3. Click on Download Kerio Outlook Connector.
Installing Kerio Outlook Connector (Offline Edition)
Before you install Kerio Outlook Connector (Offline Edition), install and run at least once the MS Outlook application.
A standard installation wizard is used to install Kerio Outlook Connector (Offline Edition).
Upgrading Microsoft Outlook
When you upgrade or downgrade MS Outlook, you must reinstall Kerio Outlook Connector manually.
2.5. Apple Mail 3 (OS X 10.5)
Summary
This article describes how to configure email accounts in Mail in Mac OS X 10.5. The exact steps to take depend on the email service you use.
Manually configuring Mail
- Open Mail (click it on the Dock or open it from the Applications folder).
- If the "Welcome to Mail" assistant does not appear, choose Add Account from the File menu.
- Fill in the Full Name, Email address, and Password fields.
Note: Your email account password will be stored in Keychain and used automatically to login to your email account when you open Mail.
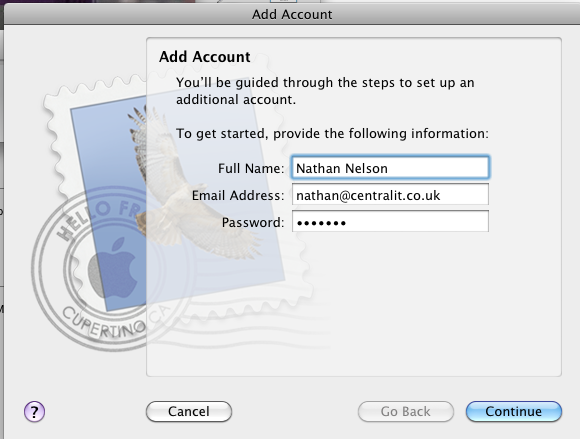
- Deselect "Automatically set up account" if it is enabled. Click Continue to proceed.
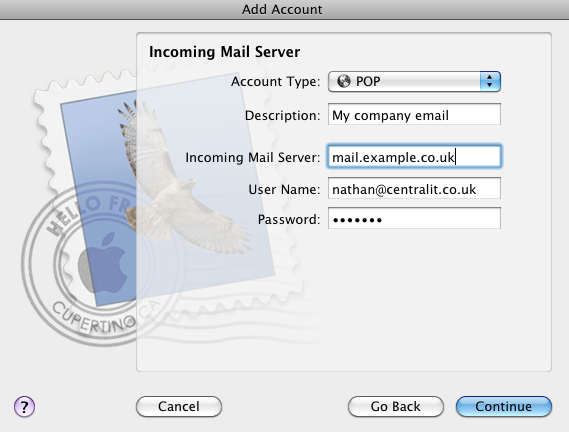
- Choose the proper Account Type. Ordinarily, we suggest that you choose POP.
- Give your account a useful description, such as "Anne's company account" or "Juan's admin account". It can be called whatever you want.
- Enter your Incoming Mail Server, User Name and Password. Note: The incoming mail server if your using Central IT's mail service is mail.centralit-hosting.co.uk
- The username is your email address. We should already have provided you with a password for the account.
- Click Continue to proceed.
- For the Outgoing Mail Server, a useful description such as "My Outgoing Mail Server" or "Central IT Outgoing Mail Server".
- Enter the Outgoing Mail Server details. You can set this to mail.centralit-hosting.co.uk
- Select "Use Authentication" and enter your User Name and Password. Your username is your email address. The password is the same as the one used for your incoming mail server.Click Continue to proceed.
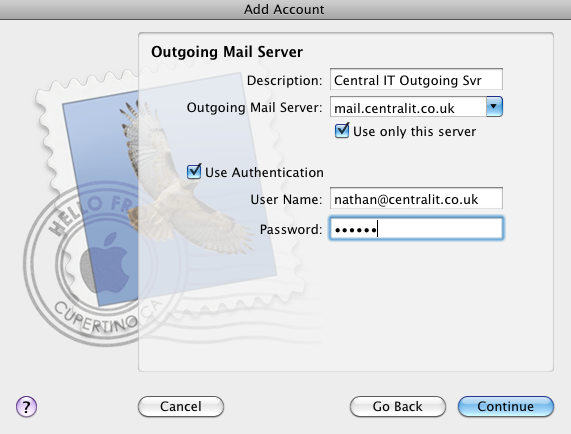
- If prompted, enter your Outgoing Mail Security settings. Authentication should be set to 'Password.' Click Continue to proceed.
- Verify your settings in the Account Summary. Check "Take account online". Click "Create" to complete the process.
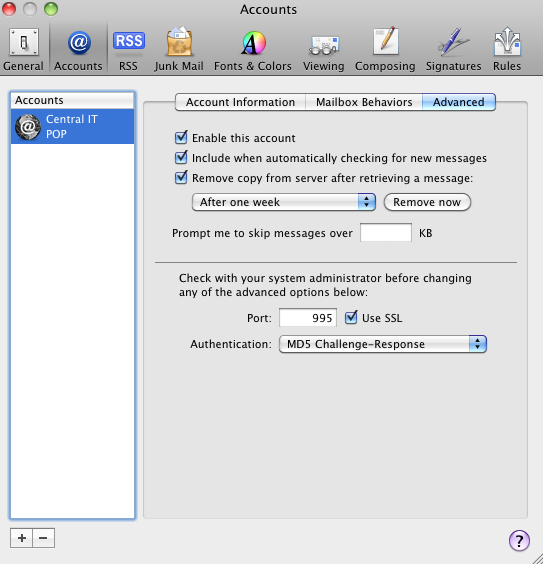
- Finally, it's strongly recommended that you do the following: Go to the Mail menu, then preferences, select the account which you have just created and then select the advanced button. Check the remove copy from the server after retrieving a message option and then select after one week from the tab below. Save the changes when you close down the prefer preferences window.
2.6. Apple Mail 4 (Edit Current Settings)
Summary
This article describes how to edit an existing email account in Apple Mail 4 in Mac OS X 10.6. The exact steps to take depend on the email service you use.
Changing your incoming and outgoing mail servers
1. Open Mail (click it on the Dock or open it from the Applications folder).
2. Go to the Mail menu at the top of the screen. It's on the left next to the Apple menu.
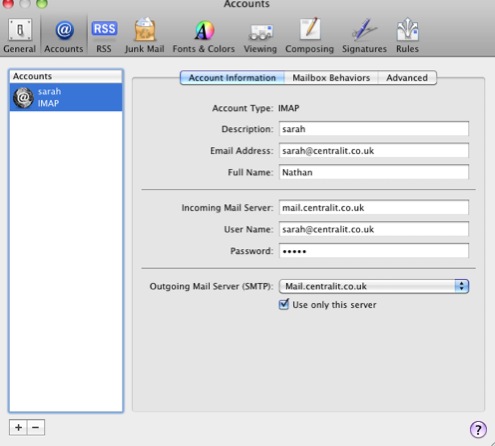
3. Select 'Preferences' and then 'Accounts.' Select your account on the left hand side under 'Accounts.'
4. To change the incoming mail server or sometimes it's referred to as POP server, edit the 'Incoming Mail Server' field on the right side of the window. Please note: mail.centralit.co.uk is only an example. If Central IT provides your company with email services, then your incoming mail server will be mail.centralit-hosting.co.uk
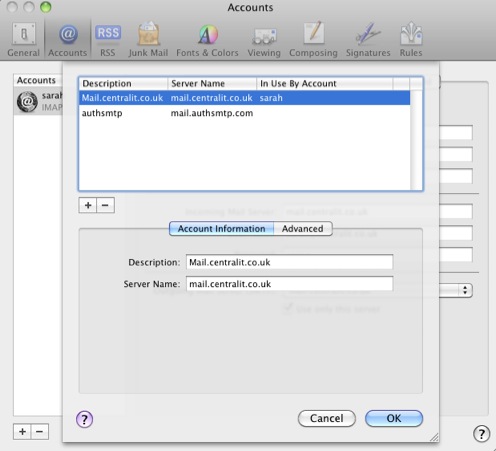
5. To change your outgoing mail server or sometimes it's referred to as SMTP server, click on the 'Outgoing Mail Server' tab at the bottom of the window. Select 'Edit SMTP Server List.' Select the correct outgoing mail server from the list at the top of the window. Under 'Account information' change the desired field for Description (which is normally the same as 'Server Name') and 'Server Name.' Please note: mail.centralit.co.uk is only an example. If Central IT provides your company with email services, then your outgoing mail server will mail.centralit-hosting.co.uk
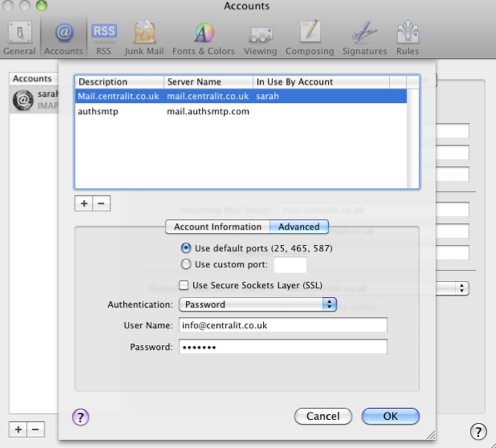
Click on the 'Advanced button' for entering default port numbers and authentication settings.
6. Once you're happy with your settings click on 'OK' and then close the 'Accounts' window. If you are asked to save changes then click on 'Save.'
2.7. Adding a new POP or IMAP account (Apple Mail 9)
Set up Mail
If you haven't already set up your email account, you're prompted to set it up when you first open Mail.
Choose 'Add Other Mail Account', then click Continue.
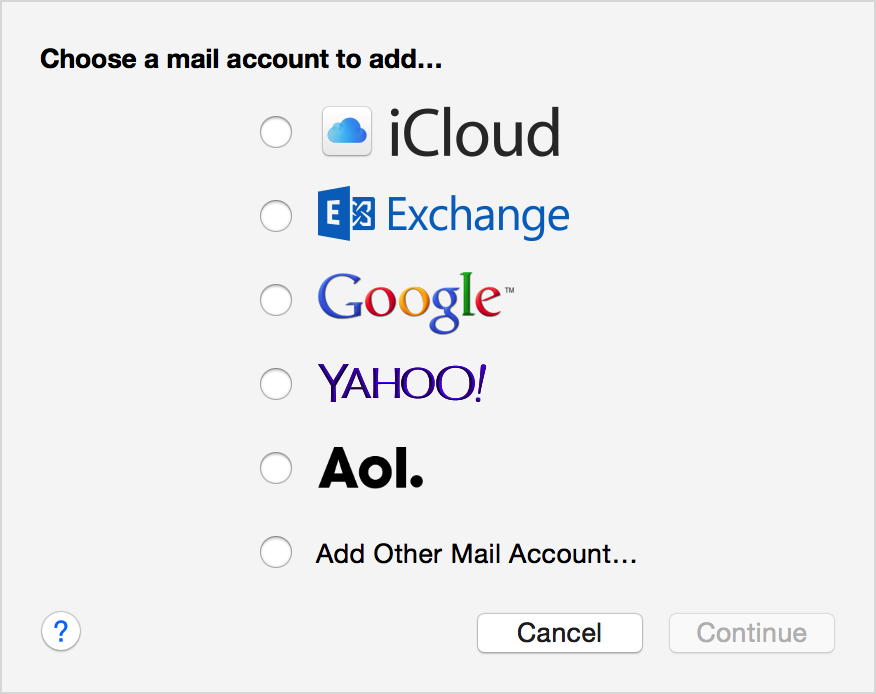
Enter your name, email address, and email password, then click Create.
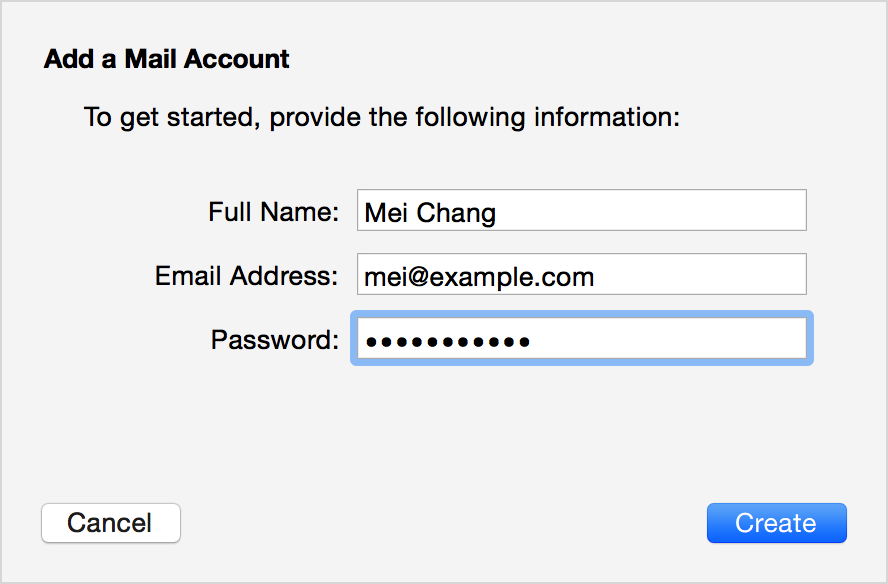
If necessary, Mail might ask you for additional settings.
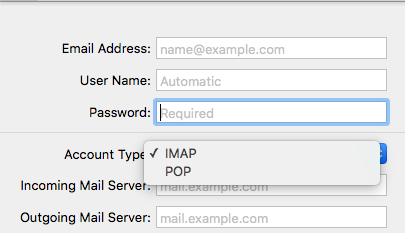
Ensure your email address is correct. Enter your username and password. For the account type select either IMAP or POP. If you're not sure which type of account you require, then please ask a member of our technical support team. Finally enter the Incoming and Outgoing Mail Server addresses. Again, if you're unsure what these are, then please get in touch with us.
Once you have clicked on 'Sign In', you'll be required to select that Apps that you would prefer to use with this account. Click 'Done'. You will be returned to the Accounts list. You may now add other accounts if necessary.
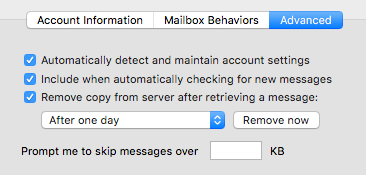
NOTE: We strongly advise that when setting up a POP account that you ensure that Apple Mail removes messages from the server once they have been downloaded onto your computer. To set this up, do the following:
Click on your newly created email account. Select the advanced tab. Select 'Remove copy from server after retrieving a message'. Select 'After one day' or 'Immediately'.
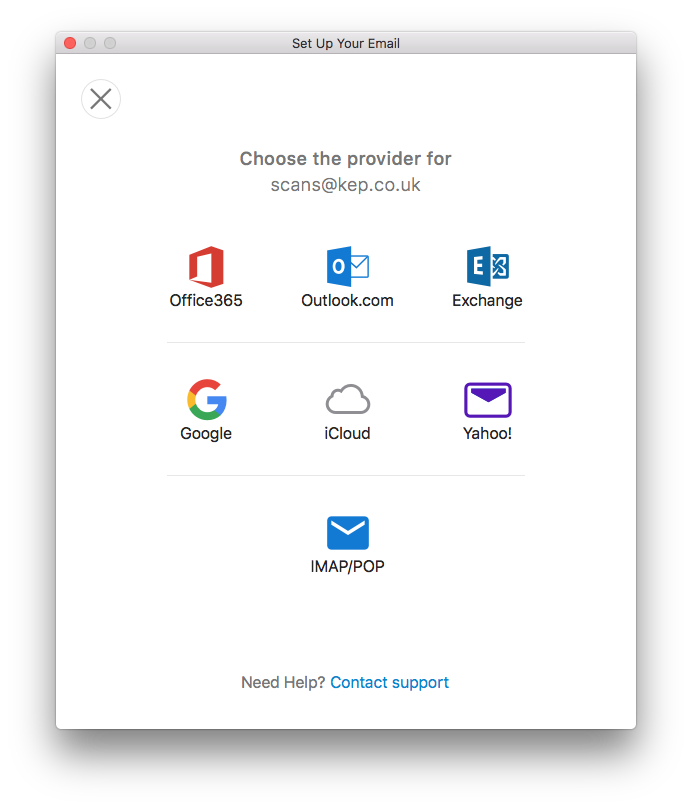
2.8. Outlook 2011 and 2016 IMAP Setup
Set up Outlook
If you haven't already set up your email account, you're prompted to set it up when you first open outlook.
Click on outlook at the top then preferences.
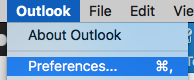
now click on accounts .
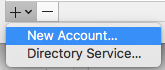
When you are in accounts click on the Plus symbol at the bottom right of screen.
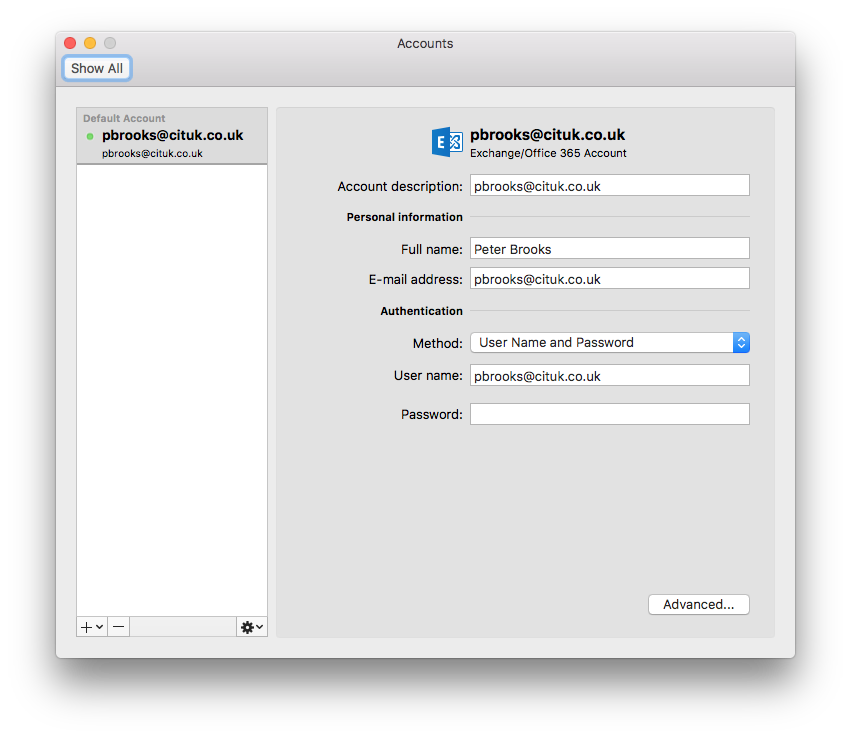
Now click on new account
Add the email address of your email account then click continue
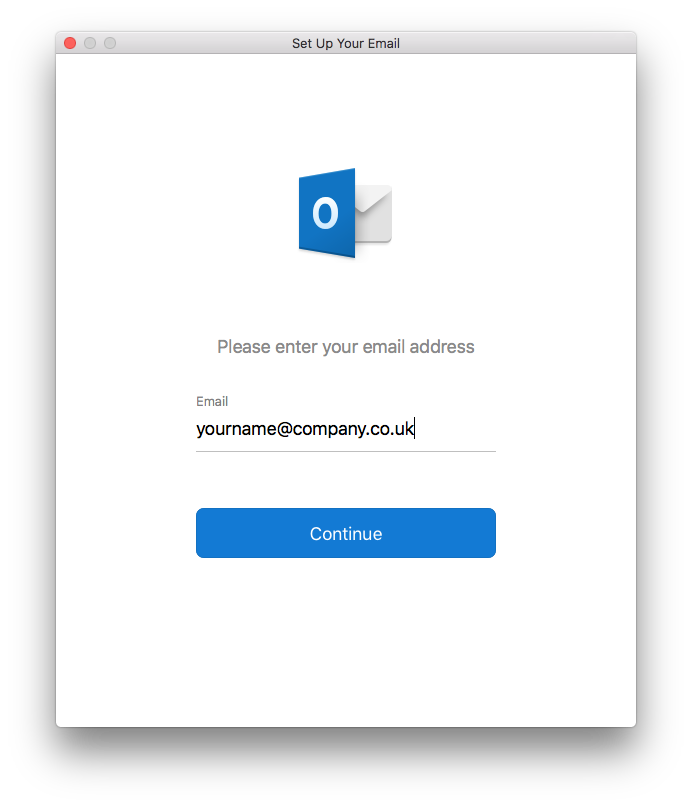
Now pick the account type IMAP/POP or IMAP if its a drop down box
Now you will need to fill in the setting for the IMAP server as it shows on this screenshot
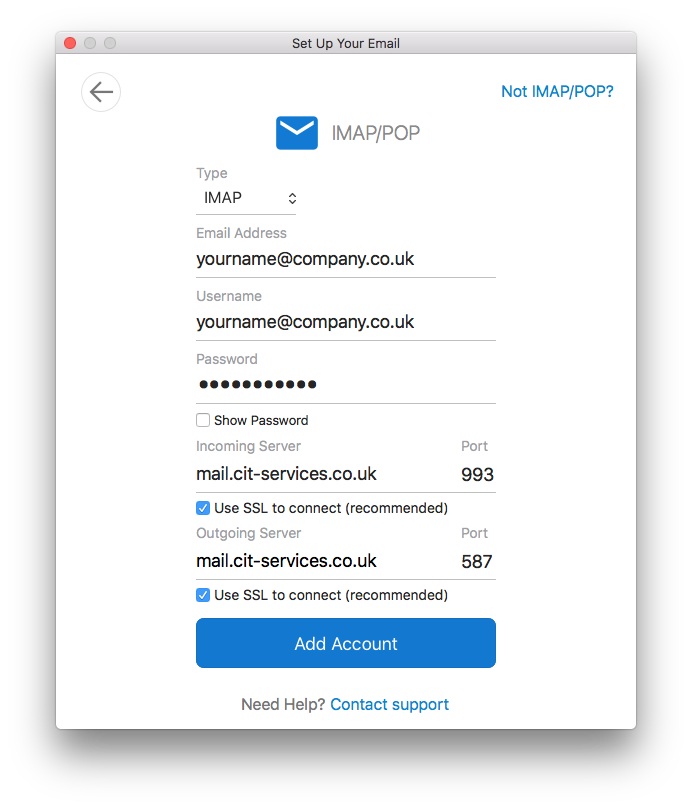
So the Incoming server and the Outgoing server should say mail.kep.co.uk and tick Use SSL Connection (Recommended) on both
now click add account
You will see a Certificate warning come up on the screen click on show certificate and then click continue it will ask you for your local password to your machine
when you have done this you will have you email setup and ready to use.
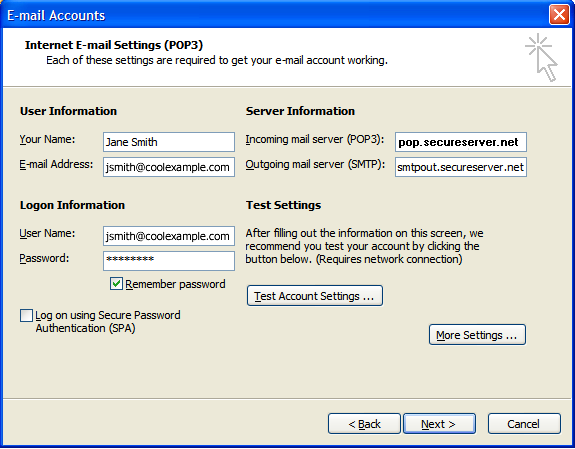
2.9. Microsoft Outlook 2003 (Edit Current Settings)
Summary
This article describes how to edit an existing email account in Microsoft Outlook 2003 in Windows XP. The exact steps to take depend on the email service you use.
1. Open Microsoft Outlook 2003
2. In Microsoft Outlook, from the Tools menu, select E-Mail Accounts.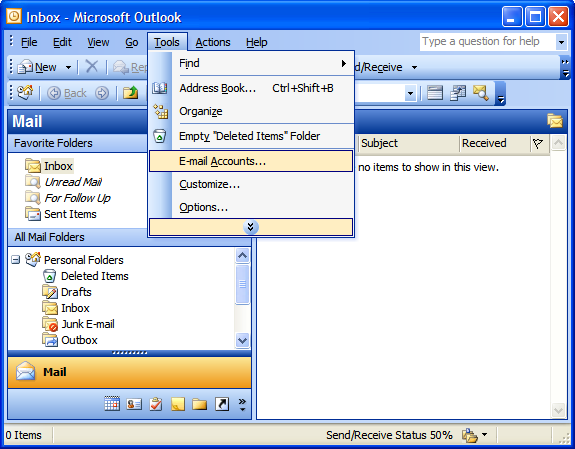
Then select 'view or change existing e-mail accounts' from the wizard window.
3. Double click on the email account you want to change.
4. To change the incoming mail server or sometimes it's referred to as POP server, edit the 'Incoming mail server (POP3)' field under 'Server Information.' Please note: pop.secureserver.net is only an example. If Central IT provides your company with email services, then your incoming mail server will be your own domain address such as mail.example.co.uk or com.

5. To change the outgoing mail server or sometimes it's referred to as SMTP server, edit the 'Outgoing mail server (SMTP)' field under 'Server Information.' Please note: smtpout.secureserver.net is only an example. If Central IT provides your company with email services, then your incoming mail server will be your own domain address such as mail.example.co.uk or com.
Click on the 'more settings' button for entering default port numbers and authentication settings. Click OK once done.
6. Click on 'Next' and then 'Finish.'
2.10. Microsoft Entourage 2008 (Edit Current Settings)
Summary
This article describes how to edit an existing email account in Microsoft Entourage in Mac OS X 10.6. The exact steps to take depend on the email service you use.
Changing your incoming and outgoing mail servers
1. Open Microsoft Entourage (click on it from the Dock or open it from the Applications folder).
2. Go to the 'Tools' Menu and select 'Accounts'. Double click the account you wish to edit from the mail section of 'Accounts'.
3. To change the incoming mail server or sometimes it's referred to as POP server, edit the 'POP server' field under the receiving mail section of account settings. Please note: mail.centralit.co.uk is only an example. If Central IT provides your company with email services, then your incoming mail server will be your own domain address such as mail.example.co.uk or com.
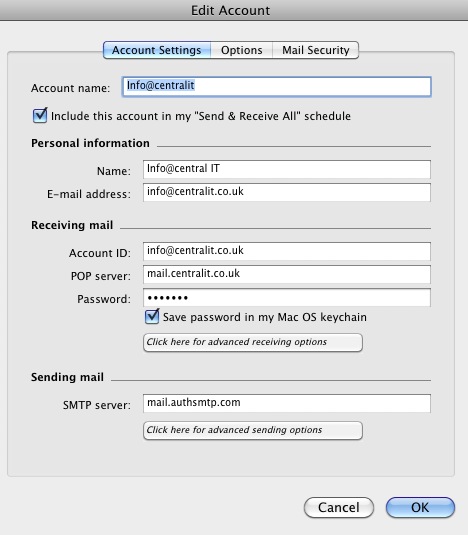
4. To change your outgoing mail server or sometimes it's referred to as SMTP server, click on the 'SMTP Server' under the sending mail section of account settings. Please note: mail.centralit.co.uk is only an example. If Central IT provides your company with email services, then your outgoing mail server will be your own domain address such as mail.example.co.uk or com.
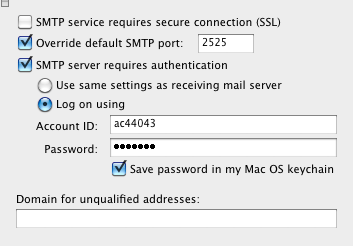
Click on the 'Advanced sending options' button for entering default port numbers and authentication settings.
5. Once you're happy with your settings click on 'OK' and then close the 'Accounts' window.
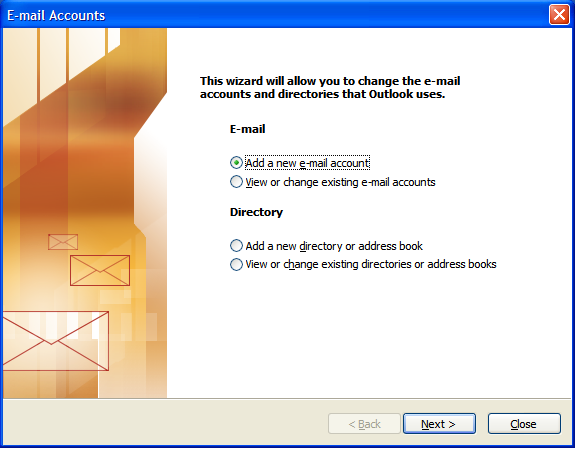
2.11. Microsoft Outlook 2003
This tutorial shows you how to set up Microsoft Outlook 2003® to work with your e-mail account. This tutorial focuses on setting up Microsoft Outlook 2003, but these settings are similar in other versions of Microsoft Outlook. You can set up previous versions of Microsoft Outlook by using the settings in this tutorial.
To Set Up Your E-mail Account in Microsoft Outlook
In Microsoft Outlook, from the E-mail Accounts menu, select Tools.
On the E-mail Accounts wizard window, select Add a new e-mail account, and then click Next.
For your server type, select POP3 or IMAP, and then click Next.
On the Internet E-mail Settings (POP3/IMAP) window, enter your information as follows:
- Your Name
- Your first and last name.
- E-mail Address
- Your email address.
- User Name
- Your email address, again.
- Password
- Your email account password.
- Incoming mail server (POP3)
- POP, mail.example.co.uk or IMAP, mail.example.co.uk.
- Where you can see 'example' above, you should use your domain name. If you're unsure what this is, please ask a member of the Central IT help desk.
- Outgoing mail server (SMTP)
- mail.centralit.co.uk
On the Internet E-mail Settings window, go to the Outgoing Server tab.
Select My outgoing server (SMTP) requires authentication.
Select Use same settings as my incoming mail server.
Go to the Advanced tab, and then select 'leave a copy of messages on the server' and remove from server after 5 days.
Click OK.
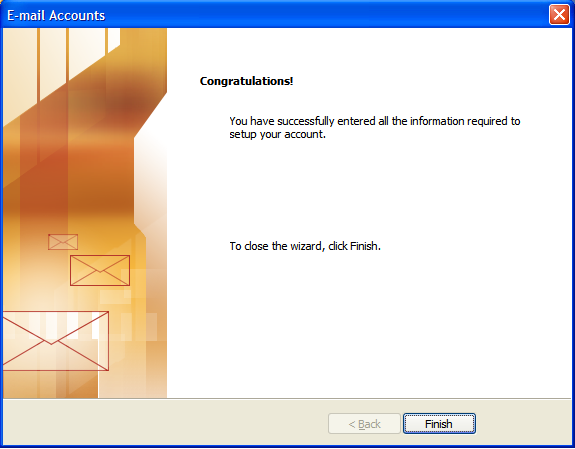
Click Next
Click Finish.
NOTE: As a courtesy, we provide information about how to use certain third-party products, but we do not endorse or directly support third-party products and we are not responsible for the functions or reliability of such products. Outlook 2003® is a registered trademark of Microsoft Corporation in the United States and/or other countries. All rights reserved.
2.12. Error message - WARNING: More than 90% of email storage space used
A standard mailbox on our server can contain up to 5000 messages and has a capacity of 250MB. The mailbox on the server is used to deliver your messages to your computer once they have been received from the sender.
But I've emptied my Inbox, Sent Items and Deleted Items on my computer. Why am I still getting this message?
These limits are imposed on the server mailboxes, not on your computer locally. The message doesn't refer to your Inbox, Sent Items or Deleted Items on your computer
The server mailbox quota is normally quite sufficient but this error will occur if:
(1) Your computer isn't setup to remove the messages from the server once you've downloaded them onto your computer OR if your computer isn't setup to remove them often enough.
(2) You are receiving two many large messages with attachments over a short period of time.
To correct this problem, you will need to remove the messages from the servers mailboxes:
Apple Mail Instructions
Mail menu>preferences>select your account>advanced> click on the 'remove now' button. This will remove the messages from the server.
Microsoft Entourage Instructions
Tools menu>accounts>double click you account>options>uncheck 'Leave a copy of each message on the server.' Click on ok and then click on the send/receive button. Entourage will now remove any messages on the server. Now go back to accounts - Tools menu>accounts>double click your account>options>re-check 'Leave a copy of each message on the server.' Click on ok and close the accounts window.
2.13. Managing Space with On My Computer Folders - Outlook for Mac
To avoid reaching your quota of storage space on your mail service, Macintosh Outlook users can move messages to folders designated as On My Computer within Outlook. This stores them on the Mac's hard drive while still allowing them to be viewed within Outlook on the computer.
- Items moved to On My Computer folders will not appear in Web Outlook or when accessing your email on a different computer or mobile device, however you can manually move or copy them back if needed.
- Be sure to back up messages stored on your computer in case Outlook crashes. To do this, include the Microsoft User Data folder within your Documents folder when backing up your Mac.
Instructions below will help you view the On My Computer folders, manually move messages, and set up archiving to automatically move old messages in Outlook 2016 and 2011. A bulk move of information via Exporting and Importing may be preferred if you want to store items from an account that is being disabled.
Viewing On My Computer Folders
Outlook automatically creates a set of default folders labeled On Your Computer. Follow these instructions if you do not see them in the folder list to the left of the Outlook mail window.
- With Outlook open, click on the main drop down menu (Outlook in the upper left) and select Preferences.
- Select the General icon under the Personal Settings heading.
- De-check the options to Group similar folders... and Hide On My Computer folders.

You will now see the On My Computer heading in the left Mail folder pane of Outlook. You may need to scroll down to find them, and click on the triangle to the left of the heading to expand and view subfolders.

 If you would like to create folders other than the default ones listed under On My Computer:
- Press the control key on your keyboard and click on the Inbox under the On My Computer heading.
- Select New Folder from the menu that appears. An Untitled Folder will appear under the Inbox.
- Rename the folder if desired, and drag it up to the On My Computer heading to move it from being a subfolder of the Inbox.
Manually Moving Messages
At any time you can move messages from folders on the mail server to On My Computer folders.
- In Outlook, click on a message or range of messages from a folder on the mail server to highlight/select.
- Click and hold on a selected message, then drag it to the desired folder under the On My Computer heading in the folder list on the left. NOTE: By default, dragging messages will copy instead of moving them so you may still need to delete the messages from the original folder. To skip this step you right-click on a message, select Move and indicate the desired folder on your computer. Alternatively, hold down the 'cmd' (Command) key whilst dragging the messages to the new location. Notice that there's no plus icon next to the mouse pointer which indicates that you are moving the messages rather than copying them.
The picture below shows 4 selected messages being dragged from the Inbox folder of an account called Columbia 1 to the Inbox folder under On My Computer.
- In addition, don't forget that a large number of messages may be in your Sent Items folder, and the Junk Folder. These should also be either moved to 'On My Computer' or deleted.
- Finally don't forget to empty your 'Deleted Items' folder as this also counts towards your storage quota.

This completes this process. If you want to learn how to automatically archive messages then please read the next section.
Setting Up Archiving Using Rules
Setting up a rule allows you to move messages that fit a certain criteria, such as their age, to another location such as the On My Computer folders.
- With Outlook open, select Tools from the uppermost menu, then Rules from the drop down that appears.

- Click on Exchange under the On My Computer heading in the left column of the window to highlight it, then select the + (plus) sign at the bottom of the window to add a Rule.

- In the Rule Name field of the next window, type in a description for the rule you are creating. This will appear in the Outlook Rules window (shown above) if you need to review, modify or delete it in the future.

- Set additional criteria for the rule. To have all messages that are older than 180 days (approximately 6 months) moved from your account on the server to your Inbox on the computer, select the following:
- In the When a new message arrives: section, change the first drop down to Date Received; the next to Is Greater Than; and type 180 in the days old field.
- If you have more than one email account configured in Outlook on your computer, click the + (plus) button to the right of days old to add the next rule condition and set it for Account - is - <name of your CUMC email account>.
- In the Do the following: section, select Move Message - Inbox (On My Computer).
NOTE: if there is another folder on your computer you prefer to use it is ok to select this, just make sure it is labeled (On My Computer). Folders not labeled as such are on the mail server and will still count towards your quota.
- If there is an additional row for rule criteria, select the - (minus) button to its right to remove.
- Make sure Enabled in the lower left of the window is checked and click the OK button.
- Click the red button in the upper right corner of the Rules window to close it and return to your Outlook mail.
- Select Messages from Outlook's topmost menu, then Rules - Apply - 180 Day Automatic Archive to run the rule. Depending on how many old messages you have it may take a few minutes to complete the archive.

- Archived messages will now appear in the On My Computer folder selected in step 4c above.
2.14. Delay when sending email
Summary
Some users may experience a delay when sending emails using the Central IT servers. This can affect anyone that is using a POP or IMAP account and has selected Central IT or their own domain which is hosted by Central IT as their default SMTP server.
Why this can happen
When a computer connects to our server, it is supposed to politely wait for the SMTP greeting - our server says that it is ready to talk. This setting deliberately delays that greeting for up to 30 seconds. If the other server attempts to start talking before then, it is just disconnected. Spammer's software usually doesn't want to waste that much time waiting around, but even if it does, you at least have cut down on how much work they can get done in a day. If every server did this, spammers would be significantly hampered (assuming they were willing to wait).
To summarise: In an effort to deter our server from SPAM abuse our server is deliberately setup to delay any incoming connections up to a period of 30 seconds.
'I know it's only 30 seconds, but it's extremely irritating!'
If you wish to use our servers to send email but find the delay too annoying we can add an exception to our server so that it won't delay messages sent from within your company. To set this up, please contact Central IT. We will require your static permanent IP address assigned to your company by your internet service provider.
Please note that this exception can only be setup for your company premises. We cannot provide this service for home users.
2.15. Ways to Avoid The Email Spam Filter
The larger emailing companies such as GMAIL, Yahoo and AOL have pretty high standards when it comes to receiving email. If there's something in your email which their systems don't like, it'll automatically flag up as a warning. There are technical things which can be done with your own email service such as SPF records and DKIM but you would need your email provider to help you sort this out for you.
There are things that you can do which will help:
Use a normal font size
Fonts that are too big or too small can trigger a Spam filter. The reason is that many Spammers either try to hide text in an email with tiny font sizes or they use huge font sizes to make an offer. Use a standard font size to avoid Spam filters.
Watch your text to image ratio
Spammers often use images to communicate their offer because Spam filters can't read what is in the image. Spam filters look skeptically upon emails that contain very little text but a large image.
Watch your link to text ratio
Spammers often send emails with little or no text and a link or numerous links. When marketing with email, links are often a critical part of the email. We usually need to place a link to the offer or to the content we are sharing with the email list. However, be sure to include ample HTML text when including links or risk being marked as Spam.
Be careful who you link to
Just as it is important not to link to spammers on your website, it's doubly important not to do so in an email. Linking to a known spammer is a surefire way to get a bad reputation. This can include also linking to your own social media sites.
Use clean code and proofread your text
Spam filters are keen to some of the more common spam formatting like red text in the body of the email or excessive use of underlining and bolding.
But they are also looking for anything out of the ordinary. Things like blank lines, words with gaps (spaces) in them and excessive use of the same words can add to your Spam score. Also take care when formulating your subject line too.
All of the above is taken into consideration where your emails are rated the other end. You can ask your client to whitelist so they no longer receive the warning. It's also possible that over time, you'll automatically become a trusted sender. Your short email does include a lost of URL links which probably doesn't help.
3. Using Email and Calendars on your iPhone
3.1. Configuring an Exchange ActiveSync account (Kerio Assistant)
Configuring an Exchange ActiveSync account
Exchange ActiveSync (EAS) is a licensed option. Ask your administrator if your account supports EAS.
-
In your iPhone browser, type the URL address of Kerio Connect Client.
-
Tap Integration with device.
-
Tap Mail, Contacts, Calendars.
-
Tap Use Exchange ActiveSync instead.
-
Type your username and password and tap Log In.
-
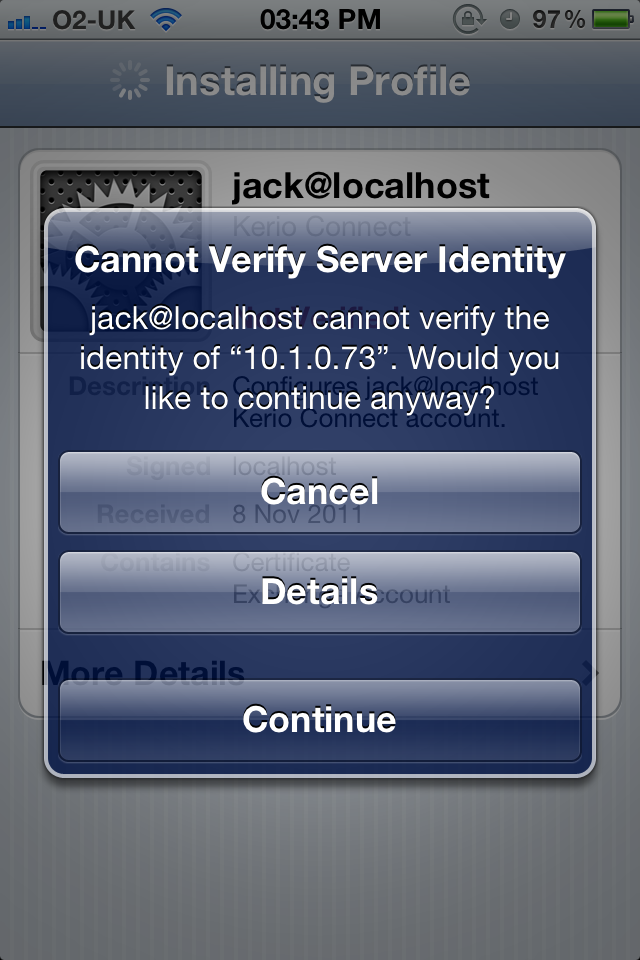
On the Install profile page, tap Install.
-
If your server uses, for example, a self-signed certificate, a warning may appear during the installation. Tap Install anyway.
-
Tap Done.
Your iPhone is ready. To see additional settings, go to Settings → Mail, Contacts, Calendars, and select the account.
3.2. Synchronizing folders with mobile devices
Overview
In Kerio Connect Client, you can select which folders will synchronize to your iCal/CalDAV/CardDAV/Exchange ActiveSync clients.
Selecting folders to synchronize
-
Click your name in Kerio Connect Client and select Settings.
-
Go to section Folders to Sync.
-
Select which folders will synchronize.
The icon will help you identify the type of each folder (emails, contacts, tasks, notes)
-
Save.
If you subscribe to shared or public folders, they are also available in the list of folders to synchronize.
If you are a resource reservation manager, you can synchronize resource calendars as well.
If you synchronize your Kerio Connect account via Exchange ActiveSync to an iOS device, the Drafts folder will not synchronize (due to the limitations of Exchange ActiveSync and the iOS device).
3.3. Exchange ActiveSync configuration (manual)
Please note that this configuration will only work if you have a Business Plus or Business Premium Mailbox.
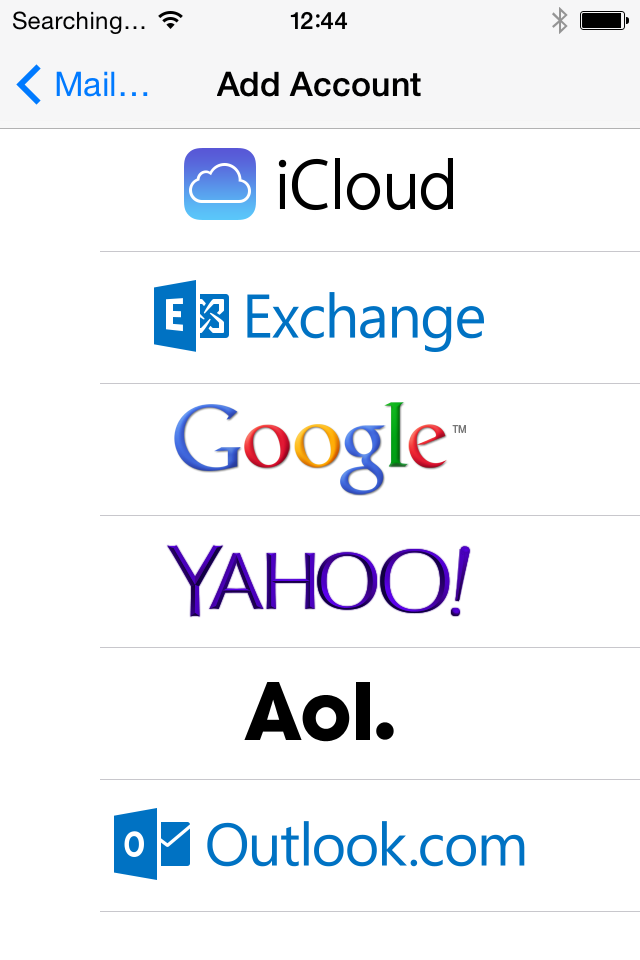
From the home screen, choose "Settings", then "Mail, Contacts, Calendars", then "Add Account..." You will see an Exchange option near the top of the list.
Select this option and you will be asked to provide your email address and Password, and a description of the account.
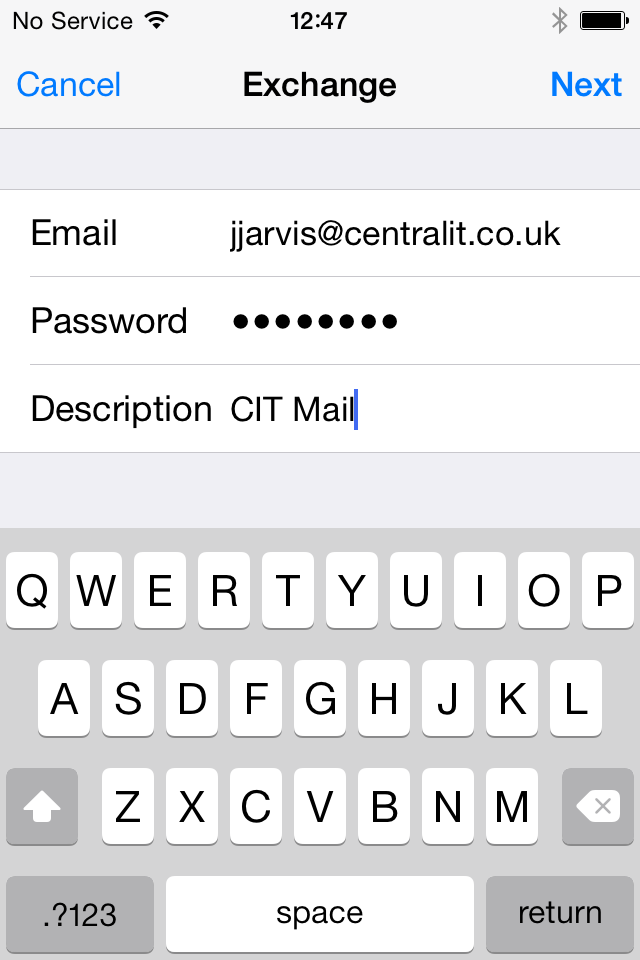
Here is an example:
After completing all fields and clicking the 'next' option, the device will attempt to locate a server, however this process will not succeed. At this point you will be provided with a similar dialog that now asks for your Server Address, Domain and Username.
Note that the 'Domain' and 'Server' fields say optional it is recommended to fill these in with your domain or server address respectively.
The domain name is the part of the email address that you find after the @ symbol. Using John.doe@computer.co.uk as an example we would use computer.co.uk as the Domain name because it falls after the @ symbol.
The Username field should be simply your login name - this is the first part of your email address, before the @ symbol.
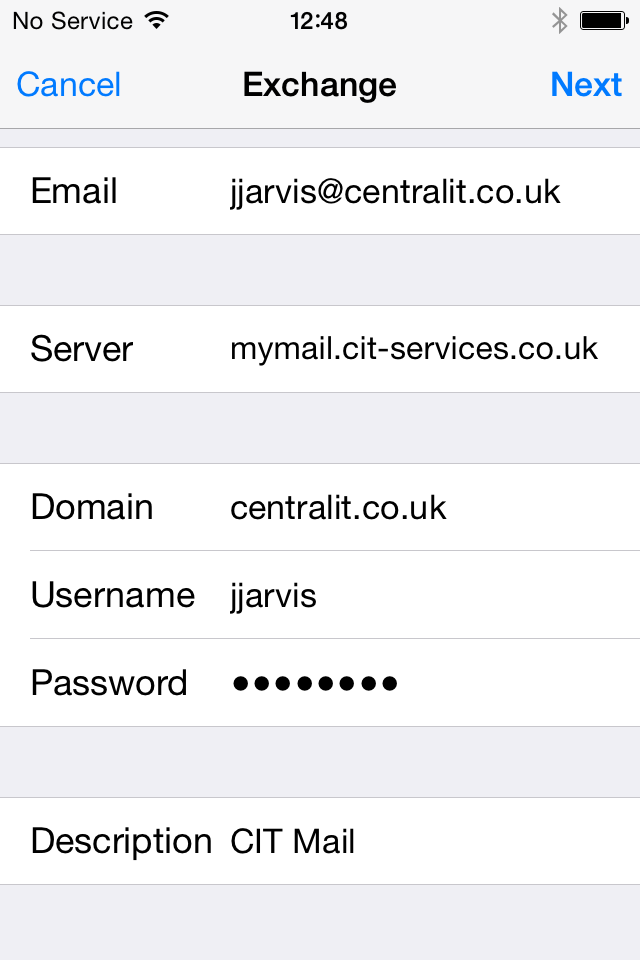
Here is an example:
- Server Address: mymail.cit-services.co.uk
- Domain: Centralit.co.uk
- Username: jjarvis
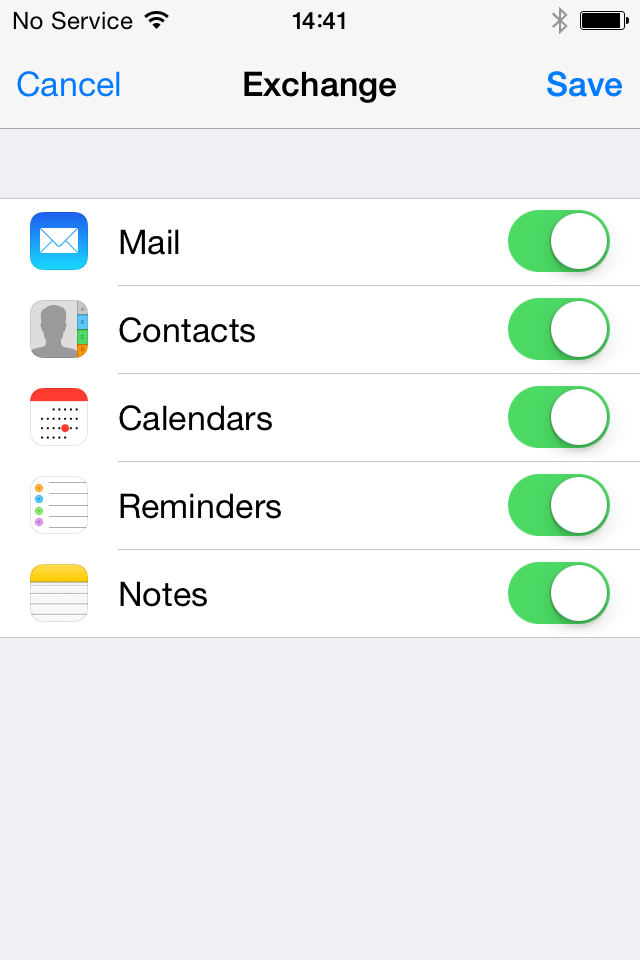
Once the iPhone has confirmed connectivity with the mail server, you will be asked which type of folders to synchronize. By default Mail, Contacts, and Calendars are selected.
3.4. Automatic Configuration (IMAP/CalDAV/CardDAV)
iOS devices, including iPads and iPhones offer a variety of options for synchronizing Email, Contacts, Calendars, Notes, and Reminders with Central IT Mail Servers. The typical configuration is performed automatically through the Kerio Connect Client interface, which installs a profile containing the SSL Certificate, IMAP, CardDAV, and CalDAV accounts.
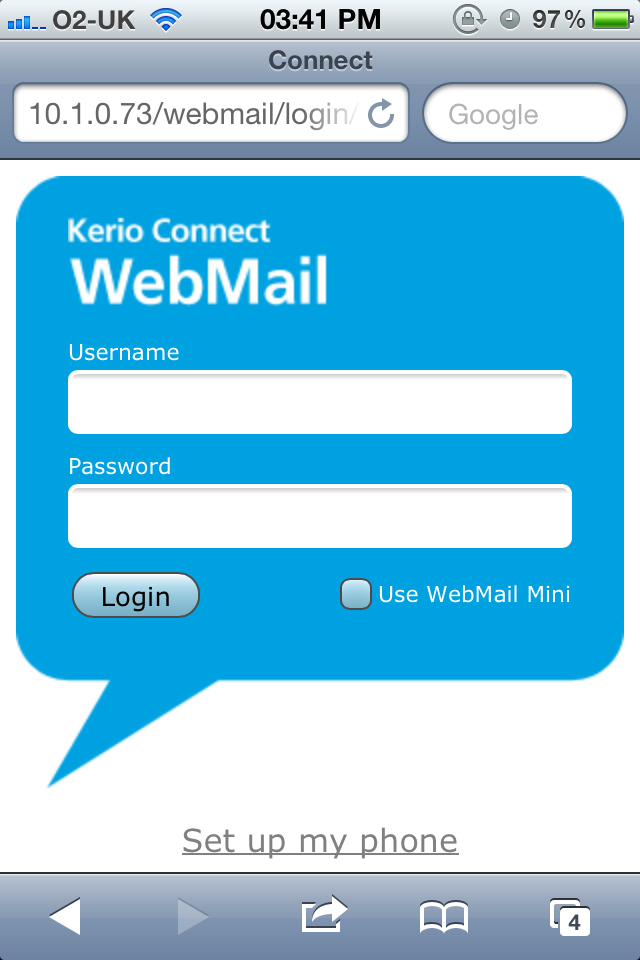
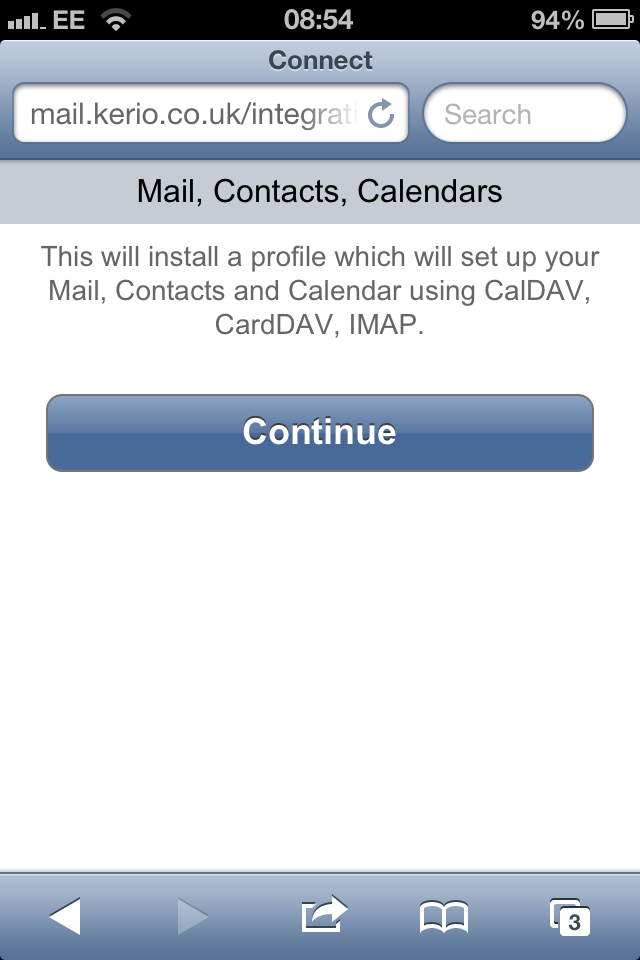
(1) You will need to go to WebMail on your iPhone by going to http://mymail.cit-services.co.uk and click on the link 'Set up my Phone'
(2) From there you have a few options, select the option 'Mail, Contacts, Calendars'
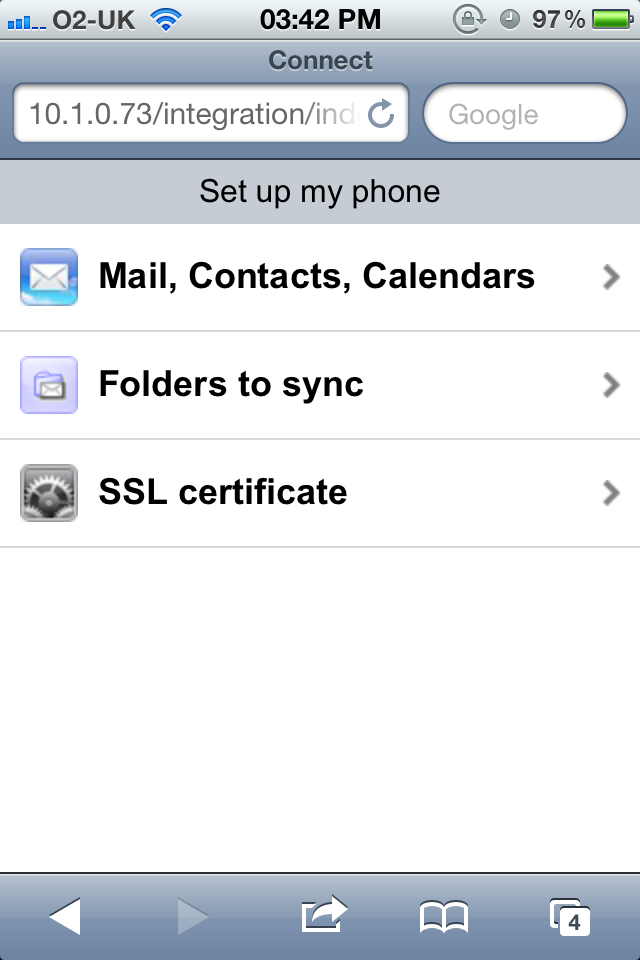
(3) You will then get a screen that will give you the option to configure your iPhone for an IMAP, CalDAV and CardDAV account. You will need to click 'Continue' to setup your IMAP, CalDAV and CardDAV accounts.
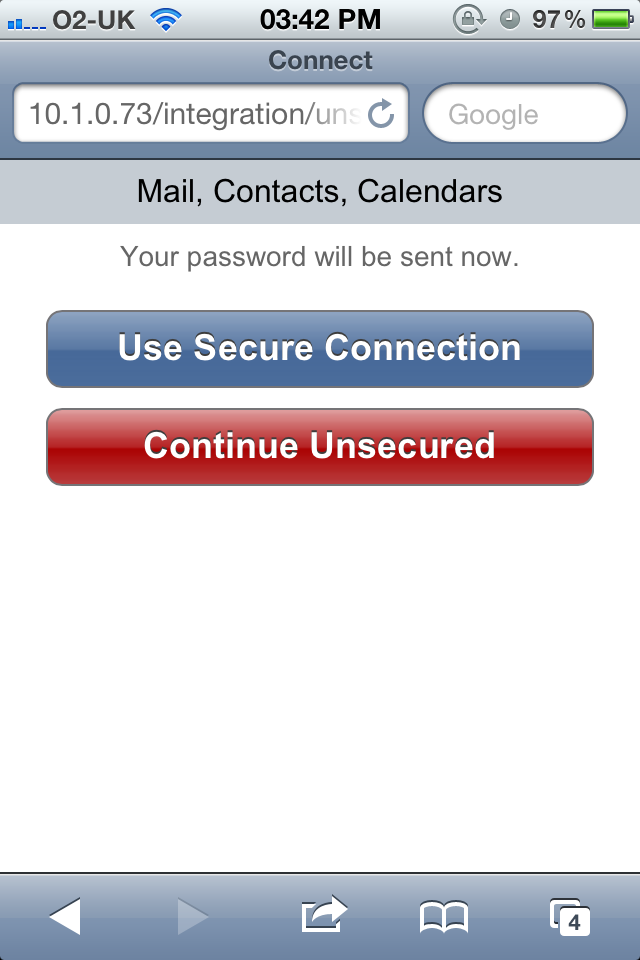
(4) You will then get an option to have a secure connection or unsecured connection configured on your iPhone. We would suggest that the secured connection is the better option to take as it will add a level of security to your data that is being transmitted wirelessly.
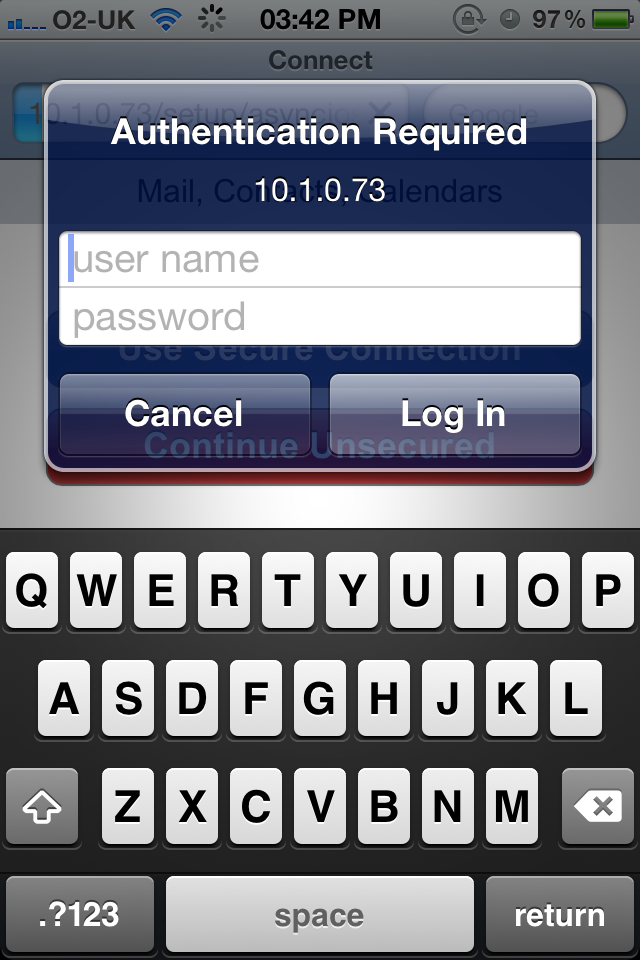
(5) You will be prompted for your username and password which you must enter. Your username is your email address.
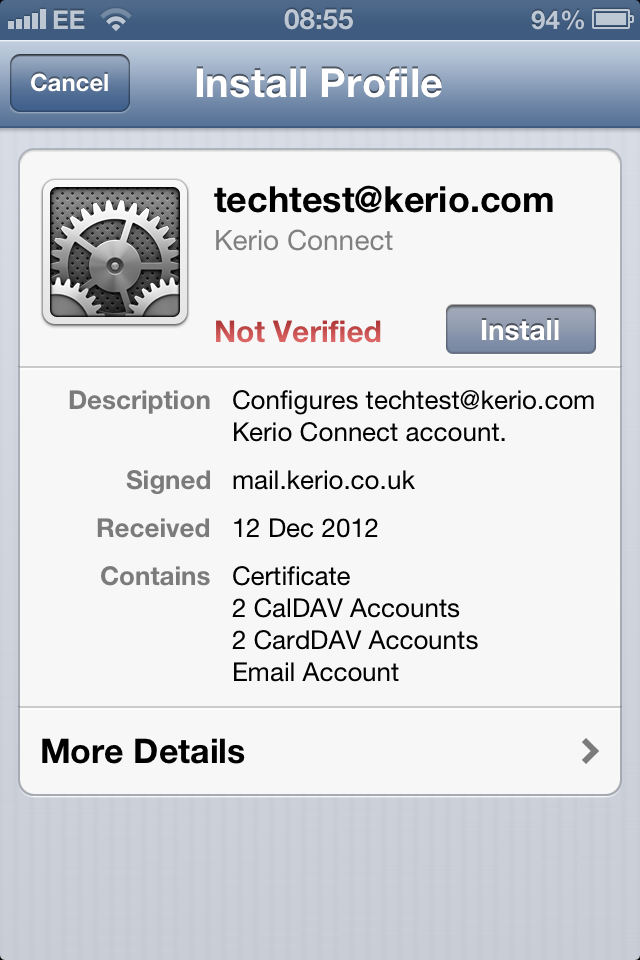
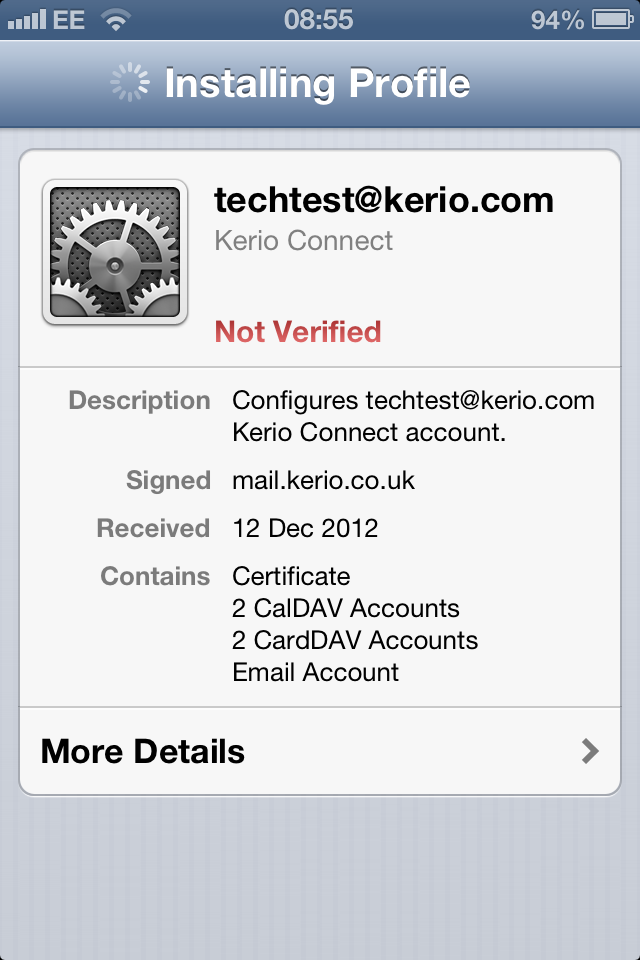
(6) Your iPhone is now ready to have the profile installed. Click on the 'Install' button and this will start to configure the IMAP, CalDAV and CardDAV accounts on the phone.
(7) You may get a warning about the authenticity of the profile but this is nothing to worry about and you will just need to click 'Install Now'.

(8) If you are using an SSL cert that the iPhone does not agree with, such as a self signed certificate you just select the option 'Continue'.
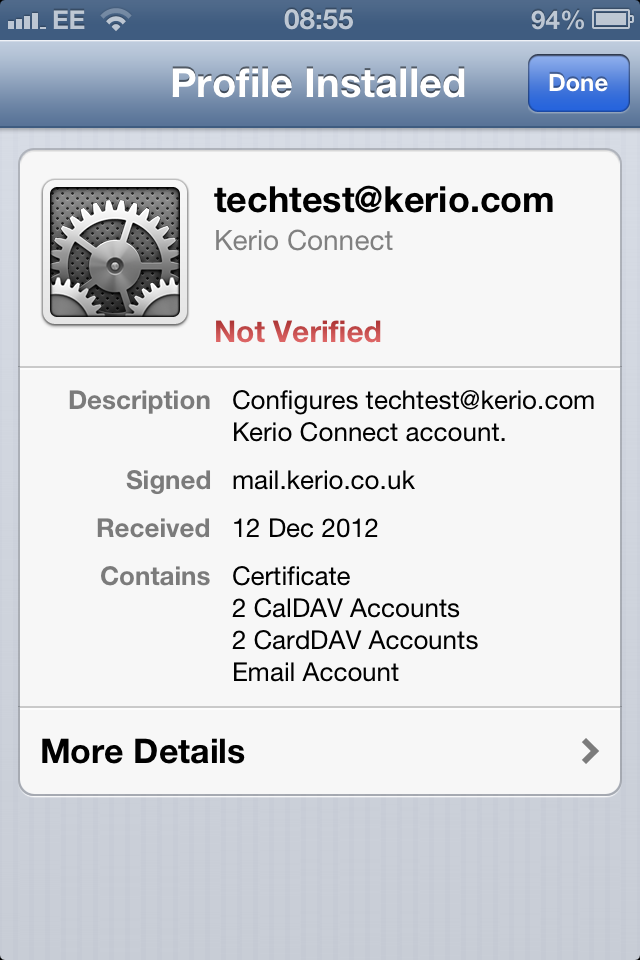
(9) You will then get the screen below to show the profile finishing installing.
(10) Then the profile is completed and you will click 'Done'. Then your IMAP, CalDAV and CardDAV accounts will be ready to use on your iPhone.
To remove a profile that has been setup with the auto configuration you will need to go to Settings->General->Profiles and remove the Kerio profile.
Please Note: If you have a Business Standard Mailbox then you might be prompted to type in the password for CALDAV and CARDDAV. You must click cancel as this service isn't included with Business Standard Mailboxes. You can remove these accounts by going to Mail, Contacts, Calendars > locate your newly created account with the subheading 'Calendars, Reminders' > slide the Account toggle to off. Click Done. Then do the same with your newly created account with the subheading 'Contacts'. Slide the Account toggle to off. Click Done.
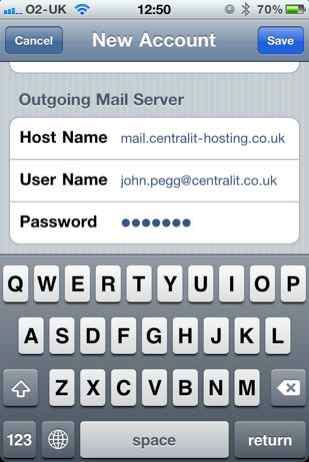
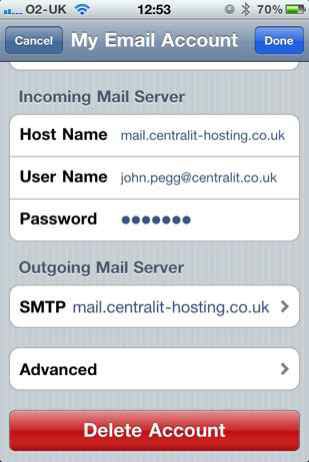
3.5. Setup SMTP Outgoing Mail
If you need to update your Outgoing Server (SMTP) settings at any point after you have set up your email account on your iPhone, this is how you access the Outgoing Server settings. We haven't published any server address or authentication details on here. If they haven't been supplied to you, then please contact Central IT for further assistance.
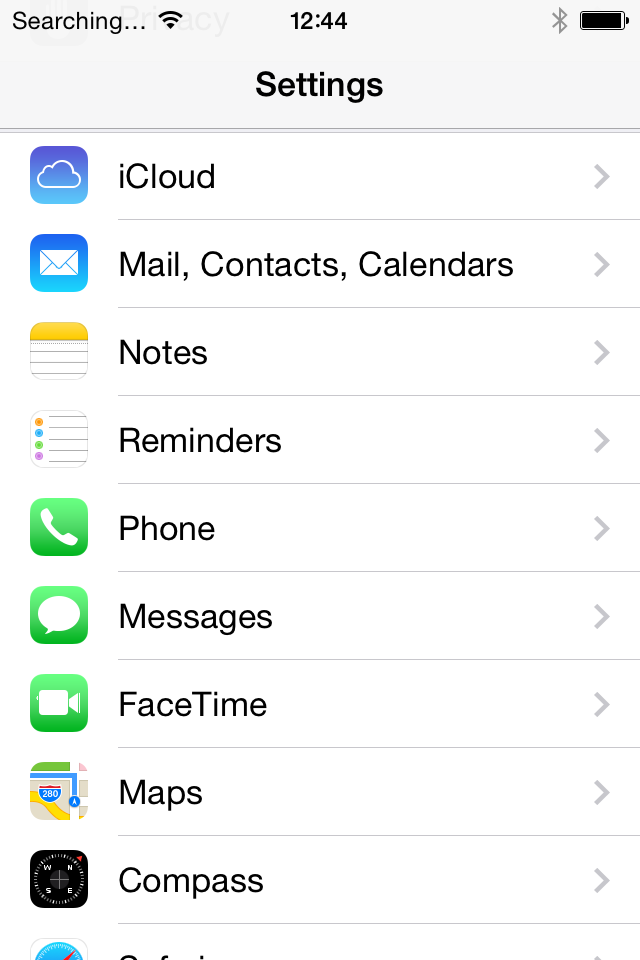
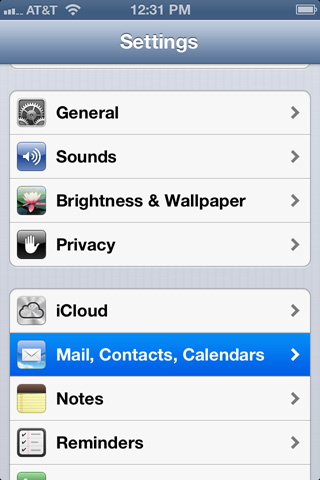
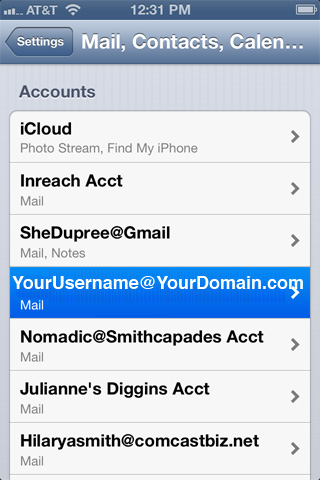
To get to these settings, click on SETTINGS on your iPhone.
You will see the SETTINGS SCREEN. Scroll down to MAIL > CONTACTS > CALENDARS, and click on that:
2. Then click on the account you need to update the SMTP settings for. As it's already established, you just choose it from the list of email accounts you have set up on your iPhone or iPad:
3. You will get to the EMAIL INFORMATION page for that account. Scroll down to the OUTGOING SERVER
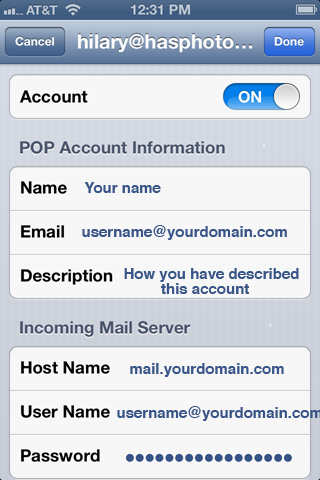
4. CLICK on the OUTGOING SERVER
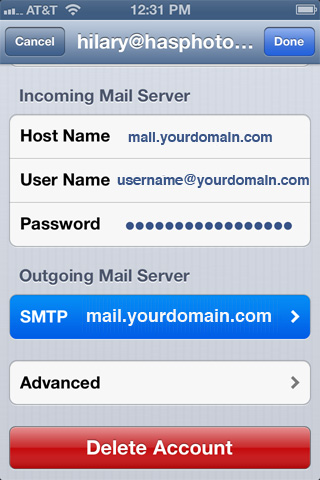
5. Now you will see a list of OUTGOING SERVERS that have been configured on your iPhone or iPad. The one that is currently set to be used with this particular email account is at the top and highlighted: Primary Server. So click on that one.
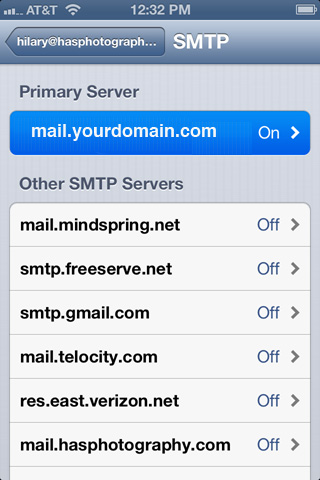
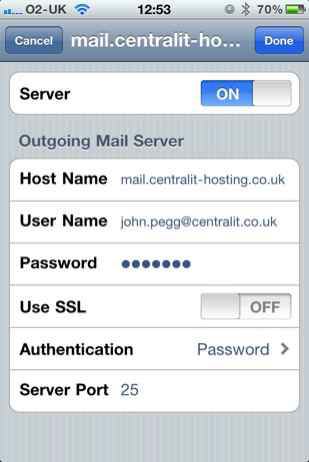
6. Now you will see the settings for that PRIMARY OUTGOING SERVER:
Make sure that:
1. SSL is OFF
2. Authentication is set to "PASSWORD"
3. Outgoing Port is set to "25" or "2525" PLEASE IGNORE THE "587" IN THE PICTURE. Only use "587" if SSL is switched on.
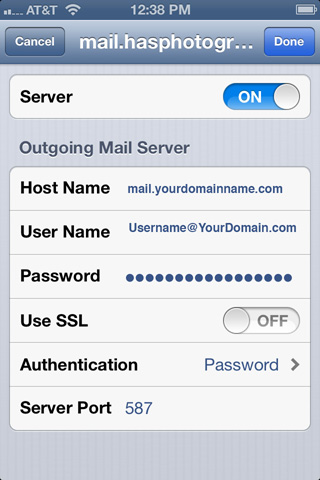
Click "Done"
It will VERIFY these settings.
If it does NOT verify, then something is wrong.
It could be that your password is typed in wrong in this particular area, or did not get saved to this part of the email set up. So type in the password for your email account again, if you're getting an error, and see if that helps.
It should verify.
Then simply click back to the main settings windows.
3.6. Setting up a POP account
Summary
This article describes how to configure a POP email account in Mobile Mail on the iPhone.
Configuring the Mail settings
1. Open settings on the iPhone and then Mail, Contacts, Calendars. Then select Add Account...
2. Click on Other.
3. Click on Add Mail Account
4. You can either select an IMAP account or POP account. In this tutorial, we will only cover setting up a POP account. This type of account retrieves your emails from the server and stores them onto the phone. Select POP and enter your name, email address and a description for your email account.
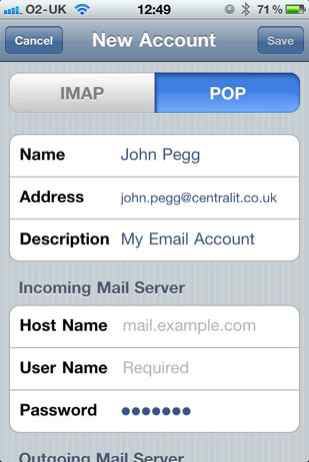
5. Enter the hostname which is our mail server address. This is: mail.cit-services.co.uk
The user name is your email address. Finally enter your password.

6. The Outgoing Mail Server settings are the same. The Host Name is: mail.cit-services.co.uk
The user name is your email address. Finally enter your password.
7. When you are done. Click on the save button. It may take up to a couple of minutes for the server to verify your settings. If there are no problems, then you will be returned to the accounts screen. Exit settings by clicking on the Home button on the iPhone and go to Mail. Verify that you are able to send and receive email.
If you are unable to connect to the mail server, then you will need to return to the Mail, Contact, Calendar Settings and verify that you have typed in your mail details correctly. If you are confident that the details are correct then please follow the instructions in the next section.
Advanced Settings
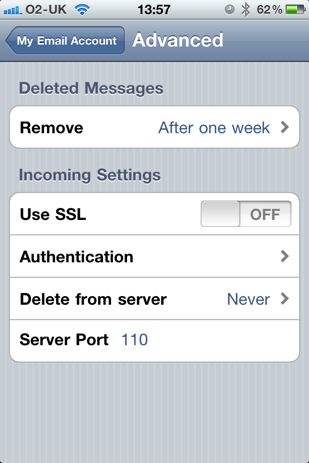
If the email account fails to work properly then you may need to check the advanced settings.
1. Scroll all the way down to the bottom your Mail account settings. Under the Outgoing Mail Server heading, click on the SMTP field.
2. Verify the settings under 'Outgoing Mail Server.' The hostname should be: mail.cit-services.co.uk
Turn Use SSL to on. Ensure Authentication is set to 'Password.'
Change the Server Port to '465.' Then click on 'Done.'
3. Click on the left arrow button on the upper left corner of the screen to return to the account setup page. Then click on advanced at the bottom of the page just above the red 'Delete Account' button.
4. Under the Incoming Settings header, turn off Use SSL. Authentication should be set to password.
The server port should be 110. Once your are finished, click on the left arrow button on the upper left corner of the screen to return to the account setup page. Then click 'Done.' Exit the Settings by clicking on the Home button on your iPhone.
Now return to Mobile Mail and test your email account. You should now be able to receive and send email successfully!
This completes the setup.
3.7. Setting up a Calendar
This is how to setup a CalDAV account on the iPhone. This will enable you to access any shared or public calendar on the iPhone with (if you have been granted them) read and write privileges.
Note, using CALDAV is different from simply subscribing to a calendar which only enables read access. This is setup differently and these instructions do not apply.
Instructions:
Add a new account on the iPhone;
Settings > Mail > Contacts, Calendars > Other > CalDav account
Add your Server name, Username and Password.
Important: Remember to add ':82' to the end of the server name. Also make sure that you use your full email address for the username.
This should produce a failure message, select continue.
Go to Advanced Settings.
The Port and Account URL need to be adjusted. You need to know which ports your Kerio MailServer is using for HTTP(S), this can be checked within the Kerio Administration console under Services.
Change the HTTP port to match your Kerio MailServer (80 is default) This is port 82 in our case.
Change the HTTPS port to match your Kerio MailServer (443 is default) This is port 4433 in our case.
You will need to change the account URL as follows;
For these examples I have used the account 'joe@domain.com'
with a server address of 'mail.domain.com'
A calendar is shared by 'tom@domain.com'
A resource called 'room101@domain.com'
For your own calendar;
HTTP(S)//mail.domain.com/principals
For a shared calendar;
HTTP(S)://mail.domain.com/principals/users/domain.com/tom
For a resource calendar;
HTTP(S)://mail.domain.com/principals/users/domain.com/room101
For a Public calendar;
HTTP(S)://mail.domain.com/principals/users/domain.com/.public
It's likely that the iPhone has already made contact with the server and entered most of the relevant information in the URL section. This means you'll only need to edit the last section of the URL, adjusting it to suit your needs.
4. Web Mail
4.1. How to connect to Webmail
Away from the office? Don't have access to your email client or just don't want to pay for one? With Kerio Connect WebMail by Central IT, you have free and instant access to your email using virtually any web browser on any device.
To connect to the service, use one of the browsers listed below and type into the address bar:
http://mymail.yourdomainname.co.uk
if you're unsure what your domain name is then you can use the following address:
http://mymail.centralit-hosting.co.uk
The full version of Kerio Connect and WebMail supports the following browsers:
Web Browsers
|
|
Kerio Connect client
Internet Explorer 8, 9 and 10
Firefox 4 and higher
Safari 5.0 and higher
Google Chrome
|
|
Kerio WebMail
Internet Explorer 7, 8, 9 and 10
Firefox 3.6 and higher
Safari 4, 5 and 6
Safari on Apple iPhone & iPad
Google Chrome
|
|
Kerio WebMail Mini
Any browser including PDA browsers, such as palmOne Blazer v4.0.
|
For technical reasons, the full version of Kerio WebMail or Connect Client cannot be run in older versions of the listed browsers or in non-listed browsers. A mini version of the browser is also available for mobile devices such as the Apple iPhone and Blackberry.

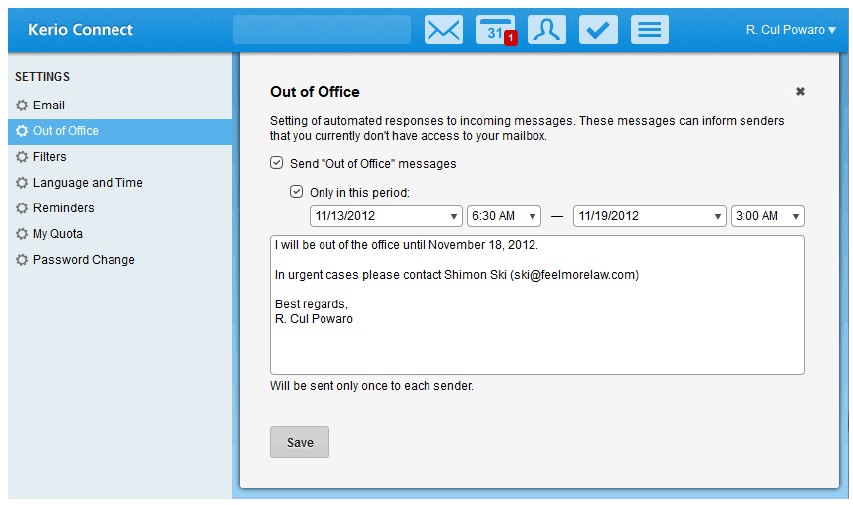
4.2. Out of Office
Out of Office message is an automatic reply which is sent from your account when you receive a message.
If you plan to go on holiday, you may want to let your business partners and customers know that you are away. To do so, you can configure an out of office message.
1. Click your name in Kerio Connect client and select 'out of office'.
2. In section Out of Office , check option Send "Out of Office" messages.
3. Write your message.
4. You can specify a time period when this automatic reply will be sent.
5. Save the settings.
Kerio Connect sends the out of office message to each sender only once.
Warning
Before enabling the Out of office rule, it is recommended to enable also the Spam rule to make sure that automatic replies are not sent to spammers. If the Spam rule is not enabled, your address will be exposed to spammers who try to send their spam messages to randomly generated addresses and later use those addresses from which they get an answer (so that they are sure the address exists and start to send even larger volumes of spam messages to it).
4.3. Managing your online disk space and messages
Explanation
If you receive messages with large attachments or have a lot of contacts, you may soon use up the quotas assigned for your account.
You should receive a message from the mail server warning you that more than 90% of your email storage space has been used. If you have exceeded 100% of your email storage space, your computer will no longer receive messages. You should also receive another message from the server stating 'User quota exceeded.' There's no need to panic as the server is still receiving your messages and will store them for up to five days, but will no longer deliver the messages to your computer until the email quota has been reduced.
This article focuses on how to manage your online disk space and message count using the online webmail service.
How to display your online account quotas
First you must login to the Kerio Connect Webmail service. If you don't know how to do this then please click here.
If you wish to see how much space you use:
1. Click on your name in Kerio Connect client and select Settings.
2. Go to section My Quota.
3. There you can see how much space your account occupies, how many items you have and what your limitations are.
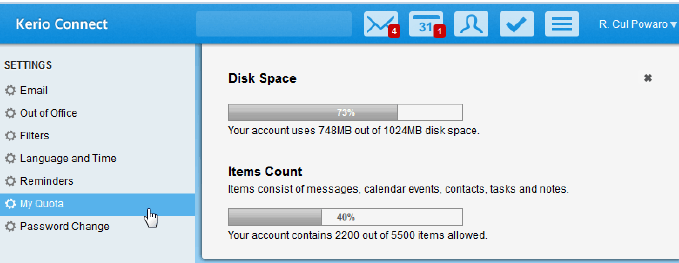
What to do when the quota is used up
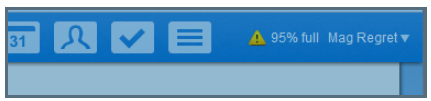
If you reach any of the limits set for your account, you will not be able to receive new messages.
Once you reach 90% of a quota, a warning message will be displayed in the top bar of Kerio Connect client.
To solve this problem, we recommend the following:
- delete messages in folders Sent and Trash (unless you need them)
- delete any other messages you do not need (especially with large attachments)
- ask your administrator to turn on automatic items clean-out (which will automatically delete old messages and messages from Trash )
- ask your administrator to add some space for your account
Important!
Remember to remove the messages from the 'Deleted Items' once you have finished deleting your messages.
Don't forget to check the Quota page once you've finished to see the final results.
4.4. How to change your password
Summary
To change your email password for your email application. This will affect access for incoming and outgoing mail within your mail application on your computer as well as access to webmail from your browser.
How to change the password from Webmail
It is only possible to change your password using the Webmail service. You cannot perform this task using your email application.
(1) First, log on to your mailbox account by going to https://mymail.cit-services.co.uk or by entering your own Webmail address in the address bar of your web browser.
Note: Please ensure that you enter https:// at the beginning of the address bar. The letter 's' added onto the 'http' section makes the connection secure. You will not be able to change your password without doing this.
Click trust, allow or continue If you are asked to as your browser will want to verify the identity of the website you are about to visit. Type in your computers password when asked to do so.
(2) Click your name in Kerio Connect client and select Settings.
(3) In the Password Change section , type your current and new passwords.
(4) Save your settings.
Remember to change your password settings within your email application on your computer if you use one. If you are using Microsoft Entourage or Apple Mail, you will need to change the password for your incoming mail and outgoing mail servers.
4.5. Forwarding messages to another email address
To forward messages to another email address you will need to setup a filter. This can be done from the Kerio Connect Webmail Site.
(1) Login into your Webmail service. If you're unsure what this is then either contact support or try http://mymail.centralit-hosting.co.uk.
(2) Once you're logged in, go to the upper right corner of the Kerio Connect window and click on the menu with your name. Then click on settings.
(3) Click on filters from the menu on the left hand side and then select New Filter.
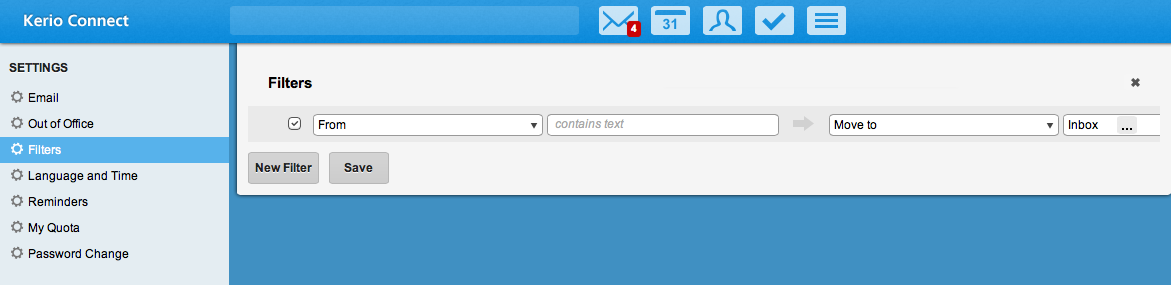
(4) On the new entry line, look for a small button with three dots.
The button will look like this (above).
(5) In the first box, enter a description. The drop tab should remain on 'Any'.
(6) To forward ALL messages then select 'All messages' from the second drop down menu.
(7) Under the 'Perform the following actions' header, select 'Forward to' and then type in the email address which your emails will be forwarded to in the field on the right.
(8) This is important: If you want to retain a copy of each message then click on the '+' button on the right to add a second action. Then select 'Keep in INBOX'.
If you don't do this, then your messages will be delivered to the forwarding address and you will not retain a copy.
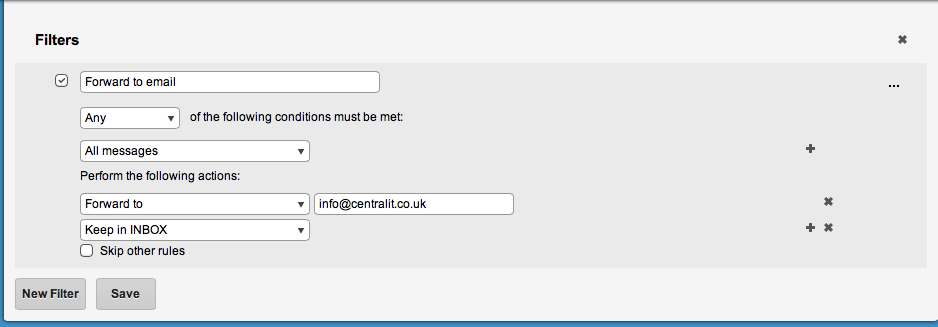
Here is an example of forwarding all messages to another address and retaining a copy within your own inbox.
For further information on how to use filters please contact Central IT.
4.6. Kerio Connect User Guide
We are pleased to provide the full user guide for the Kerio Connect Webmail service. The link can be found to the righthand side of this page. For further assistance please contact Central IT on 01530 272727.
5. Support Contracts
5.1. How to log a support ticket
There are several ways of reaching our technical support team. These are:
By telephone
Call 01530 272727 and press option 1. When calling our support line outside of business hours, you will be directed to our voicemail service. All voicemail messages are automatically sent to our helpdesk team which will be accessed and logged accordingly.
By email
Our email address is helpdesk@cituk.co.uk.
Online service portal
Visit http://www.cituk.co.uk/helpdesk. From here you can easily raise a new ticket and update existing requests. For instructions on how to use the portal, please click here.
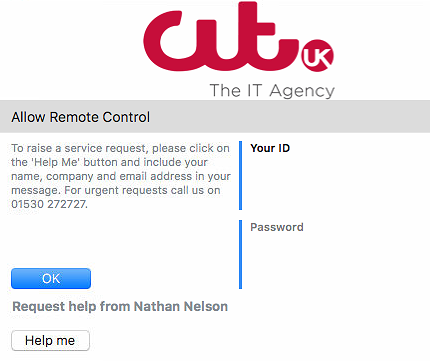
Remote support application
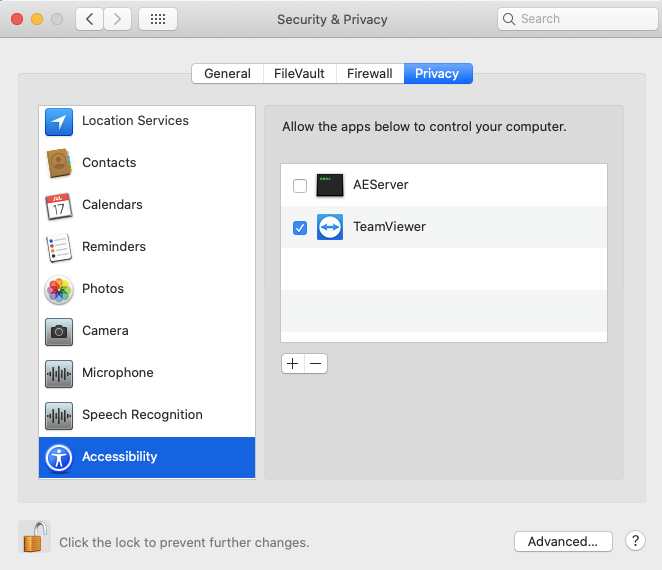
If you have a support plan with CIT (UK), then it's likely that you'll already have our remote support application (Teamviewer) preinstalled. This can be located from the menu items at the top of your screen on a Mac, or within the system tray of your PC. The icon should look like this:

Towards the bottom of the window, you'll find the 'Help me' button. From here, please include your name, email address, company name and description of your query.
Support Hours
Our standard hours of support are from 8am to 6pm Monday to Friday. New support requests received outside of business hours will be responded to on the next working day.
5.2. Using the online service portal
Our online service portal allows customers to submit and track their own calls, search useful FAQs and view news and updates.
Submit a new support call
Visit http://www.cituk.co.uk/helpdesk/ to submit a new service ticket. Fields marked in green are mandatory and must be completed.
— Enter your contact details including your name, email address and the best number to reach you on.
All of your tickets will be collated using your email address. It will also become your nominated username should you wish to login to the portal to view your tickets in the future.
— Tell us if your request is urgent or not urgent.
— Select a request category. For technical support and general requests, please select 'Helpdesk Support'.
— Type in your company name
— Tell us which product or software application your query is about. For example, it could be Microsoft Office or your MacBook Pro.
— If your computer has a serial number then please enter it into this field. If you know your TeamViewer ID, this may also be used.
— Finally tell us the nature of your problem or query. Please try to provide as much detail as possible.
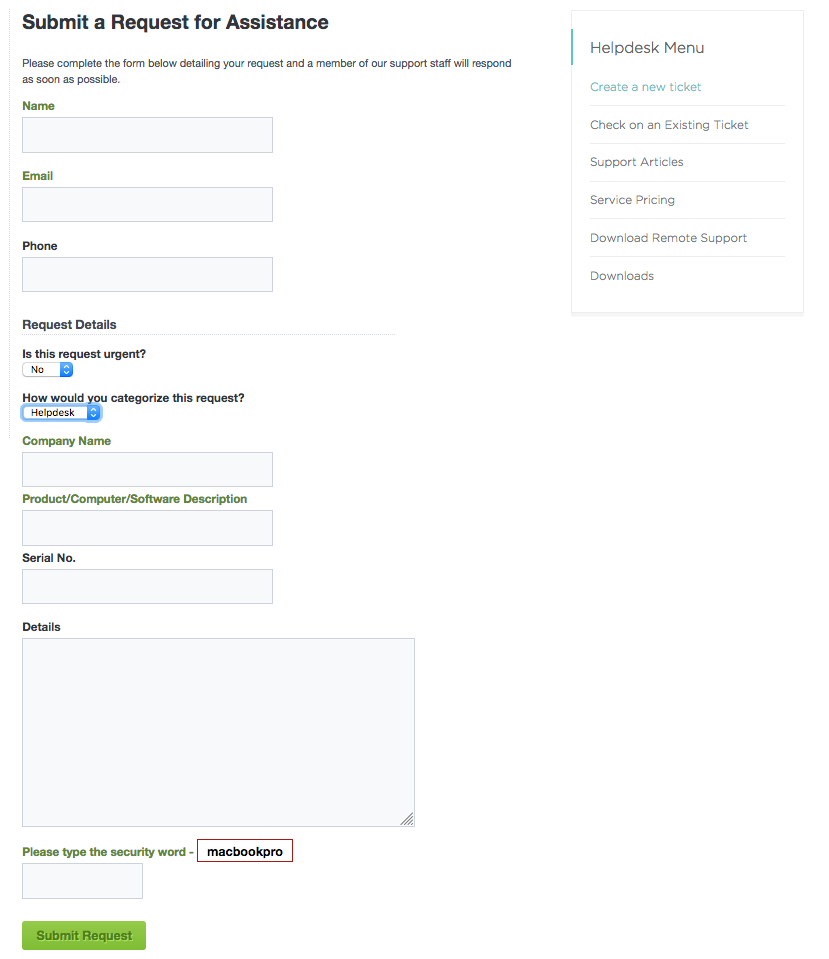
Once you're ready, type in the security word and press on 'Submit Request'.
You will now receive an email confirmation along with your ticket reference number. Please check your junk folder if it doesn't appear in your inbox.
You'll also be provided with an access key which provides you with direct access to a specific ticket from the portal.
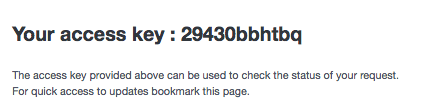
Updating your ticket from the portal using an access key
Your access key provides direct access to a specific request. Simply visit http://www.cituk.co.uk/helpdesk, click on 'check on an Existing Ticket' and enter your access key and click on 'Check'.
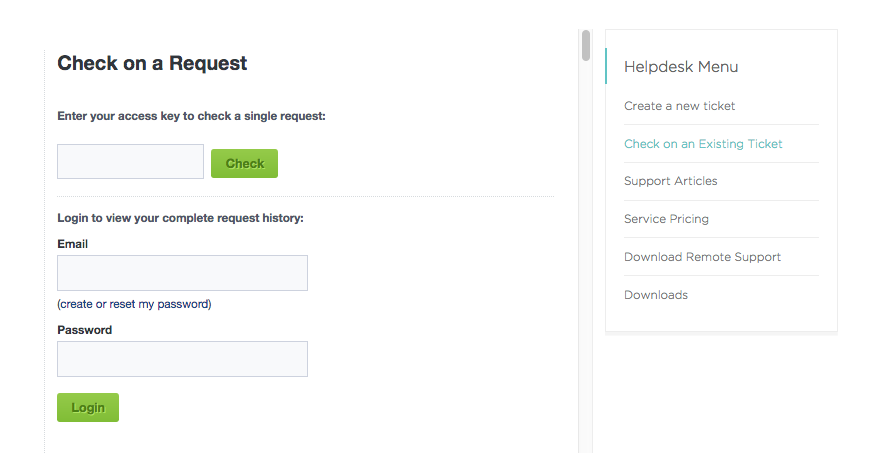
On the following page, you can update the request with further comments and view the full history of the ticket.
Updating your ticket from the portal using your login credentials
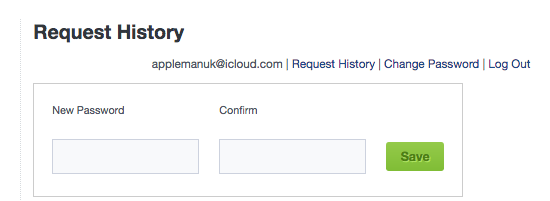
To access all of your open and historic tickets, we recommend that you create an account password. Your username is your email address, so please ensure that you use the same email address whenever you raise a new request.
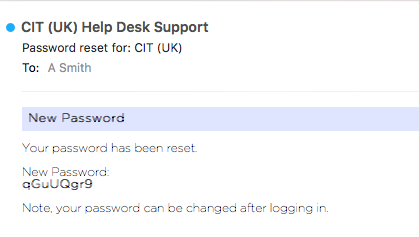
To create a password, click on 'Check on an Existing Ticket' from the helpdesk menu. Enter your email address into the email field and then select 'create or reset my password link'.
You'll receive an email with a reset password link.

Click on the link to generate a new password. This will be emailed to you separately within the next few minutes.
We recommend that your password is changed when you first login. Follow these steps to login to the service portal with account credentials:
— Visit http://www.cituk.co.uk/helpdesk and select 'Check on an Existing Ticket'.
— Enter your email address and password and click on 'Login'.
You'll now see your request history with all open and closed tickets associated with your email address.
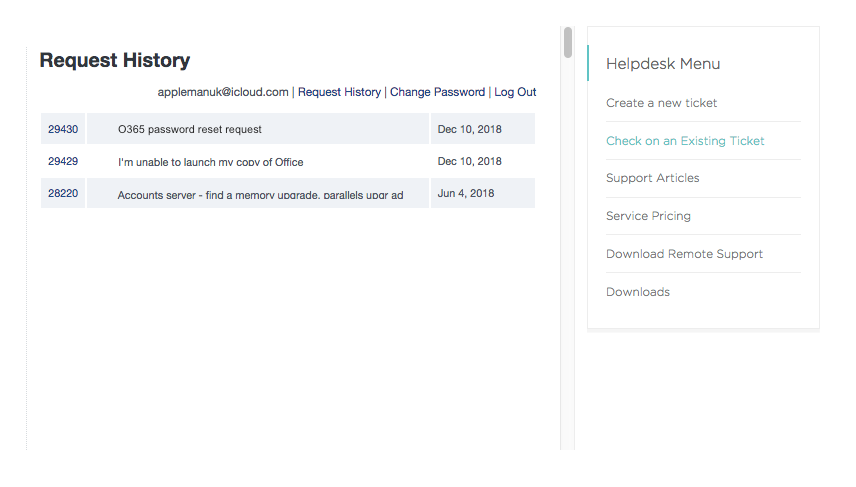
To update a ticket, simply click on the ticket reference number on the left-side column. Tickets that were previously closed will be automatically reopened when you provide an update.
You can change your password at anytime by selecting the 'Change Password' link at the top of the list. Enter your new password and confirm before clicking on the 'Save' button.
If you should have any questions regarding the service portal, please contact us on 01530 272727 and press option 1.
5.3. Support Services Guide
THE IDEA OF PURCHASING A COMPREHENSIVE SUPPORT PROGRAMME SHOULD BE MORE THAN AN AFTER-THOUGHT. IT SHOULD BE AN INTEGRAL PART OF A PRODUCT PURCHASE. CHOOSING THE RIGHT SUPPORT FOR YOUR SPECIFIC BUSINESS NEEDS HELPS ENSURE A SMOOTH DEPLOYMENT, AN EFFORTLESS OPERATION AND THE QUICK RESOLUTION OF ANY ISSUES THAT MAY ARISE.
Why Choose Support Services from Central IT?
In Today's "always on" world, taking a wait-and-see approach regarding support just doesn't work any more. Your staff should be able to concentrate on servicing your business and your customers, instead of your IT equipment. You shouldn't have to worry about the consequences of hardware failure or software corruption. And downtime of just about any duration can have a serious and negative impact on your business especially if your business relies on mission critical client and server applications. Purchasing the appropriate level of support from Central IT can minimize the impact.
The Right Time: Purchasing the right programme upfront means your covered from day one. While budgets are always a priority, purchasing a product without adequate support rarely, if ever, saves money. In addition, your business will always be up-to-date with direct access to the latest product upgrades and advice from Central IT.
The Right People: Because Central IT is a leader in both the Apple and Microsoft support field. We only employ Apple and Microsoft Certified Engineers. Central IT provides contract customers with access to the top-level people within the industry. These are people who "think Apple" every single day - concentrating on what they do best so you can concentrate on what you do best.
The Right Programme: Whether you are a small, medium or large organization, Central IT has the right programme to fit your business needs. Depending on your specific needs, four levels of support are available. Our two essential service programmes are designed to give you flexibility over budget, and are designed to solve problems as they occur. Our two premium service programmes add priority, with extended backup, minimum downtime, while taking preventative measures to solve problems before they occur.
Support Services from Central IT offers four levels of service to meet the needs of your organization - Bronze, Silver, Gold and Platinum. Each programme is based on the types of services and the level of support you need. Choosing a higher level of support means that more services are available to you. At the Gold level and up, you'll find a substantial increase in service, personal support and proactive Services.
Essential Services
- Entry: At just £50 per user (per year), this is a fantastic inexpensive way of receiving support based upon the number of users within your company. All issues are addressed either by telephone, remote or email support - and it's completely unlimited! You will be provided with access to our helpdesk web service and our really useful knowledge base articles.
- Bronze: For a small additional charge each year, you'll receive unlimited access to our Service Centre in Leicester, our loan equipment service, priority access to 2nd and 3rd line support technicians and a special 20% discount on all chargeable work and site visits.
Premium Services
- Silver: You'll receive unlimited onsite support with a next day response if we're unable to resolve your issue remotely. No labour charges are incurred. We've extended the standard support hours for our Premium plans so you'll now be able to reach us from 8am to 6pm daily. You will also benefit by an annual maintenance visit to ensure that everything is working just the way it's supposed to be!
- Gold: The most comprehensive Service Level Agreement that we offer! This service plan includes hardware cover (replacement of defective parts), our in-house data recovery service, access to our out-of-hours emergency facility and our remote management service which monitors your workstations 24/7 and alerts us to any potential problems with your hardware or operating systems.
To learn more please download one of the attached articles. It would be great to hear from you! Please call us on 01530 272727 to discuss your requirements in further detail.
5.4. Maintenance Visits 2020

Maintenance Visits 2020
One of our value added services is to provide a free annual maintenance visit to all of our Business Black, Premium Black and Signature level customers. We'll aim to visit you annually around six to nine months after your contract renewal date.
During the visit we aim to:
(1) Provide some general maintenance and to identify any issues with your hardware and software.
(2) Carry out version checks to ensure your operating system, security and Antivirus is up-to-date.
(3) Discuss any concerns, recommendations or service requirements.
The visit will ensure the following:
1. Each operating system and it's security components are up-to-date
2. Hardware such as storage and memory are healthy and in good working order
3. Updates to our asset tracking and remote support software
4. Advice and recommendations to improve performance
5. Discuss any concerns, recommendations or service requirements.
Each computer examination takes around 10-20 minutes to complete. Your consultant will recommend the best course of action where further work is required.
The visit isn't obligatory, but we know by experience that preventative maintenance can save both time, money and loss of data when those minor issues are identified before they become serious. If you would prefer to cancel the visit or defer it, then please let us know as soon as you can by either telephone or email.
Shortly after your maintenance visit, we'll provide you with a report summarising what we've found along with the following documents:
(1) A copy of each workstation report
(2) A data security report for your site — this provides an indication on how well your site is prepared for data recovery and potential security threats
(3) ITAM (IT Asset Management) report — an asset report for all laptops and workstations
(4) Hardware ageing report — a compiled list of the oldest computers in operation which you may want to consider for retirement
If you are not currently benefiting from a Premium Level Service Agreement but would like to arrange a maintenance visit then please don't hesitate to get in touch as this can be arranged for a small charge. Customers with a Business Red Support Plan may also arrange a free maintenance session at our service centre in Leicester.
5.5. Updating your Windows Operating System
Before upgrading to Windows 11 from 10 or older OS, make sure to do these eight things for a successful process.
Windows 11 is a massive overhaul, which means you must prepare your computer before installing it to ensure everything goes smoothly.
Although Windows 11 is based on Windows 10, no matter the release on your laptop or desktop computer, the upgrade process will require complete reinstallation, which means there is a good chance of problems before and after the installation. However, if you prepare your system before the installation, you will minimize the chances of issues and will have a way to recover quickly if something wrong happens.
Prepare PC to install Windows 11
If you plan to upgrade to Windows 11 (version 22H2) from Windows 10, there are several things you want to do before beginning the process manually, like checking hardware compatibility, enabling required security features, creating a backup of the current setup, and more.
Windows 11 is a massive overhaul, which means you must prepare your computer before installing it to ensure everything goes smoothly.
Although Windows 11 is based on Windows 10, no matter the release on your laptop or desktop computer, the upgrade process will require complete reinstallation, which means there is a good chance of problems before and after the installation. However, if you prepare your system before the installation, you will minimize the chances of issues and will have a way to recover quickly if something wrong happens.
This guide will highlight several tips to prepare your computer for a successful Windows 11 upgrade.
Prepare PC to install Windows 11
If you plan to upgrade to Windows 11 (version 22H2) from Windows 10, there are several things you want to do before beginning the process manually, like checking hardware compatibility, enabling required security features, creating a backup of the current setup, and more.
- 1. Check if PC will run Windows 11
- 2. Enable TPM 2.0 on the BIOS
- 3. Enable Secure Boot on the BIOS
- 4. Create full backup of the computer
- 5. Uninstall conflicting and non-essential apps
- 6. Free up space on the computer
- 7. Check and repair system errors
- 8. Disconnect non-essential peripherals
1. Check if PC will run Windows 11
Although Windows 11 is a free upgrade for existing Windows 10 computers, it doesn’t mean that your device is compatible. The new operating system has increased the minimum system requirements, which means confirming whether your computer’s hardware meets the requirements is among the first things you want to do before proceeding with the installation.
Quick note: In May 2022, Microsoft released the
update KB5005463 that installs the PC Health Check app automatically. As a result, check in the Start menu that the app isn’t already installed before proceeding with the steps below.
To check if a computer is compatible with Windows 11, use these steps:
-
Open PC Health Check download page.
-
Save the WindowsPCHealthCheckSetup.msi file on your computer.
-
Click the “I accept the terms in the License Agreement” option.
-
Click the Install button.
-
Check the “Open Windows PC Health Check” option.

-
Click the Finish button.
-
Under the “Introducing Windows 11” section, click the Check now button.

-
(Optional) Click the “See all results” button to view a list of the components that passed the compatibility.

-
(Optional) Click the Deice specifications button.
Once you complete the steps, if the hardware is compatible, you will receive a message confirming you can upgrade to the new version. If the hardware isn’t compatible, you will get a message detailing why the device can run version 22H2.
2. Enable TPM 2.0 on the BIOS
Windows 11 requires Trusted Platform Module (TPM) version 2.0 chip to provide better security. If the device doesn’t have this feature, you won’t be able to proceed with the in-place upgrade or clean installation.
To enable TPM 2.0 to pass the Windows 11 requirements check, use these steps:
-
Open Settings.
-
Click on Update & Security.
-
Click on Recovery.
-
Under the “Advanced startup” section, click the Restart now button.

-
Click on Troubleshoot.

-
Click on Advanced options.
-
Click the “UEFI Firmware settings” option.

-
Click the Restart button.
-
Click the advanced, security, or boot settings page, depending on the motherboard.
-
Select the TPM 2.0 option and choose the Enabled option.

If the computer does not have a TPM 2.0 chip, and you have an AMD processor, the module is likely built into the processor, and the option will be available as “fTPM” (firmware-based TPM 2.0) or “AMD fTPM switch.” If the device is an Intel-based system, the security feature will be available as Platform Trust Technology (PTT).
If the device does not have a TPM option, and this is a custom build, you may be able to purchase a module to add the support. However, consult the motherboard’s manufacturer’s website to confirm the support exists.
After you complete the steps, the Windows 11 check should pass, allowing you to upgrade the computer to the new OS.
3. Enable Secure Boot on the BIOS
Secure Boot is another security feature that is required to install Windows 11. This module ensures that the computer can boot only using the software that the manufacturer trusts.
If your device is using the legacy BIOS (Basic Input Output System), you need first need to convert the MBR (Master Boot Record) drive to GPT (GUID Partition Table) and then switch to UEFI (Unified Extensible Firmware Interface) mode and enable Secure Boot. Otherwise, the computer will no longer boot if you enable the newer firmware. If you are trying to perform a clean installation, you can skip the convention, but if you are trying to upgrade from the Windows 10 desktop, this is a requirement.
To enable Secure Boot before installing Windows 11 (version 21H2), use these steps:
-
Open Settings.
-
Click on Update & Security.
-
Click on Recovery.
-
Under the “Advanced startup” section, click the Restart now button.
-
Click on Troubleshoot.
-
Click on Advanced options.
-
Click the “UEFI Firmware settings” option.
-
Click the Restart button.
-
Click the advanced, security, or boot settings page, depending on the motherboard.
-
Select the “Secure Boot” option and choose the Enabled option.
Almost all devices featuring UEFI firmware will include Secure Boot, but if this is not the case, you will need to upgrade the system, or you should consider getting a new computer that meets the Windows 11 requirements.
After you complete the steps, the computer should pass the hardware verification process to proceed with the in-place upgrade or clean install of Windows 11.
4. Create full backup of the computer
A backup is perhaps the best recovery strategy if something happens during or after the installation. You can use any third-party backup software, but you can still use the built-in system image backup on Windows 10.
To create a full backup of your computer, connect a USB storage with enough space, and use these steps.
-
Open Control Panel.
-
Click on System and Security.
-
Click the Backup and Restore option.

-
Click the “Create a system image” option from the left pane.

-
Select the “On a hard disk” option.
-
Select the external hard drive to back up your device.

-
Click the Next button.
-
Click the Start backup button.

Once you complete the steps, the backup process will begin. You will see a prompt asking to create a recovery disk, but you can ignore the option as you can use a Windows 10 installation USB media to access the recovery settings.
In addition to creating a full backup, it’s also recommended to create a backup of your files to an external storage or cloud storage service like OneDrive.
You can also use this guide to create automatic file backups on your computer.
5. Uninstall conflicting and non-essential apps
During the upgrade process to a new version of Windows, poorly designed applications or third-party security tools like antivirus can cause problems that may prevent you from completing the installation of Windows 11. As a rule of thumb, uninstall conflicting apps before upgrading to avoid problems.
To uninstall apps on Windows 10, use these steps:
-
Open Settings.
-
Click on Apps.
-
Click on Apps & features.
-
Under the “Apps & features” section, select the app (or game).
Quick tip: If you have a lot of apps, you can use the search box, the “Sort by,” and “Filter by” options to find the app faster.
-
Click the Uninstall button.

-
Click the Uninstall button again.
Quick note: If you remove a classic desktop program, continue with the on-screen directions to complete the process.
Once you complete the steps, the application will be removed from the device. You may need to repeat the instructions to uninstall any other program that may conflict with the Windows 11 21H2 installation.
You can learn more ways to uninstall applications in this guide.
6. Free up space on the computer
Although Windows 11 requires a hard drive with at least 64GB of space, the device still needs around 20GB of available space to process the installation.
You can use these instructions to determine what files are taking the most space and understand what stuff you need to remove to clear some of the space.
To free up space on Windows 10, use these steps:
-
Open Settings.
-
Click on System.
-
Click on Storage.
-
Under the “Local Disk (C:)” section, click the Temporary files option.

-
Check the temporary files that you want to delete to free up space, including:
- Windows upgrade log files.
- System created Windows Error Reporting Files.
- Windows Defender Antivirus.
- Thumbnails.
- Temporary files.
- Recycle Bin.
- Previous Windows installations.
- Temporary Internet Files.
- Device driver packages.
- Delivery Optimization Files.
- DirectX Shared Cache.
-
Click the Remove files button.

After you complete the steps, Windows 10 will clean up the drive making more room to process the Windows 11 installation.
In addition to clearing out temporary and other files, apps and games can also take a lot of space. If this is the case, use the previous steps to remove apps and games from your computer to free up space.
7. Check and repair system errors
If you have had the same installation for a while, the setup might likely contain corrupted files and other issues that may prevent a successful upgrade. If you plan to perform an in-place upgrade, you can use the Deployment Image Servicing and Management (DISM) and System File Checker (SFC) command-line tools to check and repair any problems with installing Windows 11 successfully.
To check and repair errors before installing Windows 11, use these steps:
-
Open Start.
-
Search for Command Prompt, right-click the top result, and select the Run as administrator option.
-
Type the following command to repair the Windows image and press Enter:
DISM /Online /Cleanup-Image /RestoreHealth

-
Type the following command to repair the installation and press Enter:
SFC /scannow
Once you complete the steps, the SFC tool will repair the system files using the local image files that were also repaired using the DISM tool. The log files will be saved on %windir%/Logs/CBS/CBS.log and %windir%\Logs\DISM\dism.log which you can view to get more details about the process.
8. Disconnect non-essential peripherals
When you plan to upgrade to any new release of Windows, there could be hardware conflicts that prevent the installation from completing successfully.
For example, storage devices (such as USB flash drives and external hard drives), printers, and cameras connected to the computer can cause errors and other problems during installation. As a result, it’s best to disconnect all the peripherals to avoid many issues installing version 22H2.
Bluetooth can also cause problems. If you have a device using this wireless technology, disable it before upgrading from Settings > Devices > Bluetooth & other devices and turning off the Bluetooth toggle switch.
You only need a monitor, keyboard, mouse, and internet connection. After the installation, you can reconnect the devices.
In addition to all these tips, before installing Windows 11, you want to ensure you are starting the upgrade process using an account with administrator privileges. Also, if you are performing an in-place upgrade, it’s recommended to note your installed apps and custom settings to make sure you can reconfigure the setup accordingly if you lose any of these things after the process.
After you complete the preparation process, you can perform an in-place upgrade or clean installation of Windows 11.
5.6. Updating your Operating System (Sierra and El Capitan)
While MacOS Sierra is a free download and arrives as a simple to use installer from the Mac App Store, you'll want to prepare your Mac before jumping into a new release of MacOS.
Below we have outlined some important steps before upgrading your system.
Customers with a support plan with Central IT should bare in mind the following when updating your system:
- Minor updates such as MacOS 10.10.4 to MacOS 10.10.5 are supported by Central IT. We recommend that you contact us first for advice before proceding.
- We support all self-installed applications, drivers and and their respective updates. An example of this is Adobe Creative Cloud or Microsoft Office.
- Major system updates such as MacOS 10.10 (Yosemite) to MacOS 10.11(El Capitan) are NOT supported by Central IT and can potentially void your cover. There may be a charge for correcting issues relating to such an upgrade.
1: Confirm System Requirements Compatibility
Here is a full list of the Macs that will be able to download the upgrade with Sierra:
MacBook (Late 2009 or later)
MacBook Air (2010 or later)
MacBook Pro (2010 or later)
Mac mini (2010 or later)
Mac Pro (2010 or later)
iMac (Late 2009 or later)
Obviously it's disappointing to find out that your Mac isn't compatible, particularly when El Capitan was available to Macs stretching back to 2007. However, this stretch back to support seven-year-old machines is good work by Apple, considering it sometimes drops device support for iOS update long before they reach the ripe old age of seven.
System requirements for OS X El Capitan are quite generous, and if the Mac is capable of running OS X Yosemite then it can also run OS X El Capitan. The minimum hardware list as determined by developer versions is as follows:
iMac (Mid-2007 or newer)
MacBook (13-inch Aluminum, Late 2008), (13-inch, Early 2009 or newer)
MacBook Pro (13-inch, Mid-2009 or newer), (15-inch, Mid / Late 2007 or newer), (17-inch, Late 2007 or newer)
MacBook Air (Late 2008 or newer)
Mac Mini (Early 2009 or newer)
Mac Pro (Early 2008 or newer)
Xserve (Early 2009)
Those Macs or newer, which all have a Core 2 Duo or better processor, will run OS X El Capitan. You'll also need at least 15GB of disk space available to download the update from the App Store and then install El Capitan, but realistically you should have more than that available for performance reasons.
2: Update Apps & Install Lingering Software Updates
It's always good practice to regularly update your Mac apps, system software, and the other occasional updates that come through to OS X, but many of us ignore these things. Before updating to a major new release of OS X, it's a good idea to update all of this stuff though.
Head to the Apple menu and choose "Software Update"
Install whatever updates are waiting within the Updates tab of the Mac App Store
Software update
As usual, if any core system updates are in there, be sure to back up the Mac before installing them.
3: Perform General System Maintenance
Performing some general system maintenance is always a good idea, so try to make it a habit. We've touched on some easy maintenance tips before, and they still apply here.
If your Mac is low on hard drive space, free up disk space so that you have enough available storage to install the update and be sure that OS X has space to run well (that means plenty of room for caches, virtual memory, your own files and apps, etc).
Also, if you have some old Mac apps that are sitting around collecting dust and never being used, you may want to consider uninstalling them to free up some space and reduce overhead for functions like Software Update.
We would also highly recommend that the hard disk is checked for problems within disk utility (utilities folder) before proceeding with the upgrade.
4: Back Up the Mac
You're almost ready to install Sierra! But before doing so, you absolutely must back up your Mac. This should not be considered optional, without a backup you could lose your stuff if something goes wrong. Don't risk it, just back up your Mac. Time Machine is so easy to use, runs automatically and routinely, and external hard drives are cheap. Seriously, there's no excuse and the risk is not worth it, always have backups.
Time Machine
Remember to start a backup with Time Machine right before you begin the actual installation with Sierra, this insures that if a disaster happens, you can resume to exactly where you were right before the problem happened. Do not skip this!
5: Download Sierra & Install
Checked everything off the list and you're ready to go? Head to the App Store, start the download on your Mac, and update to OS X Sierra, and enjoy!
Install MACOS SIERRA
Remember that to utilize the full feature set in OS X El Capitan, you'll also want the latest version of iOS (iOS 8.1 or newer) on your iPhone, iPad, or iPod touch, this allows for features like Handoff, Continuity, and the ability to make phone calls from your Mac.
5.7. Updating your Operating System (High Sierra)
Considering updating to the latest macOS version?
While macOS High Sierra is a free download and arrives as a simple to use installer from the Mac App Store, you'll want to prepare your Mac before jumping into a new release of MacOS. The new system is a major release and changes many of the drivers and features that you will no doubt rely on within your premises. Whilst in the vast majority of cases system updates are applied successfully, it is possible that you may experience problems ranging from stability/reliability issues from certain applications (Adobe Creative Cloud for example), issues with email, printing, connecting to your network, accessing servers and peripherals. At worst, the update may fail and render your computer inoperable. Although the chances of a failed update is quite small it's important that you are aware of the possible implications of running an operating system update.
Below we have outlined some important steps before upgrading your system.
Customers with a support plan with CIT (UK) should bare in mind the following when self-updating an operating system system:
- Minor updates such as MacOS 10.12.4 to MacOS 10.12.5 are supported by CIT (UK). We recommend that you contact us first for advice before proceeding.
- We support all self-installed applications, drivers and and their respective updates. An example of this is Adobe Creative Cloud or Microsoft Office.
- Security updates published by Apple should always be applied. Please download and install them.
- Major system updates such as MacOS 10.12 (Sierra) to MacOS 10.13 (High Sierra) are NOT supported by CIT (UK) and can potentially void your cover. Whilst we'll do our very best to help you, there may be a charge for correcting issues relating to the upgrade.
1: Confirm System Requirements Compatibility
Here is a full list of the Macs that will be able to download the upgrade with High Sierra:
macOS High Sierra has the same requirements as its predecessor:
- iMac: late 2009 or newer
- MacBook/MacBook (Retina): late 2009 or newer
- MacBook Pro: mid-2010 or newer
- MacBook Air: late 2010 or newer
- Mac Mini: mid-2010 or newer
- Mac Pro: mid-2010 or newer
- iMac Pro: 2017
2: Check to make sure your software will work with the new system
Developers are working hard to ensure that their software is compatible with High Sierra but if you're working in a production environment, it's worth checking for any potential problems you might experience after the update by visiting the developers website.
It's also worth considering peripheral and network support. For example, it's possible that you're using a printer driver, Wacom tablet, scanner etc which might not be supported by the new system. Another common example is that Apple Mail might not be compatible with your companies mail server.
2: Update Apps & Install Lingering Software Updates
It's always good practice to regularly update your Mac apps, system software, and the other occasional updates that come through to macOS, but many of us ignore these things.
Check the Mac App Store on a regular basis to install updates on apps you have bought there. (To do this in the Mac App Store app, click on the Updates tab. This will check the store for any updates.)
If you have software you didn't get in the Mac App Store, launch the app and look in the preferences or other menus for an option to check for updates. You can also look on the developer's website.
3: Perform General System Maintenance
If your Mac is low on hard drive space, free up disk space so that you have enough available storage to install the update and be sure that the macOS has plenty of space to run well (that means plenty of room for caches, virtual memory, your own files and apps, etc).
Also, if you have some old Mac apps that are sitting around collecting dust and never being used, you may want to consider uninstalling them to free up some space and reduce overhead for functions like Software Update.
We would also highly recommend that the hard disk is checked for problems within disk utility (utilities folder) before proceeding with the upgrade.
4: Back Up the Mac
You're almost ready to install High Sierra! But before doing so, you absolutely must back up your Mac. This should not be considered optional, without a backup you could lose your stuff if something goes wrong. Don't risk it, just back up your Mac. Time Machine is so easy to use, runs automatically and routinely, and external hard drives are cheap. Seriously, there's no excuse and the risk is not worth it, always have backups. You might even save your important documents separately from your primary backup, just in case.
Time Machine
Remember to start a backup with Time Machine right before you begin the actual installation with High Sierra, this insures that if a disaster happens, you can resume to exactly where you were right before the problem happened. Do not skip this!
5: Download High Sierra & Install
Checked everything off the list and you're ready to go? Head to the App Store, start the download on your Mac, and update to OS X High Sierra, and enjoy!
How do I install macOS High Sierra? After you download High Sierra from the App Store, there are several ways to run the installation.
- Go to the High Sierra product page in the Mac App Store. The Download button will be replaced by an Open button. Click on it to start the installation.
- In the Mac App Store app, click on the Purchased tab. You should see the macOS High Sierra installer in the list of purchased apps. Click on the Install button.
- Go to your Applications folder and look for a app called "Install macOS High Sierra" and double-click on it.
5.8. Updating your Operating System (Mojave)
Considering updating to the latest macOS version?
While macOS Mojave is a free download and arrives as a simple to use installer from the Mac App Store, you'll want to prepare your Mac before jumping into a new release of MacOS. The new system is a major release and changes many of the drivers and features that you will no doubt rely on within your premises. Whilst in the vast majority of cases system updates are applied successfully, it is possible that you may experience problems ranging from stability/reliability issues from certain applications (Adobe Creative Cloud for example), issues with email, printing, connecting to your network, accessing servers and peripherals. At worst, the update may fail and render your computer inoperable. Although the chances of a failed update is quite small it's important that you are aware of the possible implications of running an operating system update.
Below we have outlined some important steps before upgrading your system.
Customers with a support plan with CIT (UK) should bare in mind the following when self-updating an operating system system:
- Minor updates such as MacOS 10.12.4 to MacOS 10.12.5 are supported by CIT (UK). We recommend that you contact us first for advice before proceeding.
- We support all self-installed applications, drivers and and their respective updates. An example of this is Adobe Creative Cloud or Microsoft Office.
- Security updates published by Apple should always be applied. Please download and install them.
- Major
system updates such as MacOS 10.13 (High Sierra) to MacOS 10.14 (Mojave) are NOT supported by CIT (UK) and can potentially void your
cover. Whilst we'll do our very best to help you, there may be a charge
for correcting issues relating to the upgrade.
1: Confirm System Requirements Compatibility
Here is a full list of the Macs that will be able to download the upgrade with Mojave:
• MacBook (Early 2015 or newer)
• MacBook Air (Mid 2012 or newer)
• MacBook Pro (Mid 2012 or newer)
• Mac mini (Late 2012 or newer)
• iMac (Late 2012 or newer)
• iMac Pro (2017)
• Mac Pro (Late 2013; Mid 2010 and Mid 2012 models with recommended Metal-capable graphics cards)
General Requirements
- OS X 10.8 or later
- 2GB of memory
- 12.5GB of available storage (OS X El Capitan 10.11.5 or later)
- Some features require an Apple ID; terms apply.
- Some features require a compatible Internet service provider; fees may apply.
- Requires up to 18.5 GB of available storage to upgrade from earlier releases.
2: Check to make sure your software will work with the new system
Developers are working hard to ensure that their software is compatible with Mojave but if you're working in a production environment, it's worth checking for any potential problems you might experience after the update by visiting the developers website.
It's also worth considering peripheral and network support. For example, it's possible that you're using a printer driver, Wacom tablet, scanner etc which might not be supported by the new system. Another common example is that Apple Mail might not be compatible with your companies mail server.
2: Update Apps & Install Lingering Software Updates
It's always good practice to regularly update your Mac apps, system software, and the other occasional updates that come through to macOS, but many of us ignore these things.
Check the Mac App Store on a regular basis to install updates on apps you have bought there. (To do this in the Mac App Store app, click on the Updates tab. This will check the store for any updates.)
If you have software you didn't get in the Mac App Store, launch the app and look in the preferences or other menus for an option to check for updates. You can also look on the developer's website.
3: Perform General System Maintenance
If your Mac is low on hard drive space, free up disk space so that you have enough available storage to install the update and be sure that the macOS has plenty of space to run well (that means plenty of room for caches, virtual memory, your own files and apps, etc).
Also, if you have some old Mac apps that are sitting around collecting dust and never being used, you may want to consider uninstalling them to free up some space and reduce overhead for functions like Software Update.
We would also highly recommend that the hard disk is checked for problems within disk utility (utilities folder) before proceeding with the upgrade.
4: Back Up the Mac
You're almost ready to install Mojave! But before doing so, you absolutely must back up your Mac. This should not be considered optional, without a backup you could lose your stuff if something goes wrong. Don't risk it, just back up your Mac. Time Machine is so easy to use, runs automatically and routinely, and external hard drives are cheap. Seriously, there's no excuse and the risk is not worth it, always have backups. You might even save your important documents separately from your primary backup, just in case.
Time Machine
Remember to start a backup with Time Machine right before you begin the actual installation with Mojave, this insures that if a disaster happens, you can resume to exactly where you were right before the problem happened. Do not skip this!
5: Download Mojave & Install
Checked everything off the list and you're ready to go? Head to the App Store, start the download on your Mac, and update to macOS Mojave, and enjoy!
How do I install macOS Mojave? After you download Mojave from the App Store, there are several ways to run the installation.
- Go to the Mojave product page in the Mac App Store. The Download button will be replaced by an Open button. Click on it to start the installation.
- In the Mac App Store app, click on the Purchased tab. You should see the macOS Mojave installer in the list of purchased apps. Click on the Install button.
- Go to your Applications folder and look for a app called "Install macOS Mojave" and double-click on it.
5.9. Updating your Operating System (Catalina)
Considering updating to the latest macOS version?
While macOS Catalina is a free download and arrives as a simple to use installer from the Mac App Store, you'll want to prepare your Mac before jumping into a new release of MacOS. The new system is a major release and changes many of the drivers and features that you will no doubt rely on within your premises. Whilst in the vast majority of cases system updates are applied successfully, it is possible that you may experience problems ranging from stability/reliability issues from certain applications (Adobe Creative Cloud for example), issues with email, printing, connecting to your network, accessing servers and peripherals. At worst, the update may fail and render your computer inoperable. Although the chances of a failed update is quite small it's important that you are aware of the possible implications of running an operating system update.
It's also worth noting that if your computer is already suffering with performance issues or is unstable, or it's an older model, then applying the upgrade will likely have a negative impact on your computer. Please contact us if in doubt.
Below we have outlined some important steps before upgrading your system.
Customers with a support plan with CIT (UK) should bear in mind the following when self-updating an operating system system:
- Minor updates such as MacOS 10.12.4 to MacOS 10.12.5 are supported by CIT (UK). We recommend that you contact us first for advice before proceeding.
- We support all self-installed applications, drivers and and their respective updates. An example of this is Adobe Creative Cloud or Microsoft Office.
- Security updates published by Apple should always be applied. Please download and install them.
- Major
system updates such as upgrading from MacOS 10.14 (Mojave) to MacOS 10.15 (Catalina) isn't supported by a CIT (UK) Support Plan. Whilst we'll do our very best to help you, call outs and site visits to correct a failed system update may result in charges.
1: Confirm System Requirements Compatibility
Here is a full list of the Macs that will be able to download the upgrade for Catalina:
MacBook introduced in 2015 or later
MacBook Air introduced in 2012 or later
MacBook Pro introduced in 2012 or later
Mac mini introduced in 2012 or later
iMac introduced in 2012 or later
iMac Pro (all models)
Mac Pro introduced in 2013 or later
General Requirements
- OS X 10.11 (Mavericks) or later
- 4GB of memory
- 12.5GB of available storage (OS X El Capitan 10.11.5 or later)
- Some features require an Apple ID; terms apply.
- Some features require a compatible Internet service provider; fees may apply.
- Requires up to 18.5 GB of available storage to upgrade from earlier releases.
To upgrade from Lion or Mountain Lion, first upgrade to El Capitan, then upgrade to Catalina. To find your macOS version, Mac model, memory and storage space, choose About This Mac from the Apple menu . If your Mac isn’t compatible with macOS Catalina, the installer will let you know.
2: Check to make sure your software will work with the new system
Developers are working hard to ensure that their software is compatible with Catalina but if you're working in a production environment, it's worth checking for any potential problems you might experience after the update by visiting the developers website.
It's also worth considering peripheral and network support. For example, it's possible that you're using a printer driver, Wacom tablet, scanner etc which might not be supported by the new system. Another common example is that Apple Mail might not be compatible with your companies mail server.
2: Update Apps & Install Lingering Software Updates
It's always good practice to regularly update your Mac apps, system software, and the other occasional updates that come through to macOS, but many of us ignore these things.
Check the Mac App Store on a regular basis to install updates on apps you have bought there. (To do this in the Mac App Store app, click on the Updates tab. This will check the store for any updates.)
If you have software you didn't get in the Mac App Store, launch the app and look in the preferences or other menus for an option to check for updates. You can also look on the developer's website.
3: Perform General System Maintenance
If your Mac is low on hard drive space, free up disk space so that you have enough available storage to install the update and be sure that the macOS has plenty of space to run well (that means plenty of room for caches, virtual memory, your own files and apps, etc).
Also, if you have some old Mac apps that are sitting around collecting dust and never being used, you may want to consider uninstalling them to free up some space and reduce overhead for functions like Software Update.
We would also highly recommend that the hard disk is checked for problems within disk utility (utilities folder) before proceeding with the upgrade.
4: Back Up the Mac
You're almost ready to install Catalina! But before doing so, you absolutely must back up your Mac. This should not be considered optional, without a backup you could lose your stuff if something goes wrong. Don't risk it, just back up your Mac. Time Machine is so easy to use, runs automatically and routinely, and external hard drives are cheap. Seriously, there's no excuse and the risk is not worth it, always have backups. You might even save your important documents separately from your primary backup, just in case.
Time Machine
Remember to start a backup with Time Machine right before you begin the actual installation with Catalina, this insures that if a disaster happens, you can resume to exactly where you were right before the problem happened. Do not skip this!
5: Download Catalina & Install
Checked everything off the list and you're ready to go? Head to the App Store, start the download on your Mac, and update to macOS Catalina, and enjoy!
How do I install macOS Catalina? After you download Catalina from the App Store, there are several ways to run the installation.
- Go to the Catalina product page in the Mac App Store. The Download button will be replaced by an Open button. Click on it to start the installation.
- In the Mac App Store app, click on the Purchased tab. You should see the macOS Catalina installer in the list of purchased apps. Click on the Install button.
- Go to your Applications folder and look for a app called "Install macOS Catalina" and double-click on it.
5.10. Updating your operating System (Big Sur)
Considering updating to the latest macOS version?
While macOS Big Sur is a free download and arrives as a simple to use
installer from the Mac App Store, you'll want to prepare your Mac before
jumping into a new release of MacOS. The new system is a major release
and changes many of the drivers and features that you will no doubt rely
on within your premises. Whilst in the vast majority of cases system
updates are applied successfully, it is possible that you may experience
problems ranging from stability/reliability issues from certain
applications (Adobe Creative Cloud for example), issues with email,
printing, connecting to your network, accessing servers and peripherals.
At worst, the update may fail and render your computer inoperable.
Although the chances of a failed update is quite small it's important
that you are aware of the possible implications of running an operating
system update.
It's also worth noting that if your computer is already suffering with
performance issues or is unstable, or it's an older model, then applying
the upgrade will likely have a negative impact on your computer. Please
contact us if in doubt.
Below we have outlined some important steps before upgrading your system.
Customers with a support plan with CIT (UK) should bear in mind the following when self-updating an operating system system:
- Minor updates such as MacOS 10.12.4 to MacOS 10.12.5 are supported by
CIT (UK). We recommend that you contact us first for advice before
proceeding.
- We support all self-installed applications, drivers and and their
respective updates. An example of this is Adobe Creative Cloud or
Microsoft Office.
- Security updates published by Apple should always be applied. Please download and install them.
- Major
system updates such as upgrading from macOS 10.15 (Catalina) to macOS 11 (Big Sur) isn't supported by a CIT (UK) Support Plan. Whilst
we'll do our very best to help you, call outs and site visits to correct
a failed system update may result in charges.
1: Confirm System Requirements Compatibility
Here is a full list of the Macs that will be able to download the upgrade for Big Sur:
- MacBook (2015 or later)
- MacBook Air (2013 or later)
- MacBook Pro (Late 2013 or later)
- Mac mini (2014 or later)
- iMac (2014 or later)
- iMac Pro (2017 or later)
- Mac Pro (2013 or later)
General Requirements
- OS X 10.9 or later
- 4GB of memory
- 35.5GB available storage on macOS Sierra or later*
- Some features require an Apple ID; terms apply.
- Some features require a compatible internet service provider; fees may apply.
* If upgrading from macOS Sierra or later, macOS Big Sur requires 35.5GB
of available storage to upgrade. If upgrading from an earlier release,
macOS Big Sur requires up to 44.5GB of available storage.
2: Check to make sure your software will work with the new system
Developers are working hard to ensure that their software is compatible
with Big Sur but if you're working in a production environment, it's
worth checking for any potential problems you might experience after the
update by visiting the developers website.
It's also worth considering peripheral and network support. For example,
it's possible that you're using a printer driver, Wacom tablet, scanner
etc which might not be supported by the new system. Another common
example is that Apple Mail might not be compatible with your companies
mail server.
2: Update Apps & Install Lingering Software Updates
It's always good practice to regularly update your Mac apps, system
software, and the other occasional updates that come through to macOS,
but many of us ignore these things.
Check the Mac App Store on a regular basis to install updates on apps
you have bought there. (To do this in the Mac App Store app, click on
the Updates tab. This will check the store for any updates.)
If you have software you didn't get in the Mac App Store, launch the app
and look in the preferences or other menus for an option to check for
updates. You can also look on the developer's website.
3: Perform General System Maintenance
If your Mac is low on hard drive space, free up disk space so that you
have enough available storage to install the update and be sure that the
macOS has plenty of space to run well (that means plenty of room for
caches, virtual memory, your own files and apps, etc).
Also, if you have some old Mac apps that are sitting around collecting
dust and never being used, you may want to consider uninstalling them to
free up some space and reduce overhead for functions like Software
Update.
We would also highly recommend that the hard disk is checked for
problems within disk utility (utilities folder) before proceeding with
the upgrade.
4: Back Up the Mac
You're almost ready to install Big Sur! But before doing so, you
absolutely must back up your Mac. This should not be considered
optional, without a backup you could lose your stuff if something goes
wrong. Don't risk it, just back up your Mac. Time Machine is so easy to
use, runs automatically and routinely, and external hard drives are
cheap. Seriously, there's no excuse and the risk is not worth it, always
have backups. You might even save your important documents separately
from your primary backup, just in case.
Time Machine
Remember to start a backup with Time Machine right before you begin the
actual installation with Big Sur, this insures that if a disaster
happens, you can resume to exactly where you were right before the
problem happened. Do not skip this!
5: Download Big Sur & Install
Checked everything off the list and you're ready to go? Head to the App
Store, start the download on your Mac, and update to macOS Big Sur, and
enjoy!
How do I install macOS Big Sur? After you download Big Sur from the App Store, there are several ways to run the installation.
- Go to the Big Sur product page in the Mac App Store. The Download
button will be replaced by an Open button. Click on it to start the
installation.
- In the Mac App Store app, click on the Purchased tab. You should
see the macOS Big Sur installer in the list of purchased apps. Click on
the Install button.
- Go to your Applications folder and look for a app called "Install macOS Big Sur" and double-click on it.
5.11. Updating your operating System (Monterey)
Considering updating to the latest macOS version?
While macOS Monterey is a free download and arrives as a simple to use
installer from the Mac App Store, you'll want to prepare your Mac before
jumping into a new release of MacOS. The new system is a major release
and changes many of the drivers and features that you will no doubt rely
on within your premises. Whilst in the vast majority of cases system
updates are applied successfully, it is possible that you may experience
problems ranging from stability/reliability issues from certain
applications (Adobe Creative Cloud for example), issues with email,
printing, connecting to your network, accessing servers and peripherals.
At worst, the update may fail and render your computer inoperable.
Although the chances of a failed update is quite small it's important
that you are aware of the possible implications of running an operating
system update.
It's also worth noting that if your computer is already suffering with
performance issues or is unstable, or it's an older model, then applying
the upgrade will likely have a negative impact on your computer. Please
contact us if in doubt.
Below we have outlined some important steps before upgrading your system.
Customers with a support plan with CIT (UK) should bear in mind the following when self-updating an operating system system:
- Minor updates such as MacOS 10.12.4 to MacOS 10.12.5 are supported by
CIT (UK). We recommend that you contact us first for advice before
proceeding.
- We support all self-installed applications, drivers and and their
respective updates. An example of this is Adobe Creative Cloud or
Microsoft Office.
- Security updates published by Apple should always be applied. Please download and install them.
- Major
system updates such as upgrading from macOS 10.15 (Catalina) to macOS 12 (Monterey) isn't supported by a CIT (UK) Support Plan. Whilst
we'll do our very best to help you, call outs and site visits to correct
a failed system update may result in charges.
1: Confirm System Requirements Compatibility
Here is a full list of the Macs that will be able to download the upgrade for Monterey:
- MacBook Pro (16-inch, 2021)
- MacBook Pro (14-inch, 2021)
- MacBook Pro (13-inch, M1, 2020)
- MacBook Pro (13-inch, 2020, Two Thunderbolt 3 ports)
- MacBook Pro (13-inch, 2020, Four Thunderbolt 3 ports)
- MacBook Pro (16-inch, 2019)
- MacBook Pro (13-inch, 2019, Two Thunderbolt 3 ports)
- MacBook Pro (15-inch, 2019)
- MacBook Pro (13-inch, 2019, Four Thunderbolt 3 ports)
- MacBook Pro (15-inch, 2018)
- MacBook Pro (13-inch, 2018, Four Thunderbolt 3 ports)
- MacBook Pro (15-inch, 2017)
- MacBook Pro (13-inch, 2017, Four Thunderbolt 3 ports)
- MacBook Pro (13-inch, 2017, Two Thunderbolt 3 ports)
- MacBook Pro (15-inch, 2016)
- MacBook Pro (13-inch, 2016, Four Thunderbolt 3 ports)
- MacBook Pro (13-inch, 2016, Two Thunderbolt 3 ports)
- MacBook Pro (Retina, 15-inch, Mid 2015)
- MacBook Pro (Retina, 13-inch, Early 2015)
- MacBook Air (M1, 2020)
- MacBook Air (Retina, 13-inch, 2020)
- MacBook Air (Retina, 13-inch, 2019)
- MacBook Air (Retina, 13-inch, 2018)
- MacBook Air (13-inch, 2017)
- MacBook Air (13-inch, Early 2015)
- MacBook Air (11-inch, Early 2015)
- MacBook (Retina, 12-inch, 2017)
- MacBook (Retina, 12-inch, Early 2016)
- iMac (24-inch, M1, 2021)
- iMac (Retina 5K, 27-inch, 2020)
- iMac (Retina 5K, 27-inch, 2019)
- iMac (Retina 4K, 21.5-inch, 2019)
- iMac (Retina 5K, 27-inch, 2017)
- iMac (Retina 4K, 21.5-inch, 2017)
- iMac (21.5-inch, 2017)
- iMac (Retina 5K, 27-inch, Late 2015)
- iMac (Retina 4K, 21.5-inch, Late 2015)
- iMac (21.5-inch, Late 2015)
- Mac mini (M1, 2020)
- Mac mini (2018)
- Mac mini (Late 2014)
- Mac Pro (2019)
- Mac Pro (Late 2013)
General Requirements
If upgrading from macOS Sierra or later, macOS Monterey requires 26GB of available storage to upgrade. If upgrading from an earlier release, macOS Monterey requires up to 44GB of available storage.
2: Check to make sure your software will work with the new system
Developers are working hard to ensure that their software is compatible
with Monterey but if you're working in a production environment, it's
worth checking for any potential problems you might experience after the
update by visiting the developers website.
It's also worth considering peripheral and network support. For example,
it's possible that you're using a printer driver, Wacom tablet, scanner
etc which might not be supported by the new system. Another common
example is that Apple Mail might not be compatible with your companies
mail server.
3: Update Apps & Install Lingering Software Updates
It's always good practice to regularly update your Mac apps, system
software, and the other occasional updates that come through to macOS,
but many of us ignore these things.
Check the Mac App Store on a regular basis to install updates on apps
you have bought there. (To do this in the Mac App Store app, click on
the Updates tab. This will check the store for any updates.)
If you have software you didn't get in the Mac App Store, launch the app
and look in the preferences or other menus for an option to check for
updates. You can also look on the developer's website.
4: Perform General System Maintenance
If your Mac is low on hard drive space, free up disk space so that you
have enough available storage to install the update and be sure that the
macOS has plenty of space to run well (that means plenty of room for
caches, virtual memory, your own files and apps, etc).
Also, if you have some old Mac apps that are sitting around collecting
dust and never being used, you may want to consider uninstalling them to
free up some space and reduce overhead for functions like Software
Update.
We would also highly recommend that the hard disk is checked for
problems within disk utility (utilities folder) before proceeding with
the upgrade.
5: Back Up the Mac
You're almost ready to install Monterey! But before doing so, you
absolutely must back up your Mac. This should not be considered
optional, without a backup you could lose your stuff if something goes
wrong. Don't risk it, just back up your Mac. Time Machine is so easy to
use, runs automatically and routinely, and external hard drives are
cheap. Seriously, there's no excuse and the risk is not worth it, always
have backups. You might even save your important documents separately
from your primary backup, just in case.
Time Machine
Remember to start a backup with Time Machine right before you begin the
actual installation with Monterey, this insures that if a disaster
happens, you can resume to exactly where you were right before the
problem happened. Do not skip this!
6: Download Monterey & Install
Checked everything off the list and you're ready to go? Head to the App
Store, start the download on your Mac, and update to macOS Monterey, and
enjoy!
How do I install macOS Monterey? After you download Monterey from the App Store, there are several ways to run the installation.
- Go to the Monterey product page in the Mac App Store. The Download
button will be replaced by an Open button. Click on it to start the
installation.
- In the Mac App Store app, click on the Purchased tab. You should
see the macOS Monterey installer in the list of purchased apps. Click on
the Install button.
- Go to your Applications folder and look for an app called "Install macOS Monterey" and double-click on it.
5.12. Service and Installation Categories
Within the footer of each support email a field called 'Call Type' lists the category of support applied to the open ticket. A detailed explanation can be found within this article which explains the different call types and any billing implications for customers with a support plan with Central IT.
Support Call; with Service Agreement
This call is covered under the terms of your service agreement. No charges will be applied and you can expect a resolution within the framework of your support agreement.
Support Call; Courtesy
This call isn't covered by your service agreement. At the discretion of the support technician the issue has however, been handled without charge.
Support Call; No Cover
This call is chargeable at our standard billing rate. If you have a current support plan with Central IT this particular issue isn't included as part of your service agreement. We reserve the right to charge for any site visit if you have requested a call out without prior diagnosis.
Please contact us prior to your visit to confirm onsite charges.*
Support Call; Emergency Response
Your call is chargeable at our premium billing rate. We have been asked to attend site on a same-day service. We reserve the right to charge for any site visit if you have requested a call out without prior diagnosis. Same day visits are subject to availability.
Our emergency onsite rate is £145 which includes the first hour onsite and then £76 for each hour thereafter (billed in 15 minute increments).*
Change Request
Your call has been classified as an installation or administration request and will be charged at our standard billing rate.
If you have a support plan with Central IT the following categories are not included:
- Installation of new equipment including migration
- Additional setup work outside the scope of your original installation
- Administrative changes to equipment not purchased from Central IT
- Setup work due to a personnel change
- Setting up or configuring mobile devices including phones and tablets
Please contact us prior to your visit to confirm on-site charges.*
*NOTE: All prices are exclusive of VAT. If you have a support plan with us you are eligible to a 20% discount.
Remote and telephone support is charged at a flat rate of £15+VAT per 20 minutes.
All of our technicians are graded according to experience and expertise therefore pricing may vary.
5.13. Sample Contracts (Service Level Agreement)
For sample copies of our current SLA documents please select and download one of the contract agreements at the bottom of this page.
For further assistance please contact us on 01530 272727 or email contracts@centralit.co.uk quoting your agreement number if you should have one.
6. Remote Support
6.1. DOWNLOAD Remote Support Host Software
Below you will find the link to our remote support software. This version runs permanently as a system service on your computer. When installing the product, please use 'RemoteSupport11' as the password and let us know what the Teamviewer ID is.
Download Here
6.2. Install CIT (UK) Remote Support (Host Edition)
Install our remote support software (host edition)
Our teamviewer host software is designed to run on your computer permanently in the background. It's a great way of receiving regular support quickly without having to download or manually launch our software each time. It's perfectly safe to use, and it requires your authorisation before we can connect.
Download the installer here
After downloading the Host module via the (customized) link, you can start the installation process.
During the installation process toward the end, you will be prompted to set a personal password for Unattended Access.

Please enter '
Directkey2021' as the password, note the capital D.
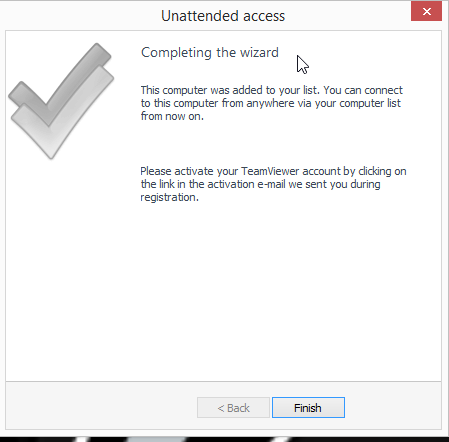
Once you have completed the installation process, a prompt will
appear. This prompt will request you
confirm that the assigned account is authorized to connect to this
device, even unattended. Please click on 'allow and finish'.
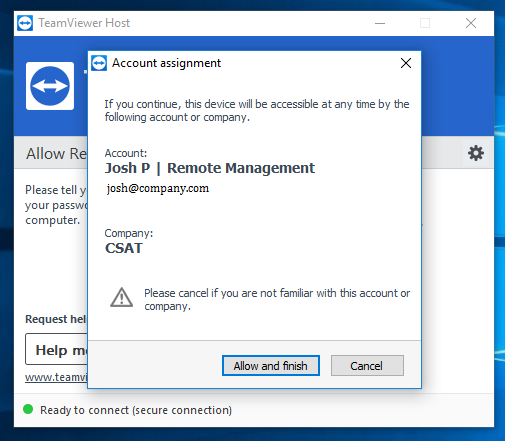
On a Mac, you will also need to review the access rights for Teamviewer from the teamviewer menu at the top of the screen. Simply click on the 'Check Access' option to review the access rights on your Mac. This completes the installation.
Important additional step required on the Mac
Recent macOS versions require your permission for apps to provide remote
control functionality (e.g. screen recording or mouse and keyboard
control).
When starting TeamViewer on your Mac running for the first time, you may see the following dialog:

How to allow each access
To allow access, click the buttons in the dialog.
For example, to allow Accessibility, click the Request Access… button.
In the next dialog, click Open System Preferences.
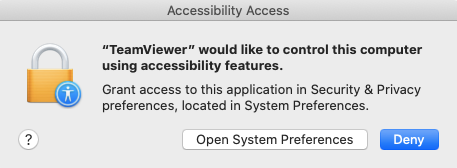
This will take you to the Accessibility section of the Security & Privacy preferences:

You may need to click the padlock icon in the
lower-left corner to make changes. You might be prompted to enter the
credentials of an administrator account to continue.
Check the box next to TeamViewer to grant access:
📌Note: If you are seeing the entry TeamViewer_Desktop in your list, make sure to check this box as well.
Go back to TeamViewer, and repeat the same process for the other permissions.
When you are done, you may click the padlock in the lower-left corner again to prevent further changes.
The next time you want to receive an incoming connection with TeamViewer, the person connecting to your Mac will be able to see and control your device.
The permission status can be reviewed under Help -> Check system access at any time.
6.3. How to verify that the remote host software is running
For customers that have a support plan with CIT (UK), a software product is pre-installed and permanently runs in the background to enable our technicians to connect to your computer when required.
Instructions for macOS
You can verify that the remote host software is running by going up to the menu bar items in the upper-right corner of the screen near the date/time. The icon looks like this:
 or
or 
This is our Teamviewer remote host software icon.
Note: If you cannot see the icon then you will need to start the application - How to launch Teamviewer Host.
STEP 1: To verify that your computer is connected to the internet, click on the Teamviewer icon and select 'Show Status Dialog'.
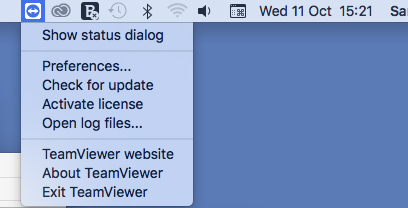
The menu bar items. Yours make look a little different to this.
A dialog box should open and you should see a green light with a 'Ready to connect' message towards the bottom of the window.
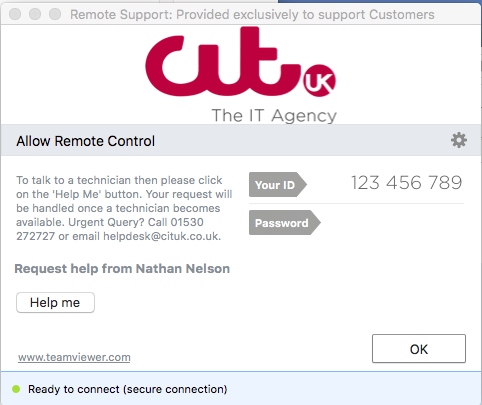
If you see a red light then you are not connected to the internet or the service isn't working properly. If this is the case then please contact CIT (UK) on 01530 272727.
STEP 2: Please supply our technician with the 9 or 10 digit number next to the 'Your ID' section of the box.
There's no need to supply the password as our technician will not be required it.
Instructions for Windows
You can verify that the remote host software is running by going down to the system tray in the lower-right corner of the screen near the date/time. The icon looks like this:
or
This is our Teamviewer remote host software icon.
STEP 1: To verify that your computer is connected to the internet, click on The TeamViewer icon and select 'Show Status Dialog'.
The system tray icons. Yours make look a little different to this.
A dialog box should open and you should see a green light with a 'Ready to connect' message towards the bottom of the window.
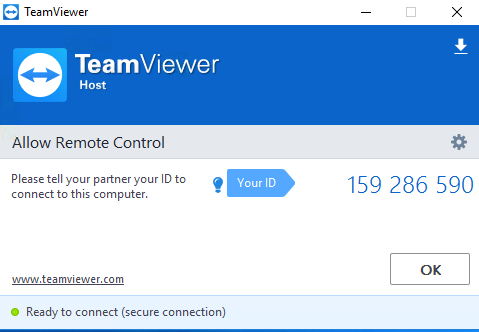
If you see a red light then you are not connected to the internet or the service isn't working properly. If this is the case then please contact CIT (UK) on 01530 272727.
STEP 2: Please supply our technician with the 9 or 10 digit number next to the 'Your ID' section of the box.
There's no need to supply the password as our technician will not be required it.
6.4. How to launch Teamviewer Host (Mac)
To launch Teamviewer Host which is our pre-installed remote support software please do the following:
(1) Click anywhere on the desktop and ensure that you are in the Finder.
(2) Go up to the 'Go' Menu at the top of the screen
(3) Select 'Applications'.
(4) Double click the Teamviewer Host icon.
The software will now launch and will remain running in the background. You do not need to do anything else.
How to verify that the remote host software is running
6.5. How to Uninstall the Advanced Monitoring Agent
You can uninstall the OSX Agent by navigating to /usr/local/rmmagent and executing uninstall.tool.
Note: This will need to be run either as the root user, or by assuming root privileges using the sudo command: sudo ./uninstall.tool
For further information, please consult the Dashboard Help System, under Getting Started > OSX Monitoring Agent Installation > Uninstall the OSX Monitoring Agent.
6.6. DOWNLOAD Remote Support Software (Teamviewer QuickSupport)
CIT (UK) provides a quick and convenient way for our technicians to remotely access your computer. The software can be downloaded from here:
DOWNLOAD REMOTE SUPPORT SOFTWARE
1. Once you've launched the software, you will need to call our office on 01530 272727 or email helpdesk@centralit.co.uk and provide us with your 9 or 10 digit session code.
2. Before the session is due to begin, **please save your work and close down all of your open applications.**
3. Please ensure that the 'TeamviewerQS' remains open and running before and during the session.
Remote support sessions are provided by appointment only.
If you have difficulty launching the software or are unable to allow access at this time, please either call or email us and we'll arrange another time slot for you.
6.7. Uninstall CIT (UK) Remote Support Software (Teamviewer) Windows and Mac
Windows uninstall instructions
If, at anytime, you decide you do not want any of the software or offers that you have downloaded during this process, you can easily uninstall them via Windows’ “Add/Remove Programs” using the following instructions:
Windows 10, Windows 8, Windows 7 & Vista
- From the Start Menu, select Control Panel.
- Under Programs click the Uninstall a Program link.
- Select the program you wish to remove and right click then select Uninstall/Change.
- Follow the prompts to finish the uninstallation of the software.
Windows XP
- From the Start Menu, select Control Panel.
- Click the Add or Remove Programs icon.
- Select the program you wish to remove and click on the “Remove” or “Change/Remove” button.
- Follow the prompts to finish the uninstallation of the software.
Windows 95, 98, Me, NT, 2000, and XP in Classic View
- From the Start Menu, select Settings, and then Control Panel.
- Double-click the “Add/Remove Programs” icon.
- Select the program you wish to remove and click on the “Remove” or “Change/Remove” button.
- Follow the prompts to finish the uninstallation of the software.
macOS uninstall instructions
TeamViewer 9 (or later) for macOS can be completely uninstalled within the TeamViewer settings. To uninstall TeamViewer for macOS, follow these steps:
- Open the TeamViewer preferences
- Open the Advanced tab
- Under Uninstall, click the Uninstall button
- TeamViewer is uninstalled
7. Cloud Backup Service
7.1. Purchase a license
To purchase your backup license or for pricing information please call Nathan Nelson on 01530 272727 (option 3).
8. Hosted Web Services
8.1. Email Client Setup (Outlook)
Step 1
Open Outlook. If this is the first time you have opened Outlook you will be directed to the new account wizard. If you already have an account set up, click File, then Add account and skip to step 3.
Step 2
When the Welcome to Outlook box opens, click Next, then Next again.
Step 3
Select the button marked Mannual setup or additional server types then click Next.

Step 4
Select POP or IMAP, then click Next.

Step 5
There is a lot of information to fill in on this next screen, let’s look at each section bit by bit.
User Information
- Your name: This is what most email users will see in their inboxes instead of your email address. Enter your name.
- E-mail Address: Enter your full email address. This is made up of the mailbox name you chose, an @ symbol and your domain name. you@yourdomain.com for example.
Server Information
- Account type: Depending on your preferred type of connection, select POP or IMAP from the drop down menu.
- Incoming mail server. Enter the address supplied in your email
- Outgoing mail server (SMTP). Enter the address supplied in your email
Logon Information
- User Name: Enter your full email address. This made up of the mailbox name you chose, an @ symbol and your domain name.
- Password: Enter the password you set up when you created the mailbox within your control panel.
- Remember password: Check this box.
- Require logon using Secure Password Authentication (SPA): Leave unchecked.
Once completed, the screen should look similar to the following:

Once you have entered all the information required, click More Settings.
Step 6
Make sure Use same settings as my incoming mail server is selected.

Step 7
Click the Advanced tab and enter the following settings:
- Incoming Server: 993 for IMAP or 995 for POP.
- Use the following type of encrypted connection: Set to SSL.
- Outgoing server: Enter 465.
- Use the following type of encrypted connection: Set to SSL.

Step 8
Click OK, then Next and Outlook will test the connection.

When the test is complete click Close, and then click Finish to close the wizard. Outlook 2013 is now configured to send and receive email through your mailbox.
8.2. Email Client Setup (Apple Mail)
Step 1
Open Mail on your Mac

Step 2
If you already have an email account setup, you will need to select Mail > Add Account... otherwise skip to the next step.

Step 3
Select Other Mail Account...

Click Continue
Step 4
Enter the following in the text boxes provided:
- Name: Enter your full name.
- Email Address: Enter the full email address of the mailbox you are setting up.
- Password: Enter the mailbox password.

Click Sign In.
Step 5
Mail will attempt to automatically connect with these simple settings. This attempt will fail and you will be asked to provide more information.

Step 6
Enter the following server settings.
- Incoming Mail Server: Enter the address supplied in your email
- Outgoing Mail Server: Enter the address supplied in your email

Click Sign In
Step 7
Sending and receiving email are both performed over secure connections. Mail will now error as it is yet unable to connect to the SMTP servers. It will instead revert to an insecure connection.
You will reconfigure these settings later in the guide.

Click continue
Step 8
If you chose IMAP (recommended) you will be asked which apps to synchronise with the server.
This is useful for sharing data between devices.

Click Done
Step 9
We will now go back and reconfigure the SMTP settings for which we had a warning for in Step 7.
Select Mail > Preferences

Step 10
Click the Accounts icon.

Step 11
If you have multiple account setup, make sure the correct account is selected and click Server Settings.

Step 12
Under Incoming Mail Server (IMAP) untick the Automatically manage connection settings box. You now need to change these settings.
- User Name: Enter your email address.
- Password: Enter your password.
- Host Name: Enter the address supplied in your email
- Port: Enter 993 for IMAP or 995 for POP.
- Use TLS/SSL: Tick this box.
- Authentication: Select Password from the drop down menu.

Step 13
Under Outgoing Mail Server (SMTP) untick the Automatically manage connection settings box. You now need to change these settings.
- User Name: Enter your email address.
- Password: Enter your password.
- Host Name: Enter the address supplied in your email
- Port: Enter 465
- Use TLS/SSL: Tick this box.
- Authentication: Select Password from the drop down menu.

Once done, click Save.
8.3. Email Client Setup (iOS)
Step 1
Tap the Settings icon.
Step 2
Scroll down and press Accounts & Passwords.

Step 3
Press Add Account.

Step 4
Press Other.

Step 5
Press Add Mail Account.

Step 6
Enter the following information and press Next:
- Name: Enter your name. People will see this when you send them an email from your device.
- Email: Enter the full email address you are setting up. For example ralph@ralphsdomainname.com.
- Password: Enter your mailbox password.
- Description: Enter an optional description to help you identify this mailbox.

Step 7
When using a mobile device, we recommend using IMAP. This will give you greater flexibility sharing information between your various devices. You should now be able to enter your various email server settings, and the screen will look similar to this:

Incoming mail server
Lets now enter the INCOMING MAIL SERVER settings. These settings control your ability to receive email on your device.
- Change your Host Name to Enter the address supplied in your email.
- Enter the email address, e.g. ralph@ralphsdomainname.com, for the Username.
- Enter the Password will be the same you entered earlier.

Outgoing mail server
Lets now enter the OUTGOING MAIL SERVER settings. These settings control your ability to send email from your device.
- Enter the address supplied in your email as your Host Name.
- Enter the email address, e.g. ralph@ralphsdomainname.com, for the Username.
- Enter the Password.

and finally...
Press Next
Your device will then Verify the settings. This can take a couple of minutes.

Once everything has been verified, press the Save button to save your new account.

8.4. Email Client Setup (Android)
Step 1
Click the Settings icon on your device.

Step 2
Scroll down to the Personal section and select Accounts.

Step 3
Click Add account and select Personal (IMAP).

Step 4
Enter your email address and mailbox password in the text boxes provided and select Manual Setup.

Step 5
Select Personal (IMAP) as the account type and click Next.

Step 6
Enter your mailbox Password and click Next.
Step 7
For the Incoming settings, enter the following details in the text boxes provided:
- Username: Enter your mailbox username, this will be the same as your Email address.
- Password: Enter your mailbox password. This is the same password you chose when you created your mailbox.
- Server: Enter the address supplied in your email.
- Port: Set this to 993.
- Security type: Set to SSL/TLS (Accept all certificates).
Once you have filled out all the details, click Next.

Step 8
For the Outgoing settings, enter the following details in the text boxes provided:
- Require sign-in: Make sure this is checked.
- Username: Enter your e-mail address.
- Password: Enter your password.
- SMTP server: Enter the address supplied in your email
- Port: Set this to 465.
- Security type: Set to SSL/TLS (Accept all certificates)
Once you have filled out all the details, click Next.

Step 9
You will be given options to select some custom settings.

Once you have chosen your custom settings, click Next.
Step 10
Enter an account name in the Set account name box and enter a display name in the Your name box.
The account name will allow you to distinguish this account from any other Email accounts you have set up on your Phone. The display name will be shown on all outgoing messages.

Click Next.
Your mailbox will now be ready to use.