2.1. iPhoto: How to move the Library folder to a new location
This article shows you how to move the iPhoto Library folder or Library package to a new location.
This article has been archived and is no longer updated by Apple.
Note: The iPhoto library in iPhoto '08 or later is called a package.
Pre-iPhoto '08Post-iPhoto '08
The iPhoto Library folder or package contains imported photos and any albums you've created using iPhoto. If you want to move your iPhoto Library folder or package to a new location, you must move the entire folder or package and then identify its new location in iPhoto. The following steps only apply to iPhoto 2 and later. For iPhoto 1.1.1, refer to iPhoto 1.1.1: How to Move the iPhoto Library Folder to a New Location.
Note: If you move, delete, rename, or change files or folders in the iPhoto Library folder, you may be unable to see your pictures in iPhoto.
To move the iPhoto Library folder or package to a new location:
Quit iPhoto if open.
Open your Pictures folder and select the iPhoto Library.
Drag the iPhoto Library folder or package to its new location.
If you are using iPhoto '08 or later, you can double-click the iPhoto Library icon in its new location to open iPhoto. iPhoto will remember this new location in the future.
If you are using iPhoto '06 or earlier, you will need to follow these steps to tell iPhoto where the Library is now located:
Hold down the Option key on the keyboard and open iPhoto. Keep the Option key held down until you are prompted to create or choose an iPhoto Library.
Click Choose Library.
Locate and select the iPhoto Library in its new location.
2.2. iTunes for Mac: Moving your iTunes Media folder
Learn how to move your iTunes Media folder to a different location on your Mac.
If your hard drive is nearly full after you load your media into iTunes or you want to move your media files to another hard drive, follow these steps to move your media and keep your playlists, ratings, and play history.
Notes
Follow these steps to move the iTunes Media folder on a Windows PC.
If you created your iTunes library using iTunes 8 or earlier, the iTunes Media folder may be called "iTunes Music."
Before you begin, select the option to keep your iTunes media folder organized:
Choose iTunes > Preferences.
Click the Advanced button.
Select "Keep iTunes Media folder organized."
Click OK.
Note: If you move your media to an external hard drive, you must connect that drive to your computer to access your files. Remember to back up the media you have in iTunes.
Follow these steps to move your iTunes Media folder to a new drive and consolidate your library to the new location:
Open iTunes.
Choose iTunes > Preferences.
Click the Advanced button.
Click the Change button in the "iTunes Media folder location" pane. The Change iTunes Media Folder Location window appears.
Choose where you want to save your new iTunes Media folder. Note: Your iTunes Media folder is named "iTunes Media" in ~/Music/iTunes/ (the tilde ~ represents your home directory).
Click the New Folder button in the Change iTunes Media Folder Location window. The New Folder window appears.
Enter the name of the new iTunes Media folder.
Click Create.
Click Open in the Change iTunes Media Folder Location window.
Click OK in the Advanced window.
iTunes 9 or later: Choose File > Library > Organize Library. iTunes 7 or iTunes 8 for Mac: Choose File > Library > Consolidate Library.
In the Organize Library (or Consolidate Library) window, select "Consolidate files."
Click OK. Important: All of your media files should copy to the new location. There must be enough hard disk space available to copy all of your media files.
After the folder copies, find your original iTunes Media folder and drag it to the Trash. Important: Keep the iTunes library files that may be in the same location as the iTunes Media folder. Learn about the iTunes library files.
Quit iTunes and open iTunes again.
If you see the alert "The folder containing "iTunes Library" cannot be found, and is required. Please choose or create a new iTunes library," you may have moved the iTunes library files. You should move them out of the Trash and back to where they were.
If you can open and close iTunes without seeing the alert, empty the Trash.
2.3. iTunes for Windows: Moving your iTunes Media folder
Learn how to move your iTunes Media folder to a different location on your Windows PC.
If your iTunes library was originally created using iTunes 8 or earlier, the iTunes Media folder may be called "iTunes Music" instead.
If your hard drive is nearly full after loading all your music and other media into iTunes, or if you just want to move all those music and media files to another hard drive on your system, here's a way to make the move while retaining all your playlists, ratings, and play history.
First make sure that the "Keep iTunes Media folder organized" option is checked in iTunes Preferences:
Open iTunes.
Choose Edit > Preferences.
Click the Advanced tab in the Preferences window.
Select the "Keep iTunes Media folder organized" checkbox.
Click OK.
Once you've done that, follow the next set of steps to change your iTunes Media folder location to the new drive and then consolidate your library to the new location. This not only copies your audio and media files over, it also retains your ratings and playlists.
Note: If you move your library to an external drive, you'll need to power up and connect the drive before starting iTunes. If you don't, iTunes will prompt you to either locate the library or to create a new library (which will result in an empty library). No matter what, it's always a good idea to have a backup of the media you have in iTunes.
Open iTunes.
From the Edit menu, choose Preferences.
Click the Advanced tab in the Preferences window.
Click the Change button in the iTunes Media folder location pane.
In the Change Media Folder Location window that appears, navigate to the location where you would like your new Media folder to be created.
Tip: In Windows Vista and Windows 7, click the triangles next to the folders and drives to navigate. In Windows Vista, the default location is:
\username\Music\iTunes
. In Windows 7, the default location is:
\username\My Music\iTunes.
In Windows XP and Windows 2000, click the plus signs next to the folders and drives to navigate. The default location is
\Documents and Settings\username\My Documents\My Music\iTunes
.
Click the Make New Folder button in the Change Media Folder Location window.
Enter the name of the new iTunes Media folder.
Click OK in the Change Media Folder Location window. Click OK in the Advanced window.
For iTunes 9 and 10: Choose File > Library > Organize Library For iTunes 8: Choose File > Library > Consolidate Library For iTunes 7 or earlier: Choose Advanced > Consolidate Library.
A message will pop up. For iTunes 9 and 10: Place a check next to "Consolidate files" and click OK.
For iTunes 8 and earlier: Click Consolidate.
Important: This action copies all of your music and other media files to the new location. There must be enough hard disk space available to copy all of your files.
After the folder has been copied, locate your original iTunes Media folder, and drag it to the Recycle Bin. Important: Don't remove the iTunes Library files that may be in the same location as the iTunes Media folder. For more information about the iTunes Library files, see What are the iTunes Library files?
Quit and reopen iTunes.
If you receive the alert: "The folder containing "iTunes Library.itl" cannot be found and is required. Please create or choose an iTunes library," you most likely moved the iTunes Library files. If this is the case, move them out of the Recycle Bin and back to where they were.
If you do not encounter the above alert when opening and closing iTunes, empty the Recycle Bin.
3. Apple Photos
3.1. Duplicate Photos: Why it happens
Regardless of how often you snap photos, it’s safe to say that you
have thousands of them in your photo library. And as you try to keep
your phone synced with your computer or a cloud service, there’s a good
chance you will notice an annoying amount of duplicate photos on your
iPhone.
Learn some of the common causes of duplicate
pictures and what you can do to prevent them in the future.
Reason 1. iCloud sync
In theory, iCloud should recognize when your iPhone is trying to
upload a duplicate picture. But, from time to time, they still sneak
in.
How to prevent duplicate photos: Upload from one source
While it might be tempting to manually sync your iPhone photos to
your computer via the USB, don’t do this if you have iCloud Photos
turned on. This is especially true if you have iCloud Photos turned on,
on both your iPhone and computer. It’s best to just let one device
upload photos iCloud and all your other devices download from iCloud.
Reason 2. Multiple cloud services
If you’re using multiple cloud services, such as iCloud and Google
Photos, duplicates become more likely. Because your iPhone is uploading
pictures to two different locations, it will occasionally see the photo
as two different images because they’re being synced from different
places.
How to prevent duplicate photos: Use one cloud service on your phone
The best way to prevent duplicates due to multiple cloud services is
to use only one automatic service on your iPhone. If you want to use
another cloud service as a backup, it’s best to either do it manually or
only have your computer signed in to the two services.
Reason 3. The HDR setting is turned on
HDR is a camera effect for your photos. It stands for High Dynamic
Range, which, in simplest terms, means that when you take a picture, the
camera is taking multiple images and combining them into one photo.
This gives your picture a sharper, higher contrast.
In iPhone 8 and older, HDR is a feature you can switch on and off.
When it's on, it creates an HDR photo, while also saving the original
photo. This means you’re saving two similar-looking versions of the same
picture. And while they’re not exact duplicates, you probably don’t
want to keep the original and the HDR photo.
How to prevent duplicate photos: Turn off Auto HDR
Fortunately, you can turn off Automatic HDR, allowing you to choose
when you want to use HDR so you don’t end up with multiple
similar-looking pictures:
Open the Settings app.
Tap Camera.
Toggle off Auto HDR.
Open the Camera app.
Tap HDR to turn it on or off.
Another
option you have is to turn off the setting to Keep Normal Photo
altogether. That way, once you take an HDR picture, it only keeps a
single copy.
Open Settings.
Tap Camera.
Toggle Keep Normal Photo off.
Reason 4. Photo editing
If you use a third-party app like VSCO to edit your photos, you’re
likely to end up with duplicates. After you’ve finished editing the
pictures, you typically need to save them to your Camera Roll again to
share them with friends or on social media, which can create multiple
versions of the same photo.
Like with HDR photos, pictures edited with a third-party app are
saved back to your Camera Roll, creating a similar picture. So while
it’s not an exact duplicate, it’s still a similar image taking up twice
the storage space.
How to prevent duplicate photos: Edit in the Photos app
While the Photos app may not have the breadth of editing
capabilities, it is still a powerful tool. And when you edit in the
Photos app, it saves over the original by default to avoid the creation
of duplicates.
Open the Photos app.
Select the picture you want to edit.
Tap Edit in the top-right corner.
Make your adjustment and then tap Done.
4. Apple Mail
4.1. How to fix Apple Mail by rebuilding and reindexing the Mailbox
f your Apple Mail doesn't seem to be searchable and/or has become so slow it seems to hang your Mac -- or even displays incorrect email content, then it's time you attacked the problem: it's time to rebuild and reindex your Mailbox.
This isn't a trivial problem:
Mac users depend on Apple Mail for day-to-day email use, but as those messages come in and go out your Mailboxes will become bloated. When they do, Mail's performance will suffer and you'll find that even something as simple as downloading new messages takes an age.
Before we begin
Delete messages inside your Deleted Items and Spam folders
Delete messages you no longer need
Update to the latest version of Mail
Now you've done that, we may be able to improve things using these two tips:
Step 1: Rebuild
Rebuilding a Mailbox in Mail sound daunting but it really isn't. Launch Mail, select one of your mailboxes and click on the Mailbox menu. At the bottom of the pane choose the Rebuild option. If you have a large mailbox, you can expect the process to take a few hours.
You must repeat this step for each one of your Mailboxes.
While the process takes place, you may experience system performance lag, as it can consume a lot of system resources and memory.
Another caveat, if you use IMAP or Exchange with any of the accounts, the process will redownload every message from the server, so you'll use a lot of bandwidth.
Now that you've completed these steps, work with Mail a little longer. If you are still having issues, or Mail fails to launch, you should try a manual reindex.
Step 2: Reindex
Manual reindexing of Mail messages is the only way to go if the application has become so unresponsive it barely works at all, search is not functioning correctly or the app won't launch.
Mail will automatically attempt to reindex your messages if it detects problems with the mailboxes, but sometimes a manual reindex is the best option. If you are still having problems with Mail after following step one, try manual reindexing.
Quit Mail if it's open.
To get to your home Library folder, hold down the Option key, then in the Finder choose Go > Library.
In ~/Library/Mail/V2/MailData, delete any file that begins with "Envelope Index," such as Envelope Index or Envelope Index-shm. (Before you actually delete the files, it makes sense to copy them to a folder on your desktop.)
Launch Mail and the app will build new Envelope Index files -- this can take a long time if there are numerous messages to go through.
If everything seems to be working correctly, you can now delete the copies of the "Envelope Index" files from your desktop.
In most cases, these two tips should solve most Mail problems -- I hope they help resolve yours.
4.2. Repairing Mail after system upgrade
After upgrading to OS X Yosemite, you might find Apple's Mail application may crash or hang when you open it, preventing you from accessing any new messages. This can be exceptionally frustrating to manage, especially when it persists after restarting your system. If mail is constantly quitting after upgrading, and especially if it quits immediately when you open it, then there are several approaches you can take to fix this situation.
Launch Mail in Safe Mode
When you open Mail, the program will show the last Mail message that you had selected, and if this message contains errors or corruption that is causing the crash, then this may trigger Mail to always crash when opened. To bypass this and have Mail not select any mailbox or message to show when launched, open the program and immediately hold down the Shift key until Mail is opened. If this causes the program to launch successfully, then you can investigate which messages or mailboxes are causing the issue.
Boot your Mac into Safe Mode to launch Mail
Another approach is to boot OS X itself into Safe Mode by restarting and holding the Shift key down immediately when you hear the boot chimes. This will only load essential features of the operating system, and while you should expect it to run noticeably slower in this mode, it may allow Mail to load properly when launched. If this occurs, then reboot normally and try Mail again.
Remove Mail saved state
OS X will save window locations and the open documents for most open programs, so if you quit the program these items will be restored when it is next launched. If after upgrading OS X there is some problem with how the prior saved state of Mail is being handled, then this could be the reason for Mail crashing. Therefore, try removing Mail's saved state, and then re-launching Mail:
Go to the Finder
Hold the Option key and then select Library from the Go menu
Go to the Containers > com.apple.mail > Data > Library > Saved Application State folder
Locate and remove the folder called "com.apple.mail.savedState
Re-launch Mail
Temporarily disable Mail accounts
Go to the Internet Accounts system preferences, and then uncheck the Mail option for each account you have listed there. When all are unchecked, open Mail to see if it will launch correctly. Then quit Mail, re-enable your Mail accounts in the System Preferences, and try opening the program again.
Uninstall or disable any third-party Mail add-ons
If you have any third-party programs that interface with Mail, then uninstall them. These can be password managers, or junk mail filters, content managers that will handle attachments, or security software for encrypting messages and connections. Sometimes these programs may simply not be updated to work with the new version of Mail, or may just be experiencing a temporary hiccup that will benefit from a reinstallation.
If you are uncertain if you have any such programs installed, then try going to the Library > Mail > Bundles folder and remove any items in it. There are libraries in OS X that have instances of this folder. The first is the global one at the root of your hard drive (Macintosh HD > Library), and the second one is the one in your user account, accessed by holding the Option key and choosing Library from the Go menu in the Finder.
Remove and rebuild Mail's container
Mail is a sandboxed application in OS X, meaning that like many other applications it and its resources are isolated from other processes for security and stability reasons. As part of this setup, OS X will create a virtual container in which the program accesses the system resources it needs, and does so by accessing parts of the OS X filesystem through a special directory tree in your account's library. This directory tree primarily contains aliases, but also contains files specifically for Mail, such as its preference and cache files.
If you remove the container for Mail, OS X will simply rebuild it and have Mail re-create the files it needs; however, doing so will clear out settings contained in these files, requiring you to set these up in Mail again. These can include mail accounts, signatures, smart mailboxes, and mail filters, so if you remove and rebuilt Mail's container, expect to set these up again.
With this in mind, before clearing Mail's container, be sure you have a full backup of your Mac. Then access the Go menu in the Finder with the Option key held down, and choose the menu item called "Library" that appears. In the Library folder, go to the Containers directory and move the folder called "com.apple.mail" to your Desktop (so you can restore it easily, if needed). After this, re-launch Mail, configure your e-mail accounts and other settings, and you should be up and running again.
Again, because of potential complications with setting up Mail, use this option after you have tried all others, after you have created a full backup, and only do so if you cannot get Mail to launch properly by any other means.
UPDATE (10/20/2014): Added information about removing Mail's container as an option.
4.3. Safely deleting an account without losing email
We should first emphasize that you should always make a full backup on your own computer of everything related to your mail programme before making any changes. Be sure to include messages and settings.
With the Apple Mail application, if a POP3 mailbox (an "account") is deleted, it removes all messages associated with that mailbox, deleting them from your computer which may have the only copy of a message if you're not also storing them on our servers!
There are two kinds of mailboxes in Apple Mail ones that sync with an associated email server (these will be your inbox, sent items, trash, drafts and junk) and "On My Mac" mailboxes that only exist on your Mac.
To ensure that you don't lose your email data when we delete your old email account copy all messages into an "On My Mac" mailbox before we delete your account (Note: your account will only be deleted on the day of migration).
First, make a new local mailbox to store the messages after your account is deleted. Go to Mailbox > New Mailbox and this box will show up:
Create a folder called:
1 inbox 2 sent items 3 trash 4 drafts 5 junk (if you want to keep your junk)
The folders will look like this once you've created them:
Now starting with your inbox, select all the messages. Drag them to '1 inbox' under On My Mac. Do the same for sent items, dragging them to '2 sent', Trash to '3 trash', drafts to '4 drafts' etc.
Continue to do this on a regular basis up until the date of your migration. In doing this, it will help to save time and improve the process when we switch your accounts over.
5. Windows Live Mail
5.1. Import EML to Windows Live Mail
See the given steps to understand how to import eml files into windows live mail. The given instructions clearly explains the complete process to import and find location of Window Live Mail Store. So, don't worry if you have to import EML into Windows Live mail. As well as you can find out "Where does Windows Live Mail store messages" and "Where does Windows Live Mail store contacts". Here you can find solution for both.
Go to File > Click on Import Messages > Click on Windows Live Mail
Click on Browse button. See the emails. Click on Next button.
Either select all folders or a specific folder and then click on Next.
Folder will start exporting. Click on Finish.
Find Out Your Windows Live Mail Store:
Open Windows Live Mail, Select Tool > select Options.
In Option Window, click on Advanced Tab and then click on Maintenance button.
In the Maintenane Window, Click on the Store Folder.
Now you can see the Store Location.
6. Microsoft Office Installers (365 & Retail/Volume)
6.1. Deployment options for admins for Office for Mac
here are two basic ways that you, as an admin, can deploy Office for Mac to users in your organization:
Provide your users with the installer package file, and have them install Office for Mac for themselves
Download the installer package file to your local network, and then use your software distribution tools to deploy Office for Mac to your users
If you have an Office 365 plan, you can provide your users with instructions on how to download and install Office for Mac for themselves. To install Office for Mac, a user has to be administrator on the Mac or know an administrator account name and password.
But, if you deploy Office for Mac for your users, you have more control over the deployment, including which users get Office for Mac and when. To plan your deployment, review the following link for further information:
6.2. Plan your enterprise deployment of Office 365 for Business and ProPlus (PC)
Follow the steps in this article to choose how to deploy Office, how to manage updates to Office, and whether to deploy the Office files from a local source on your network or from the cloud. For Businesses, make sure you follow the Business instructions and not home.
If Office activation fails, you'll see Unlicensed Product or Non-commercial use / Unlicensed Product
in the title bar of your Office apps, and most features of Office are
disabled. To restore all features of Office, you'll need to fix the
problem that's causing activation to fail.
Step 1: Sign in to Office with the right account
If Office asks you to sign in, enter the account you
used to buy Office. You'll see "We couldn't find any Office products" if
you use the wrong address.
Please try signing in using all your personal email
addresses in case you bought Office using a different email address. If
you're at work or school, you may need to log in using your work or
school account instead of your personal email account.
To check if your Microsoft account is associated with Office, sign in to Services & subscriptions.
Your Office product or Microsoft 365 subscription should be listed
there. If it's not, your email address won't work for signing in to
Office.
Step 2: Check for multiple copies of Office
Activation can fail if you have multiple copies of Office
installed. Let's uninstall any versions of Office you aren't using
before we continue to troubleshoot.
Open Control Panel using the steps below for your operating system.
Windows 11 or Windows 10: On the Windows task bar, type Control Panel in the Type here to search box, select Control Panel in the search results, and then select Programs and Features.
Windows 8.1 or Windows 8: Right-click the Start button (lower-left corner), select Control Panel, and then select Programs and Features.
Windows 7: Select > Control Panel > Uninstall a program.
In the Search Programs and Features box (upper-right corner) of Programs and Features, search for the word office.
You might see multiple versions installed, like this:
If more than one version appears, right-click the version you aren't using and select Uninstall.
When the uninstall is finished, restart your computer.
Open an Office app and sign in, if prompted.
If Office still won't activate, try running an online repair as described in Repair an Office application to fix up the remaining install of Office. If you still can't activate, proceed to the next step.
Step 3: Check your Microsoft 365 subscription status
If you have a Microsoft 365 for home subscription, let's make sure it's still active and renew your subscription, if necessary.
If these settings aren't correct, Office activation might fail. Follow the steps below for your operating system.
Windows 11 or Windows 10
Close all Office apps.
In the bottom right-hand corner of your screen, select the date or time.
Select Date and time settings.
Select Set time automatically and, if shown, Set time zone automatically. If you don't have the option to set the time zone automatically, make sure your local time zone is shown in Time zone.
Restart any Office app.
Windows 8.1 or Windows 8
Close all Office apps.
In the bottom right-hand corner of your screen, select the date or time.
Select Change date and time settings.
If the date or time is wrong, select Change date and time and correct the date and time settings.
If the time zone is wrong, select Change time zone and select your local time zone.
Restart any Office app.
Windows 7
Close all Office apps.
In the bottom right-hand corner of your screen, select the date or time.
Select Change date and time settings.
If the date or time is wrong, select Change date and time and correct the date and time settings.
If the time zone is wrong, select Change time zone and select your local time zone.
Restart any Office app.
Tip: In Windows 7,
you can synchronize your computer clock with an Internet time server to
keep the computer clock up to date. To do this, select the date or time
in the bottom right-hand corner of your screen, and then select Change date and time settings. Select the Internet Time tab, select Change settings, select Synchronize with an Internet time server, and then select Update now.
Run Office as administrator
Running Office as administrator helps fix permission issues
that might cause Office activation to fail. Follow the steps below for
your operating system.
Windows 11 and Windows 10
Close all Office apps.
Press the Start button in the lower-left corner of your screen.
Type an application name, like Word. The Word program icon appears in the search results.
Right-click the Word icon, and select Run as administrator.
Select Yes to allow Office to run as administrator.
Windows 8.1
Close all Office apps.
In Windows 8.1, right-click the Start button in the lower-left corner of your screen, and then select Search.
Type an application name, like Word. The Word program icon appears in the search results.
Right-click the Word icon, and select Run as administrator.
Select Yes to allow Office to run as administrator.
Windows 8
Close all Office apps.
In Windows 8, move your mouse to the upper-right corner of your screen to open the charms bar, and then select the Search icon.
Type an application name, like Word. The Word program icon appears in the search results.
Right-click the Word icon, and select Run as administrator.
Select Yes to allow Office to run as administrator.
Windows 7
Close all Office apps.
Press the Start button in the lower-left corner of your screen.
In the Search programs and files box, type an application name, like Word. The Word program icon appears in the search results.
Right-click the Excel icon, and select Run as administrator.
If prompted, select Yes to allow Office to run as administrator.
Update Office
The latest Office updates might contain fixes to activation issues. To learn how to update Office, see Install Office updates.
Check your firewall
If you're using a firewall from another manufacturer, visit
the manufacturer's website for information about how to temporarily
disable the firewall. For Windows Firewall, please see below.
For information about how to turn off your antivirus
software, check your antivirus manufacturer's website. Uninstalling your
antivirus software may also help. Don't forget to reinstall it after
Office is finished installing and if you turned it off, be sure to turn
it on again.
If you're not sure which antivirus software you have, use the
following instructions to get to Control Panel to find the name of your
antivirus software.
Tip: Windows 10 comes with default antivirus software, Windows Defender. If you determine that you're using it, select the Start button > Settings > Update & Security, and then select Windows Defender on the left. Slide the button to Off. Remember to turn it On again.
Check your proxy settings
If you use your device both at home and at work, try
turning off the proxy settings in Microsoft Edge or Internet Explorer
before you install Office. If you’re using a different browser, check
their help to find out how to turn off proxy settings.
Microsoft Edge
Click the Start button (lower-left corner), and choose Settings.
Select Network & Internet, go to the bottom of the selections on the left side, and click Proxy.
In Automatic proxy setup, automatically detect settings or use setup script, by sliding to On or Off.
In Manual proxy setup, you can choose to use a proxy server. Generally, it will be off and if you slide it to On, be sure to select Save. And if it was off by default before you turned it on, be sure to slide back to Off when you've finished using it.
Internet Explorer 7, 8, 9, 10, or 11
In Internet Explorer, click Tools (upper-right corner) > Internet options.
Click the Connections tab, and then click the LAN settings button.
Under Proxy server, clear the option "Use a proxy server for
your LAN (These settings will not apply to dial-up or VPN connections)."
Click Apply and OK to save changes. Restart your computer.
8. Microsoft Office 2016 for Mac
8.1. Rebuild the database for Outlook 2016
Outlook 2011 had a proprietary database format and we (as users) had very few options to work with it. Outlook 2016 now uses a sqlite3 databases for its identity (just like Mail). While there is very little we can run from the app itself in terms of maintenance or troubleshooting, in theory we should be able to tap straight into the database through sqlite3 itself.
********* NONE OF THIS IS PUBLISHED/APPROVED/SUPPORTED BY MICROSOFT FOR OUTLOOK FOR MAC *********
As none of this is officially supported, I would recommend 1) BACKUP the database before anything. You need to backup the three files:
Outlook.sqlite
Outlook.sqlite-shm
Outlook.sqlite-wal
That are in the ~/Library/Group Containers/UBF8T346G9.Office/Outlook/Outlook 15 Profiles/Main Profile/Data folder.
2) QUIT Outlook. You can't run anything safely on the identity if it's still in use in Outlook itself.
- You can check the integrity of the database with the command: (triple-click the command to select all, then copy)
If everything is fine, the Terminal will return "OK" If you get a warning there, then obviously something in wrong in the database. In theory, Outlook should detect issues and automatically attempt to fix them, but there are been reports in the forums of identity failures and users no longer able to open up their identities. It might be worth attempting other "rescue" operations in these cases using additional commands like ".dump" etc. (which is beyond the point of this post: search for your favorite sqlite How To or Forum page for additional information on how to repair a corrupted sqlite3 database).
- A number of websites have illustrated how "vacuuming" the envelope index could help speed things up and trim the database in Mail. I figured that the same should apply to Outlook too. I ran the command in Outlook and the database shrunk a bit. No problem within Outlook whatsoever on my Mac, but who knows... (hence the very very strong suggestion to make a backup). "Vacuuming" will rebuild the database file, reclaiming free space and defragmenting tables and index. I'm not sure whether Outlook is currently using auto_vacuum or not, but I have read reports of abnormally large Outlook database files which makes me suspect it's not always taking place as it should if it is even enabled.
You can vacuum the database using: (triple-click the command to select all, then copy)
9.1. Tips and Best Practices when connecting to an Exchange account
Introduction
Outlook 2011 brings much better Exchange connectivity to the Mac than was experienced before its release. It behaves much more like the Outlook for PC than Entourage did. It requires Exchange 2007 or better, with Exchange 2010 or better recommended. Unfortunately, there are issues. Although more like the PC version, it is NOT a perfect replica. The following have all been seen: - Syncing and speed issues - Data corruption in the form of duplicated and/or missing items (Calendar & Mail) - Missing features that exist and are used in the PC version
The above items conspire to make it a less than ideal choice. It is, however, the best of the lot out there.
Below are some details regarding the issues we have seen at our university and some of the fixes or ideas that can be used to address those issues.
System Capacity
RAM - RAM plays a role; the more RAM the bigger the database the system can manage - Minimum should be 4 GB with 8 GB preferred for larger database/identities - Manipulating a 20+ GB database in Entourage failed with 2 GB of RAM - The same database task succeeded with 8 GB
Bandwidth - Minimum should be a fast DSL connection, with even that causing an identity creation taking many hours as it gets into the tens of gigabytes in size. - Consider downloading the message headers only if Outlook takes a long time to get or open messages.
Mailbox Considerations
Size Regardless of the above notes about size, the real issue is the number of items, not the total size in bytes. Although a 20+ GB database is indeed huge, having it made up of a lot of small emails can be harder on the system than if it were fewer, larger emails.
Ideally, keep the Inbox, Contacts and Calendar to 1000 items or less. According to several sources, the totals should be kept to no more than about 2500 - 5000 items in any of the critical path folders, namely Calendar, Contacts, Inbox, and Sent Items folder. I consider 5000 to be in the danger range, based on personal experience with Concordia clients and recommend an upper limit of about 2500 or so.
Having a large number of items in a folder will mean than operations in that folder will take longer, such as adding a new column to the view, sorting on a new column, finds and searches.
One option is to create folders containing older items that are not ready to be archived to the local drive. One could create a structure of the following nature on the server itself:
Folder issues Inbox syncs more often than other folders, once per minute: - It is important to keep this folder clean - When setting up an identity for the first time (or similar operation) the first 512 messages arrive, the rest is backfilled. No new mail is seen until this process is finished
Do NOT nest folders inside the Inbox. Place all those user-created folders at the same level as the Inbox. The user-created folders can contain sub-folders, although the greater the number of those can in turn add overhead to the system.
Make use of the export functions and the local storage afforded by the computer itself, if that is the only way to keep the bloat on the exchange server down to reasonable levels. It will mean that, like the PC, the mac user will be responsible for local backups but that is the price of keeping every single piece of email ever received or sent.
Presentation Outlook shows similar folders grouped together, such as all Inboxes, by default. Presumably such a setting is viewed as a convenience. The problem is that it hides the true size and folder complement of the mail accounts from the user. As well, it opens the door to moving folders from one account's inbox to another by accident.
If, instead, we turn off that feature and view each account as separate entities, their true scope is then seen in one nice chunk. It also eliminates accidental moves from account to another.
The feature is located in the "General" tab in the Preferences.
Quota information The user's quota is not reported fully from within Outlook 2011. As with previous generations of Outlook for PC, it is only possible to get the size of a given folder, including the parent Mailbox folder itself.
What is NOT available is the actual quota limit, something that is now easily done on a PC. That feature was added in PC Outlook 2010. Furthermore, it is not a good idea to assume that the user has your institution's default quota. There might already people with wildly differing quotas. The differences could grow as people in your organization begin to use the new system more aggressively.
There is, however, a workaround if your organization uses Outlook Web Access (OWA): 1) Log into OWA 2) Place the mouse over the mailbox name in the folder list. The quota will appear in a message box.
Database / Identity Maintenance
The identity in Outlook is where the entire mail environment is stored for that user. The database is part of that identity and contains the actual mail and attachments. Like any database, the file(s) involved need cleaning and fixing on occasion.
Rebuild or not? Should Outlook freeze upon launch, the usual culprit is the database. Rebuilding via the Database Utility is the usual fix. However, with Exchange only environments, another option is open to us. Assuming all the mail is on the server, it is often better to simply start from scratch. Using the Database Utility, one creates a new identity and points Outlook to that. Then one starts Outlook and creates the accounts all over again.
The previous identity can be kept for any mail stored locally. Better still would be to combine the export feature to create '.olm' files (Mac's '.pst' ) and simply re-import the data after making a new identity.
Conclusion
Keeping the critical areas of the server's Mailbox lean and clean as detailed above seems to go a long way in solving server based mail issues. For those who insist on keeping everything, encouraging archiving of some sort or another is the only alternative.
To recap: - Keep the number of items in the critical folders to a minimum. - Keep the number of plug-ins to a minimum. - Organize your email into a structure that facilitates both productivity and archiving. - Do NOT group similar items, forcing Outlook to display each account as a fully separate entity. - Downloading headers only is an option should Outlook still perform slowly. - Rebuilding is not always the way to go.
This article describes how to import Microsoft Entourage data, .pst or .olm files, and other data into Microsoft Outlook for Mac 2011.
Note: Note: ANSI-formatted .pst files - Outlook 97-2002 Personal Folders Files format cannot be imported into Outlook for Mac.
Import Outlook for Windows (.pst ) or Outlook for Mac (.olm ) data files
Before you start, make sure that the file that you want to import is located on your computer. For example, put the file in the Documents folder or in any other convenient location.
Note You must configure Outlook 2011 for Microsoft Exchange Server before you follow these steps. Otherwise, the procedure will not work.
Click File, and then click Import.
Click to select Outlook Data file (.pst or .olm). Click the right arrow
to continue.
Select the kind of file that you want to import, and then click the right arrow
to continue.
Locate the .pst file or the .olm file. Select the file, and then click Import.
Click Done.
Import from Entourage 2008 or Entourage 2004
You must set up your Outlook 2011 email account before you can import. Set up or recover Hotmail, Gmail, or AOL (POP or IMAP) email in Outlook for Mac 2011 After your Outlook 2011 email account is set up, follow these steps to import:
Click File, and then click Import.
Click to select Entourage information from an archive or earlier version. Click the right arrow
to continue.
Select Entourage 2008 or Entourage 2004, and then click the right arrow
to continue.
Select the items that you want to import. If you are not sure, do not make any changes at this point. Click the right arrow
to continue.
Click the Browse button.
Click Documents. Open the Microsoft User Data folder, and then open the Office 2008 Identities folder. Select your identity (click Main Identity).
Note These steps are based on an assumption that you have only one identity, and you have not renamed it.
Click the Choose button.
Click the right arrow
to continue, and then click Finish.
Import .csv or .mbox files
Click File, and then click Import.
Click to select Contactsor messages from a text file, and then click the right arrow
to continue.
Click to select Import Contacts from a tab (CSV) or Import messages from an MBOX- format text file, and then click the right arrow
to continue.
Locate the file, select the file, and then click Import.
Click OK.
Import holidays
Sets of holidays for different countries, regions, and religions are included in Microsoft Office applications. You can add any of these holiday sets to your Outlook calendar. To do this, follow these steps:
Click File, and then click Import.
Click to select Holidays, and then click the right arrow
to continue.
Click to select the country, and then click the right arrow
to continue.
Click OK when you are prompted, "The holidays you selected have been added to the calendar."
Click Finish.
9.3. The database could not be rebuilt (error)
Solution for this error:
Make sure you are upgraded to Service Pack 2 (SP2) 14.2.1 - 14.2.2 (you can confirm this by opening Word and looking under about Word)
Create a new blank Identity and remove the database (drag to trash)
Quit Outlook.
COPY these Data Records folders from the old Identity to the new blank Identity replacing the new identity folders. Do NOT replace the root Data Records folder. Only the sub-folders listed here.
Contacts
Events
Categories (not folders)
Mail Accounts
Message Attachments
Message Sources
Messages
Note
Signatures
Signature Attachments
Select to rebuild the new Identity in database utility; ignore any message that tells you that you need to rebuild your database while the database utility is working.
Open Outlook and your data should be back.
Most resources neglect to tell you to drag the new identity database to trash before you copy over the old identity records. Also, they may tell you to copy over the old identity folders records instead of the categories records, but don't as that is likely to cause a problem; it did for me.
10. Microsoft Outlook 2010
10.1. How to troubleshoot performance issues in Outlook 2010
Firstly the following can temporarily cause Outlook to be slow:
Is Antivirus software running? Is Windows Desktop Search Indexing? Is Outlook reconciling the OST or PST file following an issue? Please see related page for further information on these topics.
Antivirus programs and personal firewall programs can change or remove packets, rewrite files on disk, or alter the memory of running programs. All of these can cause problems for Outlook. Disable any antivirus programs and personal firewall programs.
AVG AntiVirus is known to cause problems with Outlook and the Outlook Connector. You need to disable the email scanning portion of AVG antivirus for Outlook to work properly. On most versions of AVG, the systray icon will change to a gray color when this is done.
The Google Desktop Search can cause excessive memory use and hangs when used with the Outlook Connector. You should uninstall it to confirm that it is causing your problem. If it is not the cause, you may reinstall it.
Are you running the latest version of Outlook 2010?
We recommend that you install the latest applicable Service Packs (SP) and hotfix packages. For more information about the latest applicable updates, click the following article number to view the article in the Microsoft Knowledge Base:
2625547 How to install the latest applicable updates for Microsoft Outlook (US English only)
If running Kerio Connect Client, disable Outlook Instant Search
Note that KOFF has its own built-in searching, and does not depend on the Outlook Instant Search feature.
If running Kerio Connect Client, disable 'Group by' view
In Outlook 2003 and above, there is an option to show emails in groups. If you find that folders such as the 'Sent Items' take an excessive time to load, it is recommended to disable the 'group by' view, which is the view option, 'Show in groups'.
Do you have a large .pst file or .ost file?
If you have a large .pst or .ost file, you may experience application pauses while you perform typical operations in Outlook. These typical operations include reading email messages, moving email messages, and deleting email messages.
When you use Outlook 2010, the following .ost size guidelines generally apply:
Up to 5 gigabytes (GB): This file size should provide a good user experience on most hardware.
Between 5 and 10 GB: This file size is typically hardware dependent. Therefore, if you have a fast hard disk and lots of RAM, your experience will be better. However, slower hard disk drives, such as drives that are typically found on portable computers or early-generation solid-state drives (SSDs), experience some application pauses when the drives respond.
More than 10 GB: When the .ost file reaches this size, short pauses begin to occur on most hardware.
Very large (25 GB or larger): An .ost file of this size increases the frequency of short pauses, especially while you are downloading new email messages. However, you can use Send/Receive groups to manually sync your mail. For more information about Send/Receive groups, see the "Are you synchronizing many RSS feeds?" section.
With Outlook 2010, the maximum size for a .pst file is now 50 GB. The default maximum size for a Unicode .pst or .ost file is approximately 50 GB. The following Microsoft Knowledge Base article describes how to increase the maximum size of a .pst or .ost file:
832925 How to configure the size limit for both (.pst) and (.ost) files in Outlook 2007 and in Outlook 2003
The following blog post describes how to reduce the size of your local data file by using synchronization filters:
This is a stop-gap solution and is provided here for reference if you cannot reduce the size of your mailbox. For example, you may be unable to reduce the size of your mailbox if you have to maintain an archive of all email messages, both sent and received, over a time span of several years.
Do you have many items in a single folder?
If you use .ost or .pst files
If you have lots of items in any single folder, you may experience performance issues during certain operations in Outlook while you use local data files. If you use Outlook to connect to a mailbox that is located on a Microsoft Exchange Server and use Cached Exchange Mode, Outlook synchronizes email and other items to an Offline Outlook Data (.ost) file. If you use Outlook to connect to other email accounts, such as POP3 or IMAP, Outlook stores email and other items to a local Outlook Data (.pst) file. These performance issues are especially noticeable when you switch into and out of folders that contain a large number of items.
If you have more than 50,000 items in a single folder, views other than Arrange By: Date can be slower. We recommend that you move several items in these larger folders to separate folders in the same store or to an archive store and that you use Arrange By: Date when you run Outlook 2010.
If you connect to Exchange in Online mode
If you are not using Cached Exchange mode, you should review one of the following resources. These resources document some performance issues on an Exchange server that has high item counts and restricted views. Additionally, the resources discuss how these performance issues might affect the overall client user experience.
For more information about poor performance when you are working with an Exchange Server mailbox folder that contains lots of items, click the following article number to view the article in the Microsoft Knowledge Base:
905803 Outlook users experience poor performance when they work with a folder that contains many items on a server that is running Exchange
For information about the performance effect of high item counts and restricted views, visit the following Microsoft web sites:
Understanding the Performance Impact of High Item Counts and Restricted Views
Do you have any nonessential add-ins or out-of-date add-ins installed in Outlook?
If you have nonessential add-ins installed, you may want to remove them from Outlook. To view the add-ins that are installed, follow these steps:
In Outlook, click the File tab.
Click Options, and then click Add-ins to display a list of the COM add-ins that are installed.
By default, the following COM add-ins are included in Office 2010:
Microsoft Access Outlook Add-in for Data Collection and Publishing
Microsoft Exchange Add-in
Microsoft Outlook Social Connector
Microsoft SharePoint Workspace Proxy for Outlook Add-in
Microsoft SharePoint Server Colleague Import Add-in
Microsoft VBA for Outlook Add-in
OneNote Notes about Outlook Items
Windows Search Email Indexer
Any other add-ins that are listed under COM add-ins were installed by other software.
To determine whether the performance problem is caused by add-ins, run Outlook in safe mode. To do this, press and hold Ctrl when you start Outlook. When Outlook starts in safe mode, all COM add-ins and Exchange Server client extensions are disabled.
If the problem no longer occurs when Outlook is running in safe mode, it is likely that one of the add-ins is causing the performance issue. To troubleshoot possible problems that are caused by COM add-ins or Exchange Server client extensions, disable any items that you do not use regularly. Then, restart Outlook. If that does not resolve the problem, disable the remaining add-ins one by one. If that does not resolve the problem, the issue may not be caused by an add-in.
To disable COM add-ins, follow these steps:
In Outlook, click the File tab.
Click Options, and then click Add-ins to display a list of the COM add-ins that are installed.
Select COM Add-ins in the Manage list, and then click Go.
In the COM Add-Ins dialog box, click to clear the check boxes for any COM add-ins that you want to disable.
Click OK, and then restart Outlook.
Reset Cache for Exchange, IMAP or KOFF
1. Close Outlook 2. Go to Control Panel -> mail -> accounts -> Kerio properties -> maintenance -> clear cache. 3. Re-create the offline Outlook Data File (.ost). See related article if you're unsure how to do this.
Enable AutoArchive
Your Microsoft Outlook mailbox grows as you create and receive items. To manage the space in your mailbox or on the mail server you are using, you can move old items that are important, but rarely used, to an archive location. This storage process occurs automatically with AutoArchive, but you can customize most of the default settings. For further information please see related article.
Repair the Application from the Software Control Panel
-------------
The following should be done if the above has not worked:
Create a new Profile
The Outlook profile is a frequent cause of problems. Many problems can be resolved by creating a new profile.
To create a new Outlook profile:
Open Control Panel -> Mail.
Open "Show Profiles". You will see a list of your current profiles.
Set "When starting Microsoft Office Outlook, use this profile" to Prompt for a profile to be used.
Click "Add" to create a new profile. Follow the steps and create an account of Additional Type, Kerio MailServer
Please make sure that you set "Default Delivery Location" to Kerio Outlook Connector Store. This is critical for Kerio Outlook Connector to function properly!
Complete the account with the information you have used to create prior Outlook Connector accounts
Do not create additional POP3 or IMAP accounts in this profile. This is not supported.
Note: When you create a new profile, you will not lose any mail, calendars or contacts. Your original profile will continue to be available. Your profile-specific settings will not be available in the new profile; these include default views, sorting options, and distribution lists.
Repair Outlook Data Files (.pst and .ost)
If your Microsoft Outlook Data File (.pst and .ost) won't open or you suspect that the data file is damaged, use the Inbox Repair tool (Scanpst.exe) to diagnose and repair errors in the file. The Inbox Repair tool checks the Outlook Data Files on your computer to see if they're in good shape.
Exit Outlook, and browse to <drive>:\Program Files or, if you see a Program Files (x86) folder on the same drive, browse to that instead. For example, C:\Program Files or C:\Program Files (x86).
In the Search box, type Scanpst.exe.
If the search doesn't find Scanpst.exe, try searching in the alternative folder mentioned in step 2, above Program Files or Program Files (x86).
Double-click Scanpst.exe.
In the Enter the name of the file you want to scan box, enter the name of the .pst file you want the tool to check, or click Browse to select the file.
By default, a new log file is created during the scan. Or, you can click Options and choose not to have a log created, or to have the results appended to an existing log file.
Click Start.
If the scan finds errors, you're prompted to start the repair process to fix them.
The scan creates a backup file during the repair process. To change the default name or location of this backup file, in the Enter name of backup file box, enter a new name, or click Browse to select the file you want to use.
Click Repair.
A copy of the log file is saved to the same folder as the .pst file.
Start Outlook with the profile that contains the Outlook Data File that you repaired.
Switch to the Folder List view in the Folder Pane by pressing Ctrl+6.
In the Folder Pane, you might see a folder named Recovered Personal Folders that contains your default Outlook folders or a Lost and Found folder. Although the repair process might recreate some of the folders, they may be empty. The Lost and Found folder contains any folders and items recovered by the repair tool that Outlook can't place in their original structure.
You can create an Outlook Data File, and drag the items in the Lost and Found folder into the new data file. After you've moved all the items, you can remove the Recovered Personal Folders (.pst) file. This includes the Lost and Found folder.
If you can open the original Outlook Data File, you may be able to recover additional items. The Inbox Repair tool creates a backup file with the same name as the original, but with a .bak extension, and saves it in the same folder. You may be able to recover items from the backup file that the Inbox Repair tool couldn't recover.
To recover items from the backup (.bak) file, make a copy of it and give the copy a new name with a .pst extension, such as bak.pst. Import the bak.pst file into Outlook, and then use the Import and Export Wizard to import any additional recovered items into the newly created .pst file.
10.2. Re-create an offline Outlook Data File (.ost)
Some account types, such as Microsoft Exchange Server, use an offline Outlook Data File (.ost). This type of data file is a copy of information saved on your mail server. If you encounter problems with an offline Outlook Data File (.ost), the file can be re-created by downloading a copy of your items again. We don't recommend repairing an offline Outlook Data File, so if your offline data file isn't usable, you should re-create it by doing the following:
Exit Outlook.
In Control Panel, click or double-click Mail.
Where is Mail in Control Panel?
Mail appears in different Control Panel locations depending on the version of the Windows operating system, the Control Panel view selected, and whether a 32- or 64-bit operating system or version of Outlook is installed.
The easiest way to locate Mail is to open Control Panel in Windows and then, in the Search box at the top of the window, type Mail.
Note The Mail icon appears after Outlook starts for the first time.
The title bar of the Mail Setup dialog box contains the name of the current profile. To select a different existing profile, click Show Profiles, select the profile name, and then click Properties.
In the Mail Setup dialog box, click E-mail Accounts.
Click the Data Files tab, select the Exchange account, and then click Open File Location.
A file explorer window opens to the location of the data file for the Exchange account. The Account Settings and Mail Setup dialog boxes will remain open, behind the file explorer window.
Close the Account Settings and the Mail Setup dialog boxes, then return to the file explorer window.
Important Be sure to close these two dialog boxes before you delete the file. If they aren't closed, Windows may display an error message about a conflict.
In the file explorer window, right-click the Exchange data file and then click Delete. The next time you start Outlook, a new .ost file is created for the account.
10.3. About Windows Desktop Search
Windows Desktop Search (WDS) indexes all data in .ost files and .pst files. However, the indexing of Outlook data occurs only when Outlook is running. Therefore, you may have to leave Outlook running overnight to determine whether performance issues are related to the building of your search indexes.
Performance issues may increase when Outlook is running in online mode. Such performance issues occur because running Outlook in online mode increases the load on the Exchange server. This performance issue is especially noticeable when Outlook is configured in a nondefault state to index the items from the Exchange server to the local client index, and if more than one user indexes the Outlook data at the same time by using Windows Desktop Search.
To determine the indexing status for Outlook data in Outlook 2010, follow these steps:
Click the search box above the list of email messages. The Search tab is enabled as soon as you do this.
In the Options section, click Search Tools, and then select Indexing Status.
In the Indexing Status dialog box, view the number of items that remain to be indexed.
The built-in back-off mechanisms in the indexing component of Windows Desktop Search pause the indexing of Outlook data when the system is under heavy use. The easiest way to let the indexing finish is to leave Outlook running overnight.
Additionally, you can reduce performance issues by running Outlook in Cached Exchange Mode. In this mode, Windows Desktop Search searches the local copy of the mailbox instead of the mailbox content on the server.
10.4. Outlook reconciliation process causes delay
If the .pst file or the .ost file shuts down incorrectly, you may receive one of the following error messages the next time that you start Outlook:
Error message 1
Outlook cannot open the data file filename until it has been checked for problems.
Error message 2
Microsoft Office Outlook' exited without properly closing your Outlook data file 'drive:\Users\username\AppData\Local\Microsoft\Outlook\outlook.ost'. 'Microsoft Office Outlook' must be restarted. If this error message recurs, contact support for 'Microsoft Office Outlook' for assistance.
Error message 3
The data file filename was not closed properly'. This file is being checked for problems.
If you receive one or more of these error messages, you may experience performance issues until Outlook finishes the reconciliation process for the .ost file or for the .pst file. The following gear icon appears in the status bar while Outlook checks the data file in the background:
When this icon disappears, the .pst file or the .ost file is reconciled. If you are running Outlook 2010, the reconciliation process will pause at shutdown and resume (from where it was paused) the next time that you start Outlook.
An incorrectly shut down .ost file or .pst file may occur for one of the following reasons:
Antivirus scanning of the file
Forced Microsoft Windows shutdown before the Outlook.exe process shuts down completely
Outlook add-ins
If you see this issue frequently, and you have to exit Outlook shortly before you shut down your computer, it may be better to shut down Windows while Outlook is still running. We recommend that you do this instead of exiting Outlook and then shutting down Windows shortly after that.
10.5. AutoArchive: Automatically move or delete older items
Automatically move or delete older items with AutoArchive
Your Microsoft Outlook mailbox grows as you create and receive items. To manage the space in your mailbox or on the mail server you are using, you can move old items that are important, but rarely used, to an archive location. This storage process occurs automatically with AutoArchive, but you can customize most of the default settings.
Note The Archive command and AutoArchive feature doesn't appear for any account in your Outlook profile if you include an Exchange Server account and your organization uses Microsoft Exchange Server Online Archive. Your network administrator can also disable this feature.
Note Items in your mailbox might be subject to your organization's retention policies or messaging records management. When applied to a Microsoft Exchange account, these policies take precedence over AutoArchive settings. The AutoArchive feature is removed from any Outlook profile that contains a Microsoft Exchange account with retention policies.
Review or change the default AutoArchive settings
AutoArchive moves items from their original location in Outlook to an archive file folder when they expire, that is, when they pass their aging period. You can also set options for items to be deleted when they expire.
Items are stored in their archived locations unless you change one or more AutoArchive settings, or choose to have the items automatically deleted when they expire. If the setting is to Delete expired items, those items are not archived but are deleted permanently. Items can be automatically deleted only before they are moved to their archive location. Items that are already archived can only be deleted manually.
Tell me more about when specific Outlook items expire
The different kinds of Outlook items, such as messages, appointments, and tasks, have different aging periods. These default aging periods do not change unless you change the settings for them manually. The default aging periods for Outlook items are as follows:
Folder
Aging period
Inbox and Drafts
6 months
Sent Items and Deleted Items
2 months
Outbox
3 months
Calendar
6 months
Tasks
6 months
Notes
6 months
Journal
6 months
Contacts
Do not expire
Note Folders you create that contain the same type of items as Inbox, Calendar, Tasks, Notes, or Journal have the same default, six-month aging period.
The point at which an item begins to age is determined by its type:
Item type
When the aging period starts
E-mail message
The received date/time or when you last changed and saved the message, whichever is later.
Meeting, event, or appointment
The date when you last changed and saved the item, whichever is later. Recurring items are not AutoArchived.
Task
The completion date or when you last changed and saved the task. Tasks that are not marked complete are not AutoArchived. Tasks assigned to other people are archived only if marked complete.
Note
When you last changed and saved the note.
Journal entry
The date the Journal entry was created or when you last changed and saved the entry.
Contact
Contacts are not archived by default. However, you can manually archive them.
The first time that you run Outlook, AutoArchive is turned on by default and runs every 14 days. You can change how often AutoArchive runs, specify the Outlook data file (.pst) used to store archived items, and choose when items in your Outlook folders are subject to being archived.
Click the File tab.
Click Options.
Click Advanced.
Under AutoArchive, click AutoArchive Settings.
Select the Run AutoArchive every n days check box, and then specify how often to run AutoArchive.
Select any other options that you want. You can choose to have old items deleted automatically at AutoArchive.
Notes
If you change the archive file listed under Move old items to, this new file will be used each time that AutoArchive runs.
Set the default folder options first, and then customize individual folder settings. Otherwise, you may unintentionally change the default settings.
Change the AutoArchive settings for an individual folder
In the folder list in the Navigation Pane, right-click the folder that you want to change, and then click Properties on the shortcut menu.
On the AutoArchive tab, select the options that you want.
11. Microsoft Outlook 2007
11.1. How to Import or export a folder in Outlook 2007
To export (archive, back-up) a mail folder do the following in Outlook 2007:
Open Outlook.
Click File -> Import and Export.
Choose Export to a file, then select Personal folder file (.pst).
Pick the folder to export (if you choose the topmost folder where it says Mailbox and check the include subfolders box all of your Outlook data will be exported).
Decide where to save the exported file to using the Browse button.
Decide what to do with duplicate data in case it happens. Go with the default if you are unsure.
Usually select no encryption, but if you really need it then REMEMBER YOUR PASSWORD!
To import a folder(s) back in:
Open Outlook.
Click on the folder where you want to import your data into first.
Click File -> Import and Export.
Choose to Import from another program or file.
Select Personal folder file (.pst) and then Browse to find the file to import.
Choose your options regarding duplicate items.
Select the folder to import from the list of folders that you backed up. Check the include subfolders box if you want folders within the top level folder to be imported.
Choose to import into the current folder you selected when you started or into the same folder. Be careful with the same folder option, you can clutter one of your real folders this way by accident.
12. Microsoft Lync 2011
12.1. Setting up Microsoft Lync
Download the Client
The Microsoft Lync client can be downloaded from here.
Install the Client
Double click on the disc image within your downloads folder if the image fails to open automatically.
Click Continue on the "Install Microsoft Lync For Mac" screen or click the "Lync Installer" button in the Microsoft Lync window. Follow the instructions for installing Lync.
Signing In
Click the Lync icon to start the application. This can be found either in your dock or by accessing the 'Go' menu from the Finder and selecting 'Applications.' Double click on the Microsoft Lync icon to launch the application.
If the login screen fails to open, please click on the Lync icon in the dock and then go to the 'Status' menu and 'Sign In'
(1) From the Sign In window enter your email address and leave the 'Sign In as' tab set to 'Automatic'. (2) Enter your user ID. This is normally your network login credentials for the domain. (3) Enter your password and select the 'Remember my password' check box.
Click on the 'Sign In' button to complete the login process.
For more information about the Microsoft Lync: Mac 2011 client, see: http://www.microsoft.com/mac/enterprise/lync
Note: Mac Lync 2011 passwords cannot be more than 16 characters in length.
13. Microsoft Office 2016
13.1. 'Compile error in hidden module:link' on launch (Word/Excel)
To fix go to ~/Library/Group Containers/UBF8T346G9.Office/User Content/Startup/Word/
Inside the above Word folder you'll find a new file (dated 30 Jun 16) called "linkCreation.dotm". Remove this file.
The issue should now be resolved.
13.2. The length of the full path of the Office document exceeds the maximum path length allowed
The full path of the Microsoft Office document includes the drive letter or server name, and all characters and folder names up to and including the name of the document. The entire path cannot be longer than 242 characters in Word, or 218 in Excel.
To correct this error
Make the complete path to the document shorter by saving it in a location that has fewer nested folders, or by shortening the file name of the document.
13.3. Windows Preview Pane locks files for extended period
THE INFORMATION IN THIS ARTICLE APPLIES TO:
WAFS, all versions
SYMPTOM
On a Windows Vista or Windows 7 computer, you may see a "File in use" or "File_name is locked for editing by user_name" message when opening a Microsoft Office document (e.g., Excel or Word file) in a remote shared folder in Windows Explorer that used the Details view and the Preview Pane layout. This is caused by Windows holding a lock on the files for longer than normal, which is behavior associated with the Details view and Preview Pane layout. Per Microsoft Support, the cause of this issue is a sharing violation that happens between the operating system and the Office application over a network resource.
WORKAROUNDS
On desktops accessing the files on a remote shared folder, modify the following settings to disable the Windows functions that cause this behavior:
Windows Explorer:
Click one of the following: Tools > Folder Options > View or Organize >Folder and search options.
Clear Show pop-up description for folder and desktop items.
Clear Show preview handlers in preview pane.
Click Organize -> Layout.
Clear Details Pane.
Clear Preview Pane.
In Office 2010:
Go to File > Options > Trust center > Trust Center settings.
Clear Protected View.
Click OK.
In Office 2010/2013:
Go to File > Options > Trust center > Trust Center settings > Trusted Locations.
Place a check next to Allow Trusted Locations on my network as shown below.
To prevent Windows 7 preview functions from causing documents to open read-only, create the following registry entries:
The attached ZIP file contains a separate REG file for each of the registry entries below. If you can't download the attachment, copy and paste the text below into a text file and save it as one REG file.
2. In the View menu, click the Change View drop-down menu.
3. From the Change View drop-down menu, click the Apply Current View to Other Mail Folders... option.
4. From here, you may select specific folders to apply the view or select the Apply view to subfolders check box to apply the view to all subfolders, then click OK.
13.5. Outlook Registry FIles
This guide is not for the faint hearted but still is useful if you are interested in the location of a specific file or its purpose and whether or not is possible to migrate it to another computer.
When you launch FileMaker, the default setting is this screen. It is useful if you are always creating new databases, otherwise it can be kind of annoying and confusing. So, my suggestion is to first turn off this screen. This is done by clicking the small check box near the bottom left of the screen, labeled 'No longer show this dialog'. (you can always turn it back on in the FileMaker Preferences screen).
Click the No Longer show this dialog option
Then click on the 'Open an existing file' button
and finally, click the OK button bottom right.
14.2. Add a favourite Host
Click on file menu and then Open...
Click Remote...
Select from the pop up tab favourite hosts
Click Add
Edit Favorite Host dialog box
Enter the following information: The IP address for the appropriate database and inside the Favorite Host's Name a meaningful name.
Then click save.
Note: you will have to click on the Hosts: (get the IP address from your manager) line in the Hosts box for the databases to show up in the Available Files area.
So now, click on the database you want on the right hand side and then click the 'Open' button.
15. Retrospect
15.1. How to run a full backup
Summary
This article describes how to run a full backup from an existing script using the 'Recycle Media Set' action. It is assumed that the most recent weekly or monthly backup failed and you now need to manually rerun the script. This article only applies to Retrospect versions 8 and 9.
Running a manual full backup
1. Before you can run a recently missed full backup, you need to know which script and media you are supposed to be working with. To identify the correct script and media, go to 'Activities' in the left side bar and then select 'Past' from the search criteria. Locate the date of the last full backup or current backup week.
In the example above, our current backup week is WK04 and can be clearly seen from the Destination column.
2. Now click on 'Scripts' from the left side bar. Select the appropriate script and click on 'Run'.
Tip: If you're unsure which script to choose, then go back to 'Activities', select the date of your missed backup and click on the 'Log' button. The first line will read 'Normal backup using <name of script>.
Our example above is pretty straightforward as the script is clearly named WK0204 and it's WK04 which we want to run.
3. Select the appropriate backup media set which in our example is WK04 and then select 'Recycle Media Set' from the 'Media Action' tab at the bottom of the window.
4. Ensure that the correct media is attached to your server.
5. Click on the 'Backup' Button.
6. You can monitor the progress of the backup by going back to 'Activities' and click on 'Running.'
If you see the a flashing tape/cartridge symbol next to 'Activities' in the side bar, then you must insert the correct media before the backup will continue.
This type of backup might take several hours to complete.
16. Adobe Creative Cloud
16.1. Accept the email invitation to join Creative Cloud for teams or enterprise membership
How to become a Creative Cloud team member: Accept the invitation.
Accept the email invitation
To gain access to a Creative Cloud for teams or enterprise membership, your IT administrator has to invite you. If the IT administrator has sent the invite, and you can’t find the email invitation, ask the administrator to resend it.
Your IT administrator emails you an invitation to join the team.
To create an individual Adobe ID and password to use your team or enterprise membership, follow the link in the email. On the page that opens, enter the email address at which you received the invitation as your Adobe ID, create a password, andsign in.
Note:
If you can't find the email from your administrator, search for an email from message@adobe.com or with subject "Join your team". If that does not work, contact your IT administrator to ensure @adobe.com has been white listed.
Click Accept Invite. Once you accept the invitation, you become a team member.
Note:
If you already have a Creative Cloud membership, you can maintain more than one membership (for example, an individual membership and your company's team membership). Alternatively, to cancel your individual membership at no penalty and re-enroll with the team or enterprise membership, contact support.
To activate your new team membership, sign out and sign back in to Creative Cloud, using the Adobe Creative Cloud desktop app.
To open the Creative Cloud desktop app, click the Creative Cloud icon, located in the taskbar (Windows) or Apple menu bar (Mac OS).
In the Creative Cloud desktop app, click Sign Out from the Profile menu.
In the warning dialog bog that appears, click Sign Out again, to confirm.
The Adobe sign-in window appears. To activate your new membership, sign in using your Adobe ID and password.
Note:
If you haven’t yet downloaded the Creative Cloud desktop app, download and install it from the Creative Cloud desktop app page.
Alternatively, you can deactivate and reactivate your membership by signing out of any Creative Cloud app already installed on your computer. Signing out of one Creative Cloud app deactivates all apps associated with that Adobe ID on that computer.
Launch an app, such as Photoshop, and choose Help > Sign Out.
Close the app, and then relaunch it.
To activate your new membership, choose Help > Sign in, and sign in with your Adobe ID and password.
From your admin console you can add licenses any time. However, you
have to place an order with your CIT (UK) within 30 days from your
billing anniversary date, to complete the transaction. If you don’t
place your purchase order within 30 days, you can't add any more
licenses, and your unpaid licenses are deactivated. All additional
licenses co-terminate with your original anniversary date.
To purchase more licenses, do the following:
In the Admin Console, navigate to Account.
Click Add Products.
In the list of products that appears, add licenses to the products available, or add more licenses to the existing products.
3. To review your order, click Next.
4.If you have purchased the membership from a reseller, to allow your
Account Manager to match this request with your purchase order, enter
the PO Number.
16.3. Deactivate a user (Inactive status)
When you remove a
user, all permissions and access to services conferred by the
organization are revoked. For example, the licenses for products are
revoked and users are unable to use the products.
Adobe ID type users own and manage their IDs, so
removing a user with an Adobe ID only removes a user from the
organization. Users can still access Creative Cloud, and other Adobe
services as a free member. Any files or folders stored on Creative Cloud
remain available to the user.
On the other hand, the organization owns and manages Federated and Enterprise IDs.
When an administrator deletes a user, the ID is deleted permanently.
Users lose access to any associated data, and then even administrators
cannot access the account or data of the user. For example, the URL for a
document published online using
InDesign cannot be accessed, if the user who published the document is
deleted. For this simple reason, Adobe recommends Admins to add users
only with Federated and Enterprise IDs.
If you only want to revoke access to products and services, without deleting any associated data, do not delete the user but remove the user from any product profile that confers entitlements.
Individual users
To remove users who are part of an organization that you own as a domain owner or trustee, do the following.
From the list of users that displays, select the users clicking the check box to the left of their names.
Click Remove Users.
In the Remove Users dialog box that displays, click Remove Users.
The users are removed from the Admin
Console, and all permissions and access to services conferred by the
organization are revoked.
16.4. Add Users
To set up your organization, you can start with adding users. For Creative Cloud for enterprises, there are three available identity types that
you can choose from: Federated ID, Enterprise ID, and Adobe ID. Adobe
recommends choosing Enterprise ID or Federated ID to control account and
data ownership. Creative Cloud for teams only support Adobe ID.
Enter the email address of the user and select an identity type from the drop-down list.
See the table below to learn more about each identity type.
Identity type
Account ownership
Data ownership
Enterprise features and storage
Enterprise ID
Enterprise
Enterprise
Yes
Federated ID
Enterprise
Enterprise
Yes
Adobe ID
Individual user
Individual user
No
Note:
Adobe strongly recommends enterprises to
minimize the number of Adobe IDs in their organization. Enterprise
organizations should be assigning Creative Cloud seats to Enterprise ID
and Federated ID accounts. Adobe is updating your organization's storage
to be allocated at the organization level as opposed to the individual
level. In this case, you cannot assign Creative Cloud seats to Adobe ID
accounts.
However, if your organization has non-Creative Cloud products, such
as Acrobat DC, you can add any type of users to these products.
For an Enterprise ID, select the Country of the user. For a Federated ID, enter an SSO Username and select the Country of the user.
Optionally, enter the First Name and Last Name of the user.
Note:
The SSO Username depends on your SSO configuration, and can be either the organization LDAP or organization email address for that user.
To assign products to the user, navigate to Assign Products.
The list of products that displays, is based on the purchase plan of your organization.
For enterprise accounts, click a product and select a profile for the product. For teams accounts, select the product to assign to the user.
To add the user to a user group, navigate to Assign User Groups, and select the user groups. The products associated with the selected user groups are assigned to the user.
Click Save.
The user is added, and displays in the Users list.
If you assign an admin role or a
product profile to users, they receive an email notification. Users must
follow the link to complete their profile, if prompted.
16.5. Change the Contract Owner
Change the contract owner
The contract owner is the primary
administrator or the system administrator with access to the contract
details and the billing history. If you are the current contract owner
and you have purchased the Teams membership through Adobe.com, you can
nominate an existing system administrator (secondary administrator) as
the contract owner.
There can be only one contract owner at a time. When you nominate
another contract owner, the nominee receives a notification email and
you become a system administrator. The nominated user must also have the
same country settings as yours.
If you are the only system administrator on the team, first, add the user who you want to make the contract owner, as a system administrator.
In the Admin Console, navigate to Account.
Under Contract Details, click Change.
To nominate the contract owner, select a user in the Change Contract Owner window.
Note:
If the intended user is not available in the list, click Cancel, and add that user as a system administrator. Then try changing the Contract Owner again.
Click Save.
A notification email is sent to the nominee.
16.6. All Apps: Troubleshoot Windows system errors, freezes
Troubleshoot Windows system errors
Symptoms of Windows system errors include a blank or flickering dialog box, a frozen cursor or screen, a blue screen, an unexpected restart, or a Windows error message.
Please review the following article: https://helpx.adobe.com/x-productkb/global/troubleshoot-system-errors-freezes-windows.html
16.7. Controlling Access to Adobe Creative Cloud Services
This information explains the requirements for using Adobe Creative Cloud software services in a corporate environment. Although the applications are installed and used locally on each computer, for the licensing to operate, it is a requirement that each client computer can communicate with the Adobe servers at least once every three months. It is also useful if the applications can access the update servers to ensure the software remains up-to-date. The two primary addresses which must have unrestricted access are listed below. In addition, please read through the attached documents within this article. They will explain the requirements for running Adobe Creative Cloud Services on a corporate network and also additional Adobe servers which should be considered for whitelisting.
The following host/port combinations may need to be whitelisted when logging in with an Adobe ID to download, install, and activate licensing for applications via a Creative Cloud membership.
ccmdls.adobe.com:443
ims-na1.adobelogin.com:443
na1r.services.adobe.com:443
prod-rel-ffc-ccm.oobesaas.adobe.com:443
lm.licenses.adobe.com:443
ccmdl.adobe.com:80
swupmf.adobe.com:80
swupdl.adobe.com:80
For a comprehensive listing of all network endpoints for Adobe websites and services please click here.
16.8. Issues when attempting to log into Adobe Creative Cloud
Solution 1: Update to the latest version of Creative Cloud.
In most cases, Creative Cloud downloads and installs the update automatically when you sign in. If you're unable to sign in from the Creative Cloud application, then do the following:
Sign in with the Adobe ID associated with your Creative Cloud account.
Download and install the latest version of the Creative Cloud app.
Launch Creative Cloud and sign in.
Solution 2: Clean up cached user login information.
Close the Creative Cloud application.
Navigate to the OOBE folder. Windows: [System drive]:\Users\[user name]\AppData\Local\Adobe\OOBE Mac OS: /Users/[user name]/Library/Application Support/Adobe/OOBE
Delete the opm.db file.
Launch Creative Cloud.
Solution 3: Reinstall Creative Cloud and clean up cached user login information.
Uninstall Adobe Creative Cloud.
Windows
Open the Windows Control Panel > Programs And Features.
Choose Adobe Creative Cloud and click Uninstall/Change.
Follow the onscreen instructions.
Mac OS
Open Finder and go to /Applications/Utilities/Adobe Installers.
Double-click Adobe Creative Cloud to remove.
Follow onscreen instructions.
Repeat the steps from Solution 2 to clean up cached user login information.
Repeat the steps from Solution 1 to reinstall the latest version of Creative Cloud.
Launch Creative Cloud.
16.9. Troubleshoot the Welcome Screen
Disable the Welcome Screen
If you're using a trial, you cannot disable the Welcome Screen. We hope the tutorials will be helpful in getting started with Photoshop CC or learning about the new features available in Photoshop CC.
If you're a paid Creative Cloud member, after the Welcome Screen loads, scroll down to the bottom of the New Features, Getting Started, or Tips & Techniques sections. Select Don't Show Welcome Screen Again. To display the Welcome Screen again, choose Help > Welcome.
Note: In recent versions of Mac OS, scroll bars don't display by default. To turn them on, open System Preferences > General. Select Always or When Scrolling in the Show scroll bars section.
If you are not able to get to the Don't Show Welcome Screen Again option, run the below script to turn off the Welcome Screen. You can view it by choosing Help > Welcome.
Exit Illustrator, InDesign, and Photoshop.
Download the prevent_project_hello_launching.jsx.zip file below. Remember the downloaded location.
Double-click the downloaded file to decompress it. On Windows, choose to extract all files. The decompressed script is named prevent_project_hello_launching.jsx. Remember the location of the decompressed file.
Copy the decompressed file to the following locations:
Illustrator
Windows: C:\Program Files\Adobe\Adobe Illustrator CC 2014\Support Files
Note: In Photoshop CC 2015, you can disable the Welcome Screen by going to Preferences > General and placing a check mark in the box next to "Do Not Show Welcome Screen On Launch."
Welcome Screen doesn't display
The Welcome Screen is not visible for a subset of paid Creative Cloud and trial customers. All the learning content in the Welcome Screen is available with Creative Cloud Learn on Adobe.com: https://helpx.adobe.com/photoshop/tutorials.html
The Welcome Screen doesn't display for people who are not signed into their Creative Cloud account with their Adobe ID. Instead, you see a dialog box that says "To use the Welcome dialog, please sign in to Creative Cloud."
The Welcome Screen also does not display if you have something other than English set for the user interface language in Photoshop.
Welcome Screen freezes Photoshop or computer
Determine if the computer or Photoshop is frozen.
Move the Welcome Screen by dragging the title bar.
Close the Welcome Screen by clicking the close button.
If you can do any of the above, the computer has not frozen. If the "Welcome Screen is blank or content takes a long time to display", see Welcome Screen is blank.
Welcome Screen is frozen
The Welcome Screen could appear to be frozen, but is actually taking a long time to display. See the sections below to determine if it is frozen or not.
If the Welcome Screen is frozen, try these solutions:
Solution 1: Clear your recent files.
If the Welcome Screen is frozen, try closing the Welcome Screen. If you can close it and keep working in Photoshop, it could be that a file you recently opened contains characters that can cause this issue to occur. Choose File > Open Recent > Clear Recent File List to remove this data from Photoshop's history.
Solution 2: Update or disable your virus protection software.
An old or damaged version of virus protection software can prevent the Welcome Screen from displaying. Temporarily disable your virus protection software, and see if the Welcome Screen opens normally. If it does, reinstall or update your virus protection software.
Welcome Screen is blank
The Welcome Screen is HTML-based. Anything that can affect a web page loading can also affect the Welcome Screen, including virus scanners, firewalls, and network connection issues.
Solution 1: Close the Welcome Screen and work in Photoshop.
The Welcome Screen might not be frozen, so try to close the Welcome Screen and continue to work in Photoshop.
Solution 2: Reset your preferences.
To re-create the preferences files for Photoshop, start the application while holding down Ctrl+Alt+Shift (Windows) or Command+Option+Shift (Mac OS). Then, click Yes to the message, "Delete the Adobe Photoshop Settings file?"
Solution 3: Update or disable your virus protection software.
An old or damaged version of virus protection software can prevent the Welcome Screen from displaying. Temporarily disable your virus protection software, and see if the Welcome Screen opens normally. If it does, reinstall or update your virus protection software.
Solution 4: If you encounter a blank Welcome screen along with the message 'JavaScript Prompt - File:/// , SERVER CREDENTIALS REQUIRED', launch a separate browser and log in to your local network with your user name and password.
Solution 5: Whitelist the required URLs in your firewall
The following URLs are used to download the content of the Welcome Screen. If they are blocked, your Welcome Screen remains blank.
helpx.adobe.com
wwwimages2.adobe.com
adobe.demdex.net
stats.adobe.com
Solution 6: Disable your network connection
While a network connection is available, the Welcome Screen attempts to use it to update content. If there is any form of network security which blocks any part of this communication, the Welcome Screen will not load. If you are not connected to the Internet at all, the Welcome Screen loads using preinstalled offline content. If the Welcome Screen loads while disconnected from a network, it means a form of security not mentioned above may still be blocking the Welcome Screen. See Troubleshoot Connectivity Issues for further steps.
This article is based upon the following Adobe Knowledge Article: https://helpx.adobe.com/photoshop/kb/troubleshoot-welcome-screen-photoshop.html
16.10. Troubleshoot Mac OS 10.x system errors, freezes | Adobe software
Remember to look in the following locations when removing application settings:
Application Data (Global, all users, application-based): Mac HD > Applications > Adobe Application Name > Look for a Presets folder or similar.
Library - Application Support (User-based): Mac HD > Users > ~Username > Library > Application Support > Adobe > Adobe Application Name
Library - Preferences (User-based): Mac HD > Users > ~Username > Library > Preferences > Adobe Application Name
17. Adobe InDesign
17.1. InDesign crashes upon launch while attempting to recover a damaged document
Issue
InDesign continues to crash each time you try to re-start.
Reason
Documents can become damaged while working on them in InDesign, or they can contain damaged information, for example, due to hard drive or other disk read/write errors. The situation can occur when InDesign opens the file initially, but then cause a crash because InDesign tries to read or write from or to a damaged portion of the file.
The InDesign document recovery feature tries to automatically open InDesign documents which were open during the time of an application crash. If the document it is trying to open is damaged, then it can cause InDesign to crash each time you restart InDesign.
Solution
Remove the file or files from the document recovery folder.
Move these files to your desktop, and attempt to recover them using the methods described in, "Troubleshoot damaged InDesign documents" (TechNote kb403982).
You can change the document recovery folder in the user preferences. The default path is listed below, but check the location in Preferences > File Handling > Document Recovery Data to be certain.
To restore the software to default setting which will enable you to select a new company data location, you must do the following:
Go to the C Drive, programdata folder and the Sage Payroll.
Rename the following files:
pay.usr to pay.old payroll.usr to payroll.old
Check the paydata text file to ensure that paydata still points to the C Drive>program files where the application is stored locally.
Now launch Sage Payroll. You will need to enter your serial number and license details. Sage technical support will provide this if they are lost.
Once the licensing has been entered, you will then be able to enter the company data location. You can do this by either browsing to the correct location or entering the folder path manually.
19. Internet Explorer
19.1. Support Versions of IE from January 2016
Operating System
Supported version of Internet Explorer (as of January 12th, 2016)
Windows Vista SP2
Internet Explorer 9
Windows Server 2008 SP2
Internet Explorer 9
Windows 7 SP1
Internet Explorer 11
Windows Server 2008 R2 SP1
Internet Explorer 11
Windows Server 2012
Internet Explorer 10
Windows 8
Microsoft recommends upgrading to Windows 8.1
Windows 8.1*
Internet Explorer 11
Windows Server 2012 R2*
Internet Explorer 11
Windows 10*
Internet Explorer 11
Windows Server 2016 Preview*
Internet Explorer 11
19.2. Fixing site display problems with Compatibility View
Sometimes, websites don't look like you expect them to images might not appear, menus might be out of place and text could be jumbled together. This might be caused by a compatibility problem between Internet Explorer and the site you're on. Sometimes, this can be fixed by adding the site to your Compatibility View list.
To add a site to the Compatibility View list
Open the desktop, and then tap or click the Internet Explorer icon on the taskbar.
Tap or click the Tools button , then tap or click Compatibility View settings.
Under Add this website, enter the URL of the site you want to add to the list, then tap or click Add.
Note
If you add a site to the Compatibility View list and the page looks worse, the problem might not be compatibility and you should remove the site from the list.
Once you've turned on Compatibility View, Internet Explorer will automatically show that site in Compatibility View each time you visit it. You can turn it off by removing it from your compatibility list.
20. Firefox
20.1. Recovering important data from an old profile
A Firefox profile stores all of your important data, such as your bookmarks, history, cookies, and passwords. This article explains how to copy the files to a new profile, lists important files in the profile and describes what information is stored in these files.
If you are having a problem with Firefox then sometimes, rather than trying to find and fix the exact cause of the problem, it is easier just to make a new Firefox profile and copy your most important data over to it. The Refresh Firefox feature will do this for you automatically.
Note: Because your preferences and extensions are often the causes of problems, this article does not explain how to copy these between profiles. Therefore, if you follow the steps in this article, you will have to reinstall your extensions and reconfigure your Firefox preferences afterward.
Before starting it is recommended that you make a complete backup of your existing Firefox profile in case something goes wrong. Please read the Back up and restore information in Firefox profiles article for instructions on how to do this.
Hold down the Ctrl key while you click on a file you want to copy and choose Copy.
Open the new Firefox profile folder.
Hold down the Ctrl key while you click inside the profile folder and choose Paste Item.
Repeat steps 4-6 for each file you wish to transfer over to your new profile folder.
While copying your personal data from an old Firefox profile to a new Firefox profile, it is possible that you could copy over the file that is causing the problem you are trying to get rid of! The more files you copy over, the greater the chance of this happening. It is therefore recommended that:
You copy over only the minimal amount of files that contain your most important data that you simply can't live without.
You copy over a few files at a time, and then check that the problem you are trying to get rid of hasn't returned.
Your important data and their files
Bookmarks, Downloads and Browsing History
places.sqlite
This file contains all your Firefox bookmarks and lists of files you have downloaded and of websites you have previously visited. For more information see Create bookmarks to save your favorite webpages.
Passwords
Your passwords are stored in two different files, both of which are required:
key3.db - This file stores your key database for your passwords. To transfer saved passwords, you must copy this file along with the following file.
This file stores many of your Firefox permissions that are decided on a per-site basis. For example, it stores which sites are allowed to, or blocked from setting cookies, installing extensions, showing images, displaying popups, etc.
This file stores any custom words you have added to Firefox's dictionary. If you have never added a custom word to the Firefox dictionary, then you will not have this file. For more information see How do I use the Firefox spell checker?.
Autocomplete history
formhistory.sqlite
This file remembers what you have searched for in the Firefox search bar and what information you have entered into forms on websites. For more information see Control whether Firefox automatically fills in forms.
Cookies
cookies.sqlite
Cookies are used by websites for a variety of reasons, some of which include keeping you logged in to a website you have previously logged in to, remembering any preferences a website has allowed you to set, authenticating you as a person who has visited a specific website before, etc.
Security certificate settings
cert8.db
This file stores all your security certificate settings and any SSL certificates you have imported into Firefox.
File types and download actions
mimeTypes.rdf
This file stores your preferences with respect to what Firefox does when it comes across known file types, such as whether you want to save a file or open it with a specific application. For more information see Change what Firefox does when you click on or download a file.
Click on 'download FileZilla Client' and then the 'download' button from the FileZilla column on the next popup window.
Once downloaded, go to the downloads folder (from the Finder, 'Go' menu and then 'Downloads').
Open the FileZilla image file and double click on the FileZilla start icon. FileZilla will now begin to install on your Mac. Skip the additional offer during the installation.
The installation only takes a few seconds. Once completed, from the Finder, go up to the Go menu and select Applications. You'll find your new copy of FileZilla located here. Double click on the icon to launch the application.
21.2. Download and Install FileZilla Client for Windows (64bit)
To download the latest stable version of FileZilla Client please visit:
Only 64bit versions of Windows 7, 8, 8.1 and 10 are supported.
Click on 'download FileZilla Client' and then the 'download' button from the FileZilla column on the next popup window.
Once downloaded, go to your downloads folder and double click on the FileZilla bundle icon. start icon. Click on run, agree to the terms, leave all other options on their default settings and press next through-out. Do not install the additional software when asked to. Uncheck any boxes for additional software before proceeding. See the image below for an example and expect at least two separate offers.
FileZilla will now begin to install on your computer.
The installation only takes a few seconds. Once completed, the software will automatically launch. Alternatively you'll find the software located in the Windows Start menu.
21.3. Setting up a New Site Connection (Secure)
These instructions explain how to setup a new securely encrypted site connection using the popular FTP client FileZilla.
Launch Filezilla on your Mac or Windows machine.
Now open the site manager by clicking on the icon located in the top left-hand side of the main window.
When you have opened this, you will see another window where you can create and manage your FTP sites.
Click on the 'New Site' button located in the bottom left of the window.
Provide a site name and then complete the fields on the right.
Host = The IP address or host name provided by your IT administrator. This will look like 123.123.123.123 or ftp.companyname.com.
Protocol = FTP – File Transfer Protocol
Encryption = Require implicit FTP over TLS
Logon Type = Normal
User: Provided by your client or IT administrator
Password: Provided by your client or IT administrator
Once completed, click on connect. The site information will be saved and a connection will be initiated.
An Unknown certificate window will appear. It's unknown because your computer has only just been introduced to it. The certificate provides information as to the session security details, the common name of the registered address and the certificate issuer. Once you are satisfied, check the two boxes at the bottom of the window for 'always trust certificate in future sessions' and 'trust this certificate on the listed alternative hostnames'. Click 'ok'.
The connection is now established. Typically the FTP server folders are located on the right side of the window and your local files are located on the left. You can drag files between the two locations in both directions.
This article explains how to import pre-configured site settings. The settings will be bundled within a single XML file and contains all of the connection details required to access an FTP site.
These instructions are identical for both Mac and PC.
(1) From within FileZilla, go to the File Menu, go to import and locate the settings file. Then click on the 'open' button.
(2) The Import settings dialog box will appear, leave the Site Manager Entries box checked and click on the 'ok' button.
(3) A status box should then appear stating that the import has been successful.
(4) You can access the newly imported site by going to the File Menu and then Site Manager. If you would like to rename the site, this can be easily done by selecting the site from within the sites list on the left, and then clicking on the rename button from the bottom of the window.
(5) All of the settings are saved so you may now connect to the site.

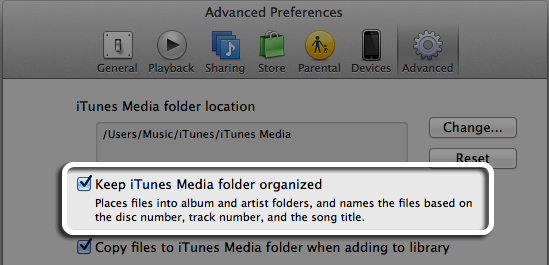
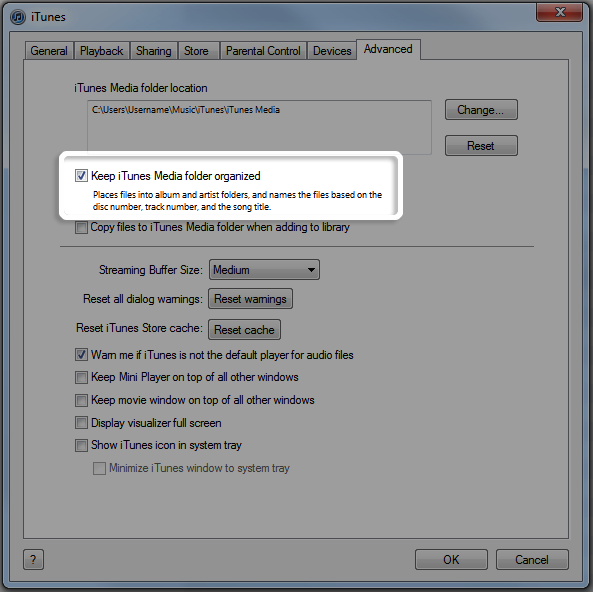
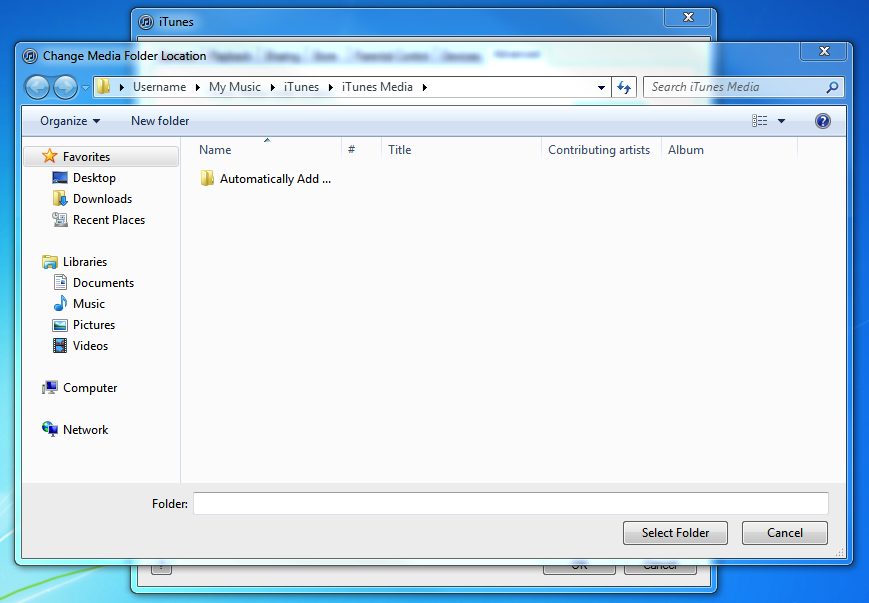
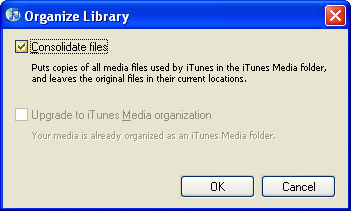
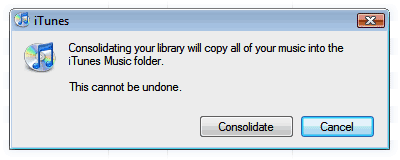

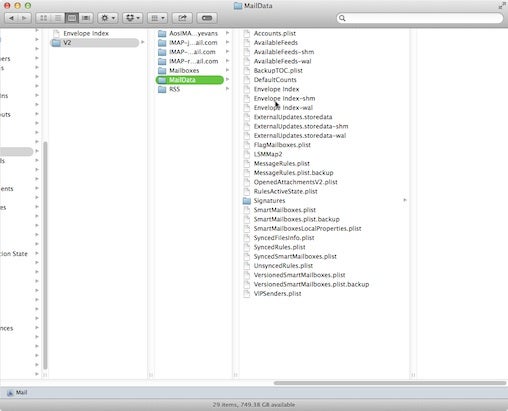


 (lower-left corner), select Control Panel, and then select Programs and Features.

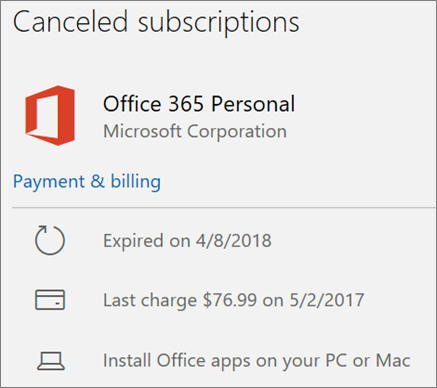


 , then tap or click
  , click help
  and select
  .
.