MacBook (13-inch Aluminum, Late 2008), (13-inch, Early 2009 or later)
MacBook Pro (13-inch, Mid-2009 or later),
MacBook Pro (15-inch or 17-inch, Mid/Late 2007 or later)
MacBook Air (Late 2008 or later)
Mac mini (Early 2009 or later)
Mac Pro (Early 2008 or later)
Xserve (Early 2009)
Your Mac also needs:
OS X Mountain Lion, Lion, or Snow Leopard v10.6.8 already installed
2 GB or more of memory
8 GB or more of available space
2. Finder Hints
2.1. How to Batch Change File Extensions in Mac OS
Have you ever wanted to change a group of files file extensions in Mac OS? For example, lets say you wanted to change a bunch files with a .htm extension to .html, or a group of files from extension tie .JPEG to .PNG. We'll show you how to easily batch change a group of file extensions on the Mac, without changing the actual file names.
Remember this is only changing the file extension, this is not actually changing the file type or performing any file conversion. We have plenty of articles about various file format and type conversions if you're interested in that, however. This is also not changing the file names, it is only changing the extension that comes as a file suffix.
We're going to use the same rename feature that allows batch renaming of files on the Mac but with a few slight modifications to the usage and related system preferences so that it focuses on changing the file extension rather than the file name. It's a subtle difference but important if all you want to do is maintain file names but change the file extensions.
Batch Changing File Extensions on Mac
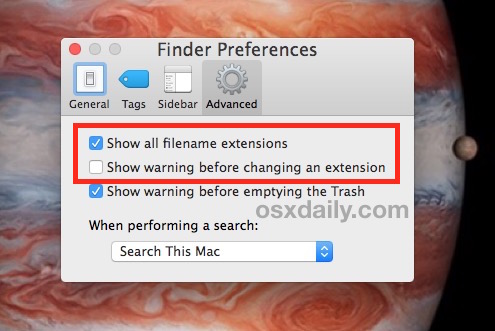
From the Finder of the Mac, pull down the "Finder" menu and go to "Preferences" and then go to "Advanced"
Check the box for "Show all filename extensions" and then uncheck the box for "Show warning before changing an extension", then close out of Finder preferences
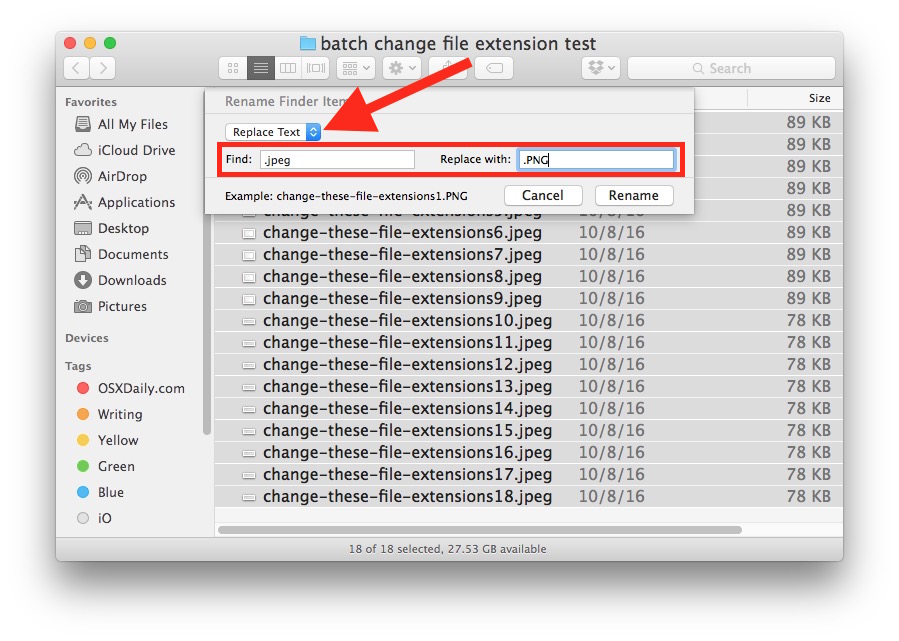
Now locate the files or folder of files that you want to change the file extensions for in the Finder and select them all, then right-click (or Control Click) and choose "Rename XX Items..."
At the "Rename Finder Items" screen choose 'Replace Text' and then within the "Find:" section place the initial file extension, and under the "Replace with:" input place the file extension you wish to batch rename all of the selected files to, then click on "Rename"
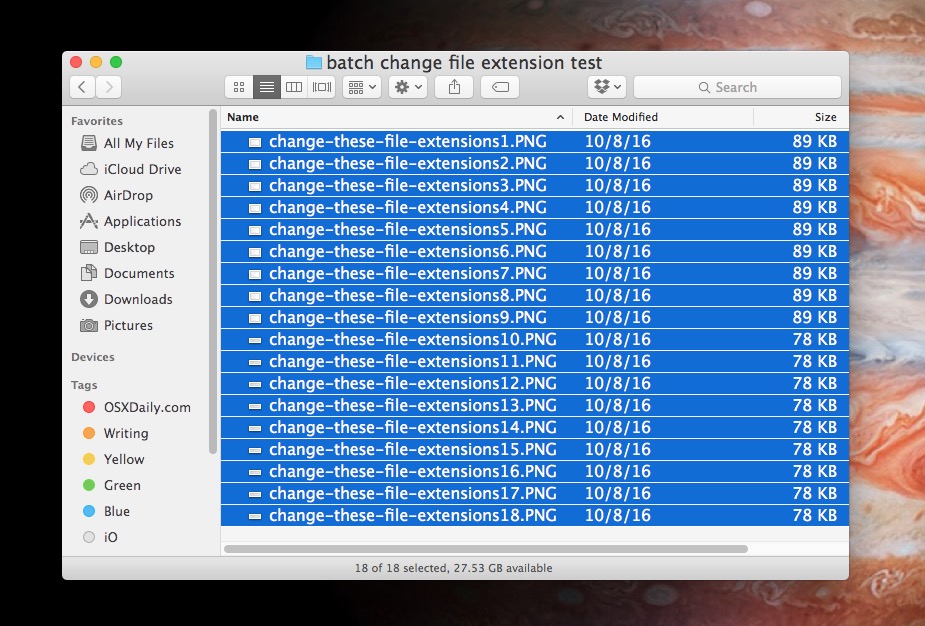
Assuming you followed the above steps correctly, you will successfully have changed only the file extensions of the selected files, and not changed any of the names.
In the example above we changed a group of image files from having a ".jpeg" file extension to having a ".PNG" file extension, but you can use this with any file extension, whether it's changing a group of files from having .docx to .doc, .txt to .php, or anything else. The extension you are choosing does not matter, though you'll obviously want to pick one that is compatible and accurately represents the file type otherwise it may make it unreadable to some applications.
A few important points here: you must have show file extensions enabled on Mac otherwise the file extensions to change will not be visible or found by the replace tool, and secondly you must turn off the file extension change warning otherwise you will be repeatedly confronted with a dialog box to confirm the file extension has changed for each individual file extension change. Beyond that, it's just a matter of using the batch Rename feature built-in "Find and Replace" functionality as shown.
Once you're finished changing the group of files file extensions you are free to adjust your Finder Preferences back to whatever setting you'd like. Generally speaking it's a good idea to leave the extension change warning enabled, however.
You could also accomplish this batch extension changing process through the command line using a variation of this trick, we'll cover specifics for that in another article.
2.2. Remove unwanted adware that displays pop-up ads and graphics on your Mac
Use these instructions to uninstall or remove ad-injection softwaresometimes called adware.
Ad-injection software is advertising-supported software that can come from third-party download sites. Software that you download from such sites may have been customized to install both the software you want and the ad-injection software. If your Mac has ad-injection software installed, you might see pop-up windows, ads, and graphics while surfing the web, even if "Block pop-up windows" is selected in Safari preferences. Ad-injection software might also change your homepage and preferred search engine.
Check Safari settings and extensions
Go to Safari > Preferences, then follow these steps:
Click the General icon and make sure that the Homepage field contains the website you want.
Click the Search icon and make sure that the search engine setting shows your preferred search engine. Some versions of Safari have this setting in the General pane instead.
Click the Extensions icon. If you don't want an extension or don't know what it does, select the extension from the list and click Uninstall. These are examples of ad-injection extensions, but there are others:
Amazon Shopping Assistant by Spigot Inc.
Ebay Shopping Assistant by Spigot Inc.
Searchme by Spigot, Inc.
Slick Savings by Spigot Inc.
GoPhoto.It
Omnibar
Remove certain ad-injection software
Use this "Go to Folder" method to find and remove each item listed in the sections below, one item at a time:
Drag to select an entire line in the lists below, starting with /System/Library/Frameworks/v.framework, for example.
Choose Edit > Copy.
Open a Finder window, then choose View > As Columns.
Choose Go > Go to Folder.
Choose Edit > Paste to paste the line you copied into the text field.
Press Return.
If the item is on your Mac, a window opens with the item you searched for already selected. Drag only that item to the Trash. If you're asked to enter a password, enter your administrator password.
If the item is not on your Mac, you'll see a message that the folder can't be found. Continue to the next item in the list.
Now find and remove /Library/Frameworks/GenieoExtra.framework.
Restart your Mac
Choose Finder > Empty Trash to permanently remove the items.
Optionally remove other adware files
You don't need to remove these files to disable the adware. If you do remove them, first remove the other files listed in the sections above. Use the same Go to Folder method to find and remove each item.
Go to the /Library/LaunchAgents/ folder and look for a file named com.*.agent.plist. The asterisk (*) could be any word, including "Apple." Example: com.midnight.agent.plist. Move the file to the Trash.
Go to the /Library/LaunchDaemons/ folder and look for a file named com.*.daemon.plist and a file named com.*.helper.plist. The asterisk (*) could be any word, but it will be the same word used in the LaunchAgents folder, above. Example: com.midnight.daemon.plist and com.midnight.helper.plist. Move the files to the Trash.
Go to the /Library/Application Support/ folder and look for a file name that is the same word used in the LaunchAgents and LaunchDaemons folders, above. Example: midnight. Move the file to the Trash.
Restart your Mac, then choose Finder > Empty Trash to permanently remove the items.
2.3. "Open With" Application Tips
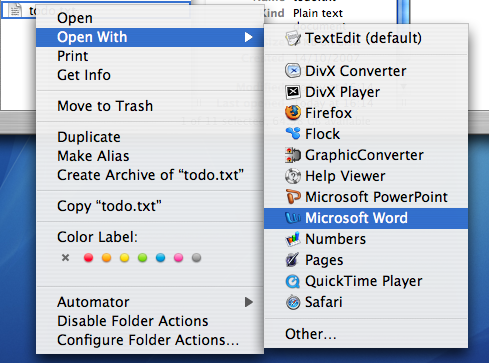
When you double-click a file it will open in the default application, which is fine for most situations. Often, each file format corresponds to a single application. Word documents open in Microsoft Word, MP3s open in iTunes and movies open in Quicktime Player. But there are times when you might want a file to open in a different application. For example, you might want a image to open in Photoshop rather than Preview, or a Word document in TextEdit instead of Microsoft Word. In this situation, you have a few options.
Firstly, if the application is in the Dock, you can simply drag the file onto its icon in the Dock. Alternatively you can open up the application first, and choose "Open" form the File Menu. A third method is to use the "Open With" menu. You will find this by right-clicking (Control-clicking) on the file and looking near the top of the contextual menu. Within the Open With submenu you will find every application that can open the file, as well as an "Other" option.
When you use the Open With menu, it is a "this time only" thing. Next time you double-click on the file, it will open with the default application again. To change the default application, bring up the menu as before, but hold down the Option key before choosing the application. The menu should change to "Always Open With".
When you use the Always Open With menu, it is a "this file only" thing. To apply a new default application to all files of that format, you can use the Get Info window located in the File Menu. In the Open With section, set the new application and click the "Change All" button.
To reset all of your files to open with the original default application, you need to delete a certain file. Go to your user folder, and navigate into the Library folder then into the Preferences folder. Find the com.apple.LaunchServices.plist file, and drag it to the Trash. Alternatively, drag it to the Desktop if you think you might change your mind and want to put it back later.
2.4. How to check your Mac's free hard drive space from the Finder
The Finder gives you at least a couple ways to see how much free disk space you have. The first method is to check the Get Info window for your hard drive.
First, you need to find your hard drive in the Finder and select it. If it appears in the Finder window sidebar or on the Desktop (it doesn't by defaultgo to Finder > Preferences... to change that), click your hard drive's icon in either of those spots. If your hard drive icon doesn't appear there, go to Go > Computer, then click the hard drive icon. Pop open the File menu, and select Get Info, and note the drive's capacity, available space, and used space.
3. Spotlight
3.1. No Search Results
Now, the most common issues with Spotlight are that it displays no results, or only partial results. The issue which i experienced this week is that Spotlight only shows some results such as Dictionary and Web search results, but not Applications, files and folders. You can see below i am attempting to search for 'iTunes' which i know is installed on my Mac, however the iTunes application is not displaying as a search result :
The first thing to check is the Spotlight preferences to ensure that Spotlight has been configured to search for the type of criteria you are looking for, in my case i need Spotlight to show me Applications in the search results :
As you can see, Applications is ticked and therefore should appear in the results. Obviously you would tick the box for what you want to search for if it wasn't already! The next thing to try is to force Spotlight to re-index folders or entire volumes as suggested by Apple on their support article (https://support.apple.com/en-us/HT201716)
You can force Spotlight to re-index your entire system hard disk with these steps: Step 1: Go to the Privacy tab in the Spotlight system preferences :
Step 2: Click the Plus '+' button in the lower left hand corner.
Step 3: Press 'Shift' + 'Command' + 'C' to reveal your hard drives or navigate to your system hard disk manually if this shortcut does not work.
Step 4: Select your system startup hard drive (usually Macintosh HD, unless you have renamed it manually) :
Step 5: Click the 'Choose' button to add to the Privacy list. Step 6: If you are using a newer version of OS X, you may receive a warning asking you to confirm your choice, if so, select 'OK' :
Step 7: Quit System Preferences and restart your Mac. Step 8: Go back to Spotlight System Preferences and select the 'Privacy' tab, then remove your hard disk from the list by selecting it and pressing the Minus '-' button in the lower left hand corner. This will force your Mac to re-index your hard drive which usually resolves Spotlight issues. You may need to wait a few minutes for Spotlight to re-index your drive, you will know when Spotlight has finished as the 'Indexing' progress bar within the Spotlight window will disappear :
This often resolves Spotlight issues but not for my student in my class this week! So, i had to bring out the big guns and use the command line! The Spotlight index is stored on your hard disk as an invisible folder so that you cannot visibly modify or access it. Re-indexing your hard disk as mentioned above does not delete the entire Spotlight index folder and settings, just modifies it to re-index your system drive. To remove the entire Spotlight database and force it to be recreated, you need to run a unix command to delete the entire Spotlight database : Step 1: Login as an Admin user on your Mac. Step 2: Navigate to /Applications/Utilities on your computer and open Terminal. Step 3: Enter the following command shown in bold and italics : cd / Step 4: Press the Enter/Return key and your Terminal window should look like this :
You have now 'changed directory' to the root level of your system drive which is where the invisible Spotlight database is located. Step 5: Now enter the following command in Terminal shown in bold and italics : sudo rm -R .Spotlight-V100/ Step 6: Press the Enter/Return key and your Terminal window should look like this :
Step 7: Enter your admin password and press the Enter/Return key, your Terminal window should provide no errors if you entered the unix command correctly and will return to a command prompt as shown below :
Step 8: Quit Terminal and restart your Mac. Step 9: Log back into your user account and select the Magnifying glass in the top right hand corner of your Mac's screen or press the shortcut keys of 'cmd' + 'spacebar' to open Spotlight. Enter 'iTunes' or whatever you were initially searching for and you should see Spotlight report that it is re-indexing :
Step 10: Wait for the re-indexing to complete and retest. Your Spotlight should be reset and working again :
I hope you found this tip useful, it certainly seems to be an issue that crops up every now and again and does not seem to be tied to a specific version of OS X.
4. Networking
4.1. Add a permanent static route in high sierra
Adding a static route using the route add command does not add a route persistently. After you reboot the system, the static route is lost and you have to reapply the command.
I suggest to use networksetup which works persistent and also in separate network locations.
First, open your terminal of choice i.e. iTerm2.app or Terminal.app
If you have a VPN which needs a static route, for example your home network is on 192.168.1.0, which incidentally is the same as the remote network your connected to using VPN and you need to reach a server on 192.168.1.198 which is on the remote network, you would use the above command.
The above command will create a route for the interface called VPN to point traffic for the 198 address across the gateway 254. Don't forget to switchtolocation first!
4.2. Adjust SMB Behaviour in macOS 10.13 and later
Adjust SMB browsing behavior in macOS High Sierra 10.13 and later
In macOS High Sierra 10.13 and later, the default settings for browsing network folders such as Server Message Block (SMB) shares are ideal for most organizations and users. But you can make adjustments to optimize SMB browsing in enterprise environments.
This article is intended for enterprise and education system administrators.
Your Mac determines how each window and its contents should appear by collecting file information such as labels, tags, and other forms of metadata.
In macOS Sierra 10.12 and earlier, your Mac gathers all metadata for the files in a folder, compares it to the folder's .DS_Store file, and then displays the folder's contents. In macOS High Sierra 10.13 and later, this behavior is changed slightly: If a folder is sorted alphanumerically, the contents are displayed immediately, then the Finder collects and compares the rest of the folder's metadata.
You can adjust macOS High Sierra 10.13 and later to make browsing faster on network shares, or to force the Finder to gather all available metadata before showing folder contents.
Speed up browsing on network shares
To speed up SMB file browsing, you can prevent macOS from reading .DS_Store files on SMB shares. This makes the Finder use only basic information to immediately display each folder's contents in alphanumeric order. Use this Terminal command:
Then log out of your macOS account and log back in.
Force the Finder to gather all metadata first
Alternatively, you can force the Finder in macOS 10.13 High Sierra and later to always collect complete metadata before displaying folder contents, matching the file browsing behavior of macOS 10.12 Sierra and earlier. Use this Terminal command:
Then log out of your macOS account and log back in.
Disable directory caching
Your Mac caches file and folder metadata temporarily in local memory. This improves browsing speeds, especially on high-latency networks. Systems with more memory installed can cache more file information.
If you'd like to disable directory caching so that macOS re-downloads the full contents of the folders and metadata every time you browse an SMB share, you can create or edit /etc/nsmb.conf. See the nsmb.conf man page for more information on how to edit this file.
If your system doesn't already have an /etc/nsmb.conf file, use the following Terminal commands. Note that you must be logged in as an administrator with sudoer privileges to set this file:
echo "[default]" | sudo tee -a /etc/nsmb.conf

 echo "dir_cache_off=yes" | sudo tee -a /etc/nsmb.conf
4.3. Performance issues with SMB 2 and 3 connections
Turn off packet signing for SMB 2 and SMB 3 connections
Learn how to turn off packet signing on your Mac.
In macOS 10.13.4 and later, packet signing is off by default. Packet signing for SMB 2 or SMB 3 connections turns on automatically when needed if the server offers it. The instructions in this article apply to macOS 10.13.3 and earlier.
When you use an SMB 2 or SMB 3 connection, packet signing is turned on by default. You might want to turn off packet signing if:
Performance decreases when you connect to a third-party server.
You can’t connect to a server that doesn’t support packet signing.
You can’t connect a third-party device to your macOS SMB server.
If you turn off packet signing, you lower the security of the SMB connection. Turn off packet signing only if both the client and server are on a secure network.
Turn off packet signing on a macOS client
Check to see if your macOS computer has an /etc/nsmb.conf file.
If your macOS computer has a /etc/nsmb.conf file
Open the /etc/nsmb.conf file.
Set the signing_required value to “no,” like this: [default]
signing_required=no
Save the /etc/nsmb.conf file.
Disconnect and then reconnect any mounted SMB shares to make the changes take effect.
If your macOS computer doesn’t have an /etc/nsmb.conf file
Open Terminal.
Use these commands to create an /etc/nsmb.conf file that has a signing_required value that’s set to “no”: sudo -s
echo "[default]" >> /etc/nsmb.conf
echo "signing_required=no" >> /etc/nsmb.conf
exit
Disconnect and then reconnect any mounted SMB shares to make the changes take effect.
Turn off packet signing on a macOS computer that hosts SMB shares
Follow the steps on macOS or on macOS Server.
On macOS
Choose Apple menu > System Preferences, then click Sharing.
Clear the File Sharing checkbox, then close the Sharing pane.
In Terminal, use this command: sudo defaults write /Library/Preferences/SystemConfiguration/com.apple.smb.server SigningRequired -bool FALSE
Choose Apple menu > System Preferences, then click Sharing.
Select the File Sharing checkbox, then close the Sharing pane.
On macOS Server
Open Terminal.
In Terminal, use these commands to make packet signing optional for clients: sudo defaults write /Library/Preferences/SystemConfiguration/com.apple.smb.server SigningRequired -bool FALSE
Just a hunch but it's quick to test. Try doing this on the client Mac:
sysctl net.inet.tcp.delayed_ack
...note what it reports. It'll be an integer, probably the value 2 or 3...then set it to zero:
sudo sysctl -w net.inet.tcp.delayed_ack=0
...then on the AFP client, unmount all AFP-mounted volumes and re-mount them so that you're establishing new TCP connections. Then try your file copy test again and see if the speed is significantly improved.
I've run into situations where Mac OS X's TCP Delayed Ack algorithm was less than optimal, so it may be good to do this test to quickly rule that out.
4.5. Disable the creation of .DS_store files
If you access a network share on Windows desktops or server, your Mac leaves .DS_store files wherever you browse. These Mac OS X system files contain data about the directory and are hidden for Mac users. You can deactivate the Writing of .DS_store Files on Networks shares, so your Windows friends will stop complaining.
Follow the steps in this article to connect to Windows File Sharing (SMB) from Mac OS X 10.1 or later. SMB is the native sharing protocol for Microsoft Windows operating systems, but it may be offered by other computers.
Products Affected
Mac OS X 10.4, Mac OS X 10.3, Mac OS X 10.2, Mac OS X 10.1, Mac OS X 10.5
Follow these steps:
Click the Finder icon in the Dock.
Choose Connect to Server from the Go menu (see Note 1).
In the address field of the Connect to Server dialog, type the URL using this syntax (see Note 2) smb://ServerName/ShareName/
Click Connect
You will be prompted for the workgroup, user name, and password. In addition to connecting to actual Microsoft Windows computers, you may also use the Connect to Server dialog to connect to a Macintosh that is offering Windows File Sharing.
Important: Review all of the Notes section, below, for important information on Windows File Sharing. To set up sharing service, see the Related Documents.
Notes:
1. When you go to the Connect to Server dialog, you may browse by computer name. In Mac OS X versions 10.0 to 10.1.5, the names of SMB-sharing computers do not appear. In Mac OS X 10.2 or later, the names of SMB computers do appear (see Note 2). However, only the names of computers on your subnet appear.
2. "ServerName" may be an IP address or DNS name. If it is required or more convenient in your environment, you may also use other valid URL formats, such as:
3. The name of the "share" (the shared disk, volume, or directory) must be specified. You will not be prompted for it.
4. You cannot type spaces as part of the share name when connecting. In place of any space in the share name, type: %20
5. You cannot connect to a share with a name that contains a hyphen. Resolve the issue by giving the share a name that does not contain a hyphen.
6. Connecting to (mounting) two or more SMB volumes simultaneously may cause a kernel panic. Drag one volume to the Trash to eject it before connecting to another (versions 10.1 to 10.2.8 only).
7. The only alert message that Mac OS X versions 10.0 to 10.1.5 display for SMB login difficulties is "There's no file service available at the URL <URL>." This is sometimes correct and sometimes incorrect. This is the message that would appear if you mistyped your password, for example.
8. Mac OS X uses SMB only over the TCP/IP protocol, not over the NetBEUI protocol.
9. When troubleshooting a connection failure, you can ping the IP address of the Windows computer using the Mac OS X Network Utility. A successful ping verifies a TCP/IP connection between the two computers.
10. When troubleshooting an SMB connection issue, try checking the Console, which is located in the Utilities folder. The Console log may help advanced users identify an issue.
11. If you are connecting to Windows XP, make sure that the Internet Connection Firewall settings are not interfering with your connection. SMB uses ports 137, 138 and 139. These ports should be open on the Windows XP computer. This may require "Advanced" configuration of the XP firewall.
4.7. Accessing 802.1X networks in OS X Lion and Mountain Lion
Learn about accessing 802.1X networks in OS X Lion and Mountain Lion.
In OS X Lion and Mountain Lion, network access using 802.1X authentication is performed by the currently logged-in user. The 802.1X authentication session runs as the user, and will interact with the user to prompt for missing information, such as certificate trust and name and password.
On a Wi-Fi network that requires 802.1X, use the Wi-Fi menu (or Wi-Fi section of Network preferences in Settings) to select a network with a visible SSID. Or, use Join Other Network to connect to a network with a hidden SSID or one that isn't visible in the current list.
When selecting a visible network, the appropriate settings should be automatically chosen, and you should be prompted for your authentication information. When attempting to join a network with a hidden SSID, you will need to know the exact SSID and the proper security option.
On an Ethernet network that requires 802.1X, the authentication process is started immediately after connecting the Ethernet cable to the network. You will be prompted to enter your authentication information. To disable this feature, use the 802.1X tab in Network preferences for the Ethernet interface and uncheck "Enable automatic connection".
This process can be used to join networks with the following EAPOL authentication types:
PEAP TTLS (see note 1) LEAP EAP-FAST (see note 2) TLS
Notes
TTLS will use MSCHAPv2 as the inner authentication method.
EAP-FAST will only work if the server has a certificate and it either allows access without a PAC or does authenticated PAC provisioning.
Additional Information
To access networks that cannot be joined with the above method, or to use a Login Window mode profile or a System mode profile, you will need to contact your network administrator for a .mobileconfig file that contains the correct network configuration information. A .mobileconfig can be created by using the Profile Manager service provided in OS X Server.
4.8. OS X Mountain Lion: Connect to a network that requires 802.1X authentication
You can connect to a Wi-Fi or Ethernet network that is protected by the Institute of Electrical and Electronics Engineers (IEEE) 802.1X standard. The 802.1X standard is designed to enhance the security of local area networks.
In most cases your network administrator provides a configuration profile that contains the information and settings you need to authenticate with the network.
When you download the profile from the web or open the attachment using Mail, the computer recognizes the .mobileconfig extension as a configuration profile and begins installing after you click Install.
During installation, you may be asked to enter any necessary information, such as passwords that weren't specified in the profile, and other information as required. Enter any password necessary to use certificates included in the profile.
Choose Apple menu > System Preferences, and then click Network.
Select the network service you want to use, such as Ethernet or Wi-Fi, in the list.
Click Connect. If you installed multiple profiles, choose the one you want to use from the 802.1X pop-up menu, and then click Connect.
If you are connecting to an Ethernet network that uses 802.1X and want to connect automatically to the network when it's detected, click Advanced, and then click 802.1X. Select "Enable automatic connection."
Ask your network administrator or service provider if you need more information.
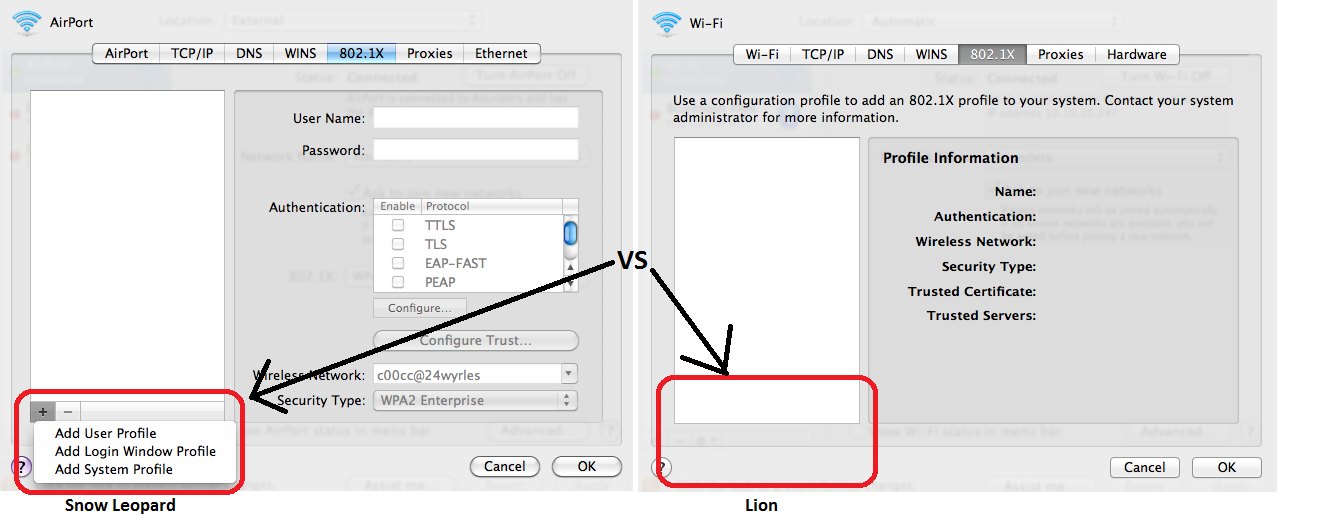
4.9. Mac OS X Lion and above: Creating Wi-Fi 802.1X Profiles
Mac OS X 10.7 (Lion) does not allow manual creation or configuration of 802.1X profiles for secure authentication on Wi-Fi and Ethernet networks for typical users. In order to access an 802.1X network in Lion, users are prompted to enter credentials when joining an active network that is in range, at which time it automatically detects the authentication settings that should be used.
The 802.1X tab in the System Preferences > Network > Advanced section no longer allows manual 802.1X profile creation.
Mac OS X 10.7 (Lion) 802.1X Profile Restriction
Lion forces the use of a configuration profile which must be created from Lion Server or using the iPhone Configuration Utility (iPCU). The config file is nothing more than an XML file containing the settings and usually has a .mobileconfig extension. Since Apple has decides to stop selling the Xserver line a year ago, most administrators will rely on the iPCU.
This restriction can be problematic for engineers wishing to test various client configuration scenarios without a live network. Many enterprise environments support multiple EAP types on their authentication servers in order to support various client deployment scenarios. Therefore, an engineer may wish to switch between profiles on the fly to test multiple authentication types. Additionally, user-created 802.1X profiles only work under their own user context, and do not work for pre-login or system level network connections which are of great benefit in enterprise environments for remote management and control when users are away from their desks (e.g. overnight). Finally, it should be noted that the "auto-detection" capability during network join may not work accurately for EAP-TTLS since it assumes use of MSCHAPv2 inner authentication.
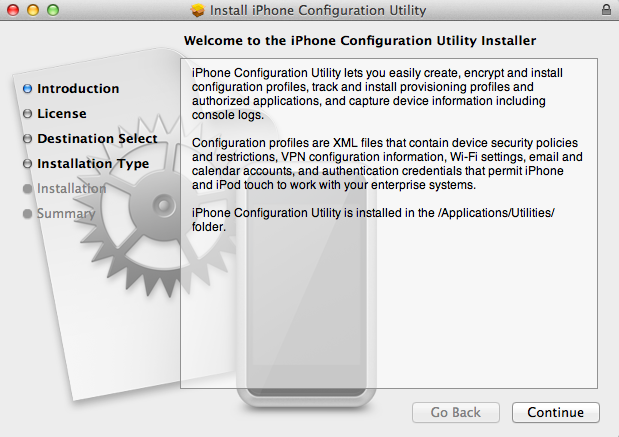
To create an 802.1X profile for Lion, download and install the iPCU:
Install the iPhone Configuration Utility
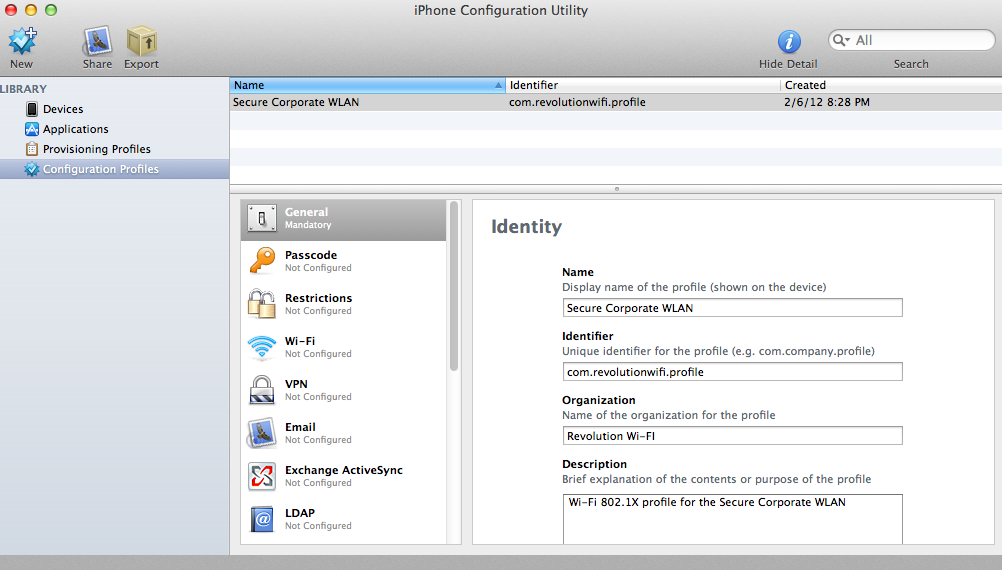
Once installed, launch it from the Applications/Utilities folder in Finder. Start by selecting Configuration Profiles on the left side, then click New.
Create A New Configuration Profile in the iPhone Configuration Utility
Give the profile a name, unique identifier, organization name, and description. Then move on to the Wi-Fi section. Configure the basics like SSID and Security Type, then select one or multiple EAP types supported on the WLAN in the Protocols tab.
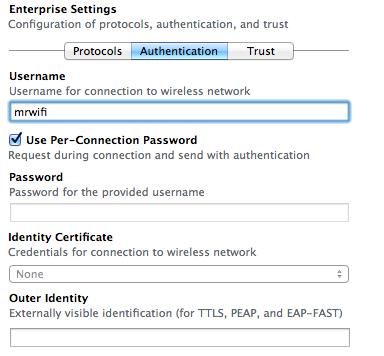
Switch to the Authentication tab to configure the credentials that will be used. Most enterprise admins will want to leave the username blank and select "Use Per-Connection Password" when deploying configuration profiles to their users to prompt each user to enter their own unique password instead of hardcoding a username and password. If using EAP-TLS an identity certificate may be selected. Finally, if you are concerned about username exposure with tunneled authentication protocols, provide an anonymous outer identity value so hackers cannot compile a list of valid usernames on your network.
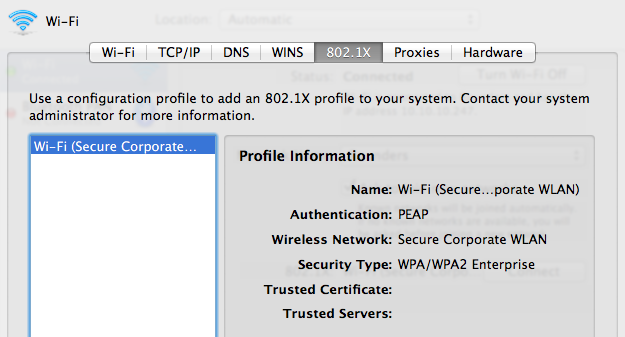
Last, configure the trusted certificates and server certificate names in the trust tab. This allows administrators to define which authentication servers or naming conventions are allowed to authenticate users. This also prevents users from being prompted to trust servers at the time of authentication.
When the Wi-Fi payload and configuration profile is completely finished, select either Share or Export. Share allows you to send the profile via email, whereas Export allows you to export the file to your local filesystem for distribution at a later time.
Note - See this Apple help documentfor further instructions on using the iPCU.
To install the configuration profile, locate the file (.mobileconfig extension) and double-click it.
Install the iPCU Configuration Profile
You will be prompted to fill-in any per-user authentication fields left blank by the administrator. The profiles can be viewed later in the System Preferences > Profiles section. This is also where you can delete previously installed profiles. The associated 802.1X profile is also visible in System Preferences > Network > Advanced > 802.1X.
802.1X Profile Successfully Installed
This method is not as easy for on-the-fly testing, but should allow administrators to accomplish all necessary tasks.
4.10. Set up a connection to a virtual private network
In order to connect to a virtual private network (VPN) you need to enter configuration settings into Network preferences. These settings include the VPN server address, account name, and any authentication settings, such as a password or a certificate you were given by the administrator of the network.
If you were given a VPN settings file, try double-clicking the file to open Network preferences and automatically import the settings. If double-clicking the file doesn't open Network preferences, choose Apple > System Preferences, click Network, and then choose Import Configurations from the Action pop-up menu. Select the file and click Import.
Choose Apple menu > System Preferences, and then click Network.
Click Add (+) at the bottom of the network connection services list, and then choose VPN from the Interface pop-up menu.
Choose what kind of VPN connection you want to set up from the VPN Type pop-up menu, depending on the network you are connecting to, and give the VPN service a name.
Enter the server address and the account name for the VPN connection.
Click Authentication Settings, and then enter the user authentication information you were given by the network administrator.
After entering the user authentication information, click OK, and then click Connect.
Select "Show VPN status in menu bar" to use the VPN status icon to connect to the network and switch between VPN services.
To remove the VPN configuration, select the VPN network connection service in the list and click Delete (-).
4.11. How to check your ethernet network speed
The convenience of wireless networking is fantastic, but it doesn't compare to the solidity and dependability of a wired network connection.
Where can you find out if your Ethernet connection is running at 10, 100, or 1000 Mbit/s? It is not in the most obvious place, as it turns out.
Make sure your Ethernet cable is plugged in, and verify that you are connected to the network in System Preference > Network.
Locate the Network Utility on your mac. It is in Applications > Utilities > Network Utility. Alternatively, search Network Utility in Spotlight Search.
In the Info tab, under Network Interface, use the drop-down menu to select the Ethernet.
You should be able to view network connection details including network addresses, and connection link speed.
That's all there is to it! It's obvious after you know where to look. While in the Network Utility, check out other useful features of this app in the other tabs.
Ping: Lets you test how long it take to send a message to a remote server and receive a response. Measured in milliseconds.
Whois: Find out who is the registered owner of a domain name.
Traceroute: Trace the path your request physically takes along the Internet when you connect to a remote server.
4.12. Fixing Wi-Fi Issues in OS X
Though Apple has largely resolved the wi-fi issues that persisted in some Macs with prior OS X releases, some users with OS X El Capitan may encounter wireless networking issues after updating to the latest OS X release. Typically the wi-fi problems are in the form of dropping connections or strangely slow speeds, and the good news is they're usually an easy fix.
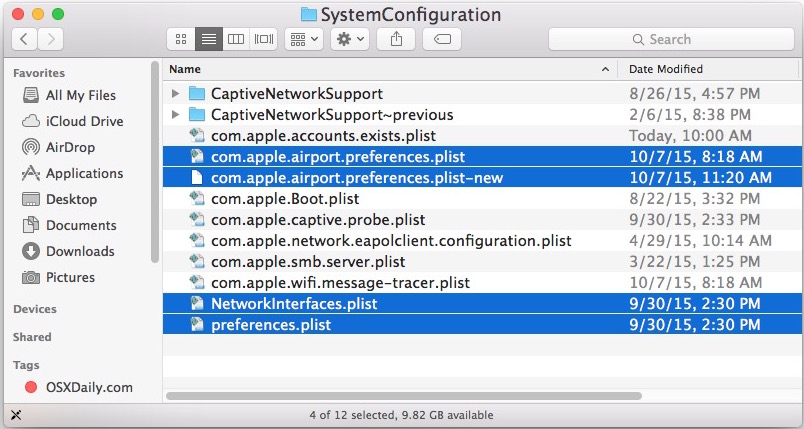
For most Mac users who are experiencing issues with wi-fi connections in OS X El Capitan, simply ditching old preference files, followed by creating a new network location with custom DNS settings and an MTU change is enough to resolve whatever wi-fi problems they may have had. This is a multi-step process but not particularly difficult.
Move all of these files into the folder you created in step 1 on the desktop (you can also delete them if you're confident and have made a backup)
Reboot the Mac
Turn on Wi-Fi from the wireless network menu again in the upper right corner of OS X
If your wi-fi works now, great, but for most users, you're not quite finished yet! Now you need to create a new custom network location.
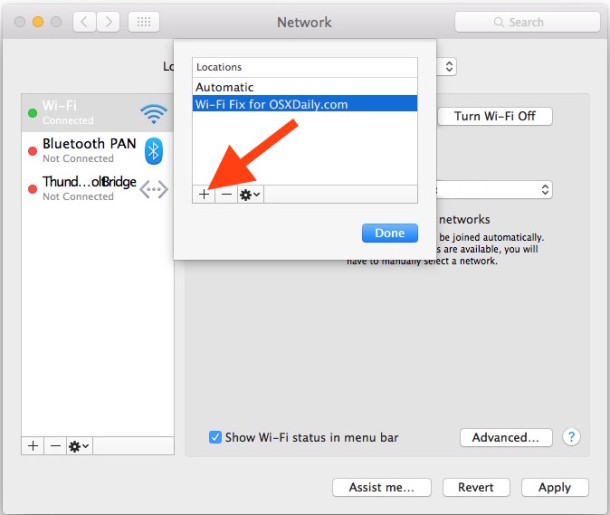
Create a New Wi-Fi Network Location with Custom DNS
Quit any open apps that are using wi-fi or networking (Chrome, Safari, Mail, etc)
Go to the Apple menu and select "System Preferences"
Choose the "Network" control panel, then choose Wi-Fi from the list on the left side
Click the "Location" menu and select "Edit Locations", then click the [+] plus button to create a new location, giving the new location an easily identifiable name like "Fixing My WiFi" and click "Done" to add it
Next to "Network Name" join the wi-fi network and authenticate with the router password as usual
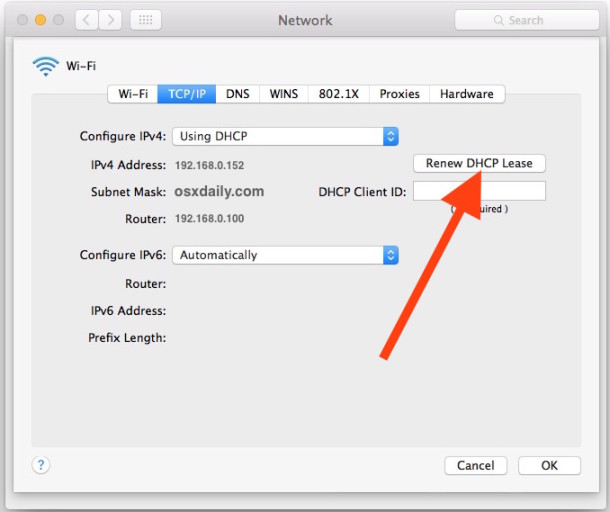
Next, select the "Advanced" button in the lower corner of Network preferences, then go to the "TCP/ IP" tab, choose "Renew DHCP Lease"
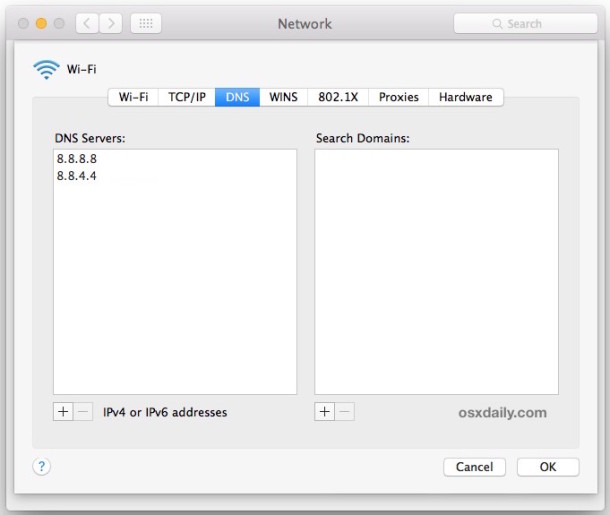
Next go to the "DNS" tab, and on the left side "DNS Servers" list, click the [+] plus button to add a new DNS server* I use 8.8.8.8 and 8.8.4.4 for Google DNS but you can choose whatever you want
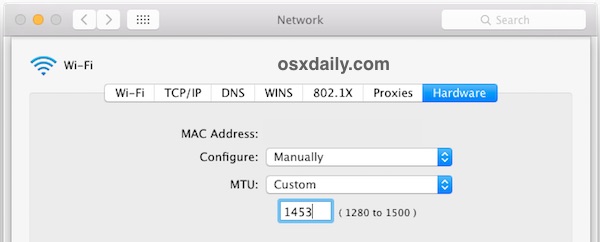
Next, choose the "Hardware" tab, then next to 'Configure' choose "Manually"
Change "MTU" to "Custom" and set the MTU number to 1453, then click on "OK"
Finally, choose the "Apply" button to set your network changes
Now wireless connectivity should be working flawlessly in OS X, and back at full speed. Try things out by navigating around the web, doing a speed test, and just using the internet as usual.
The solution outlined above almost always works to resolve wireless networking issues in OS X, particularly if they occur after updating to a new version of system software or a point release.
Additional Wi-Fi Troubleshooting Tips
If you're still having trouble with wi-fi in OS X 10.11 or later, try the following:
Reboot the Mac in the Safe Mode, then reboot again (this dumps caches)
Reboot the Wi-Fi router the Mac connects to
Update the Wi-Fi router firmware if an update is available
Join a 2.4 GHz network N network rather than a 5 GHz G network or B network
What does the 'Reset Print System' routine in OS X do?
The Reset Print System routine in OS X performs a number of adjustments to the print service's files and configurations to restore factory default settings, but these steps can be manually performed or can even be undone, if needed.
The Common Unix Printing System (CUPS) is a collection of utilities and background services (along with their configuration files) that OS X uses to manage printers attached to your Mac.
If you are having difficulty configuring your printers or even just printing to them in OS X, one thing to try is to reset the print system, which will clear out your printers and allow you to set them up again from scratch. This service may appear to only remove your printers, but it in fact does a number of checks on the system and restores configuration files to factory defaults.
As part of its PrintCore framework, Apple includes a small program called "printtool" (buried in the /System/Library/Frameworks/ApplicationServices.framework/Versions/A/Frameworks/PrintCore.framework/Versions/A/ directory) which runs as a background process; when you instruct the system to reset the print system, this process is launched and performs the following routines:
Right-click the printer list to invoke the printer-reset routine.
First it creates a new, empty version of the installed printers property list, called "InstalledPrinters.plist" in the /Library/Printers/ folder. This process starts with the system creating an empty standard XML property list file called "InstalledPrinter.plist.new," and then renames the current printer list with the extension ".bak" to preserve it as a backup. It then removes the ".new" from the name of the empty property list to make it the current working version.
The working configuration file or the CUPS service is called "cupsd.conf" and is stored in the /private/etc/cups/ folder. However, the system keeps a factory-default version of this file called "cupsd.conf.default" in the same folder as the working configuration file.
Similar to the way the "InstalledPrinters" property list is managed, the system first copies the this default configuration file to a new temporary file called "cupsd.conf.new," then it appends the ".bak" extension to the the current configuration file to preserve it as a backup. It finally removes the ".new" extension from the temporary file to make it the working CUPS configuration.
Both of these steps effectively reset the print system, but to ensure proper access to the resources the printer needs, printtool continues to do the following:
Runs a permissions and ownership check on the following CUPS system folders to make them owned by the root user and "wheel" group, and that these directories and all files within them inherit the same ownershipt as well as are both readable and executable by all users:
/Library/Printers
/usr/libexec/cups
This process can effectively be done by running the following two commands:
sudo chown -R root:wheel /Library/Printers
sudo chown -R root:wheel /usr/libexec/cups
Following these, the permissions can be set with the following two commands:
sudo chmod -R 755 /Library/Printers
sudo chmod -R 755 /usr/libexec/cups
If it seems as though resetting the print system is taking a while, it is likely because of this step; it simply takes time for the system to check every printer driver you have installed. This will especially be true if you have installed numerous driver packages manually from Apple's Web site.
Next, the printer reset routine creates a new sandbox configuration file in the /private/tmp/ folder. This will be a file with a ~13-character alphanumeric name that contains sandbox-related rules for printer access to the spool directories, driver files, and user directories, among others.
The cups local certificates directory at /private/etc/cups/certs is then recreated so print jobs can be properly authenticated.
The final modification updates the sandbox cache in a system-defined subdirectory of the /private/folders/ directory.
After these steps, the system preferences printer list will be refreshed to reflect the changes, which should show an empty list, as the printer setup is reset to factory defaults. But if you somehow have mistakenly reset the print system, you can easily undo these changes simply by restoring the two configuration files from the backups mentioned in steps 1 and 2 above. This can be done by opening the Terminal and running the following two commands:
After performing these steps, restart the system and your previous printer configuration should be fully restored.
6. System Utilities
6.1. Share files between two computers with target disk mode
What is target disk mode and when should I use it?
Target disk mode lets you share files between two Mac computers with FireWire or Thunderbolt ports. This is useful when you need high transfer speeds. This is also useful if the display on one of your computers isn't working and you need to get files from the computer.
Alternatively, you can also use AirDrop to share files between two Mac computers wirelessly. For more information, see Mac Basics: AirDrop.
How to set up and use target disk mode
To get started, connect your two computers with a FireWire or Thunderbolt cable. Then, follow these steps.
If the computer that you'll use as a disk is off, start it up while holding down the T key and skip to step four. Otherwise, click the Apple () menu and choose System Preferences.
Click Startup Disk and then click Target Disk Mode.
You will see a message asking "Are you sure you want to restart your computer in target disk mode?" Click Restart.
Once the computer starts up in Target Disk Mode, it will appear as a disk icon on the desktop of the other computer. Double-click the disk to open it and browse the files on that computer.
Transfer files by dragging them to or from the disk.
Eject the disk by dragging its icon to the Trash (the Trash icon will change to an Eject icon when you do this).
To exit target disk mode, press and hold the power button on the computer you used as a disk. Then disconnect the cable.
6.2. Move your content to a new Mac
Migration Assistant copies all of your files to your new Mac so that you don't have to do it manually.
If your files are currently on a Windows PC, follow the PC migration steps instead.
If you're moving content to a MacBook (Retina, 12-inch, Early 2015) or later, follow the MacBook migration steps instead.
Check software, settings, and power
Install all available Apple software updates on both Mac computers. Your old Mac needs OS X Snow Leopard v10.6.8 or later. You should also install any third-party software updates on your old Mac.
Make sure that your old Mac has a Computer Name: choose System Preferences from the Apple menu, click Sharing, then check the Computer Name field.
If you're moving files to or from a Mac notebook computer, make sure that the computer is connected to AC power.
Connect the computers to each other
Connect both computers to the same local Wi-Fi or Ethernet network.
Or connect both computers directly using a Thunderbolt, FireWire, or Ethernet cable.
Or connect your new Mac to a Time Capsule or external drive that has a Time Machine backup of your old Mac.
Use Migration Assistant
On your old Mac:
If you're using a FireWire cable to connect the computers, start up your old Mac in target disk mode.
If you're using a Thunderbolt cable to connect them, and your old Mac is using OS X Mountain Lion v10.8 or earlier, start up your old Mac in target disk mode.
In all other cases, start up your old Mac normally.
On your new Mac:
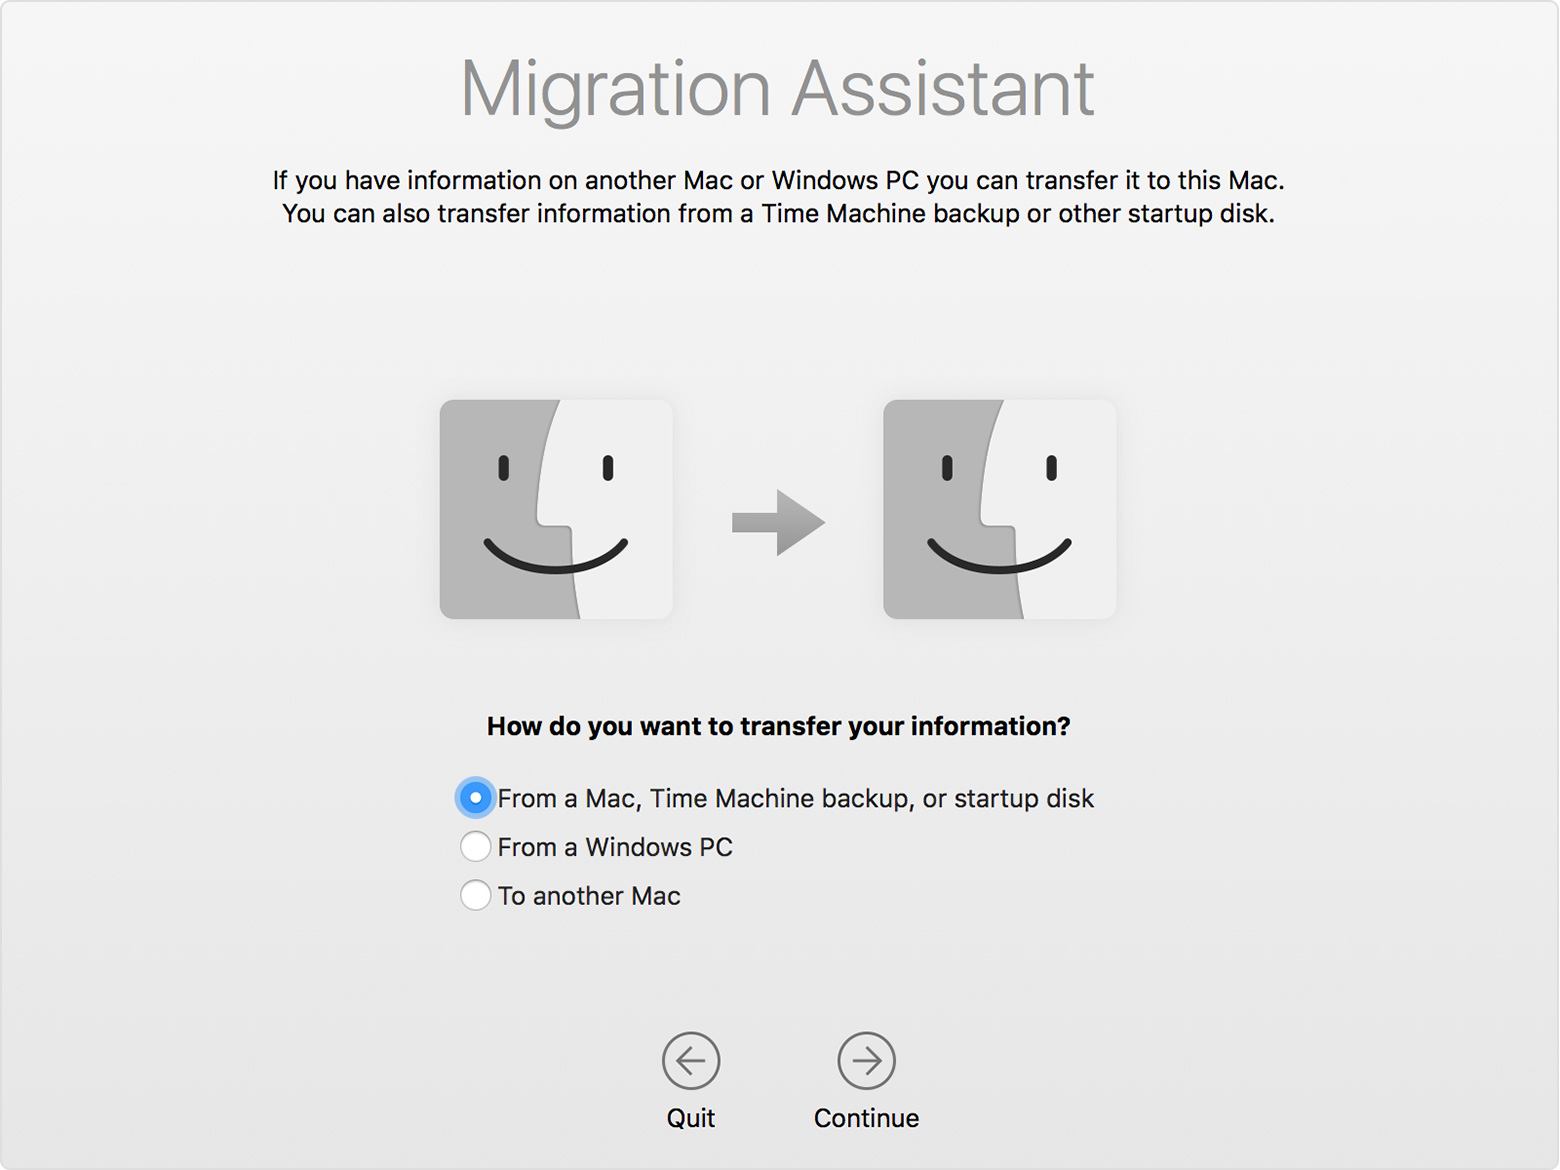
Open Migration Assistant, which is in the Utilities folder of your Applications folder.
Click Continue.
When asked how you want to transfer your information, select the option to transfer from a Mac, Time Machine backup, or startup disk.
Click Continue.
On your old Mac: If you started in target disk mode or are migrating from a Time Machine backup, skip these steps.
Open Migration Assistant.
Click Continue.
When asked how you want to transfer your information, select the option to transfer to another Mac.
Click Continue.
On your new Mac:
When asked to select a Mac, Time Machine backup, or other startup disk, click the appropriate icon.
Click Continue. You might see a security code.
On your old Mac: If you started in target disk mode or are migrating from a Time Machine backup, skip these steps.
If you see a security code, make sure that it's the same code as on your new Mac.
Click Continue.
On your new Mac:
If you're migrating from a Time Machine backup, you might be asked to enter a password for the backup or Time Capsule. You should then see a list of backups organized by date and time. Choose the backup that you want to use, then click Continue.
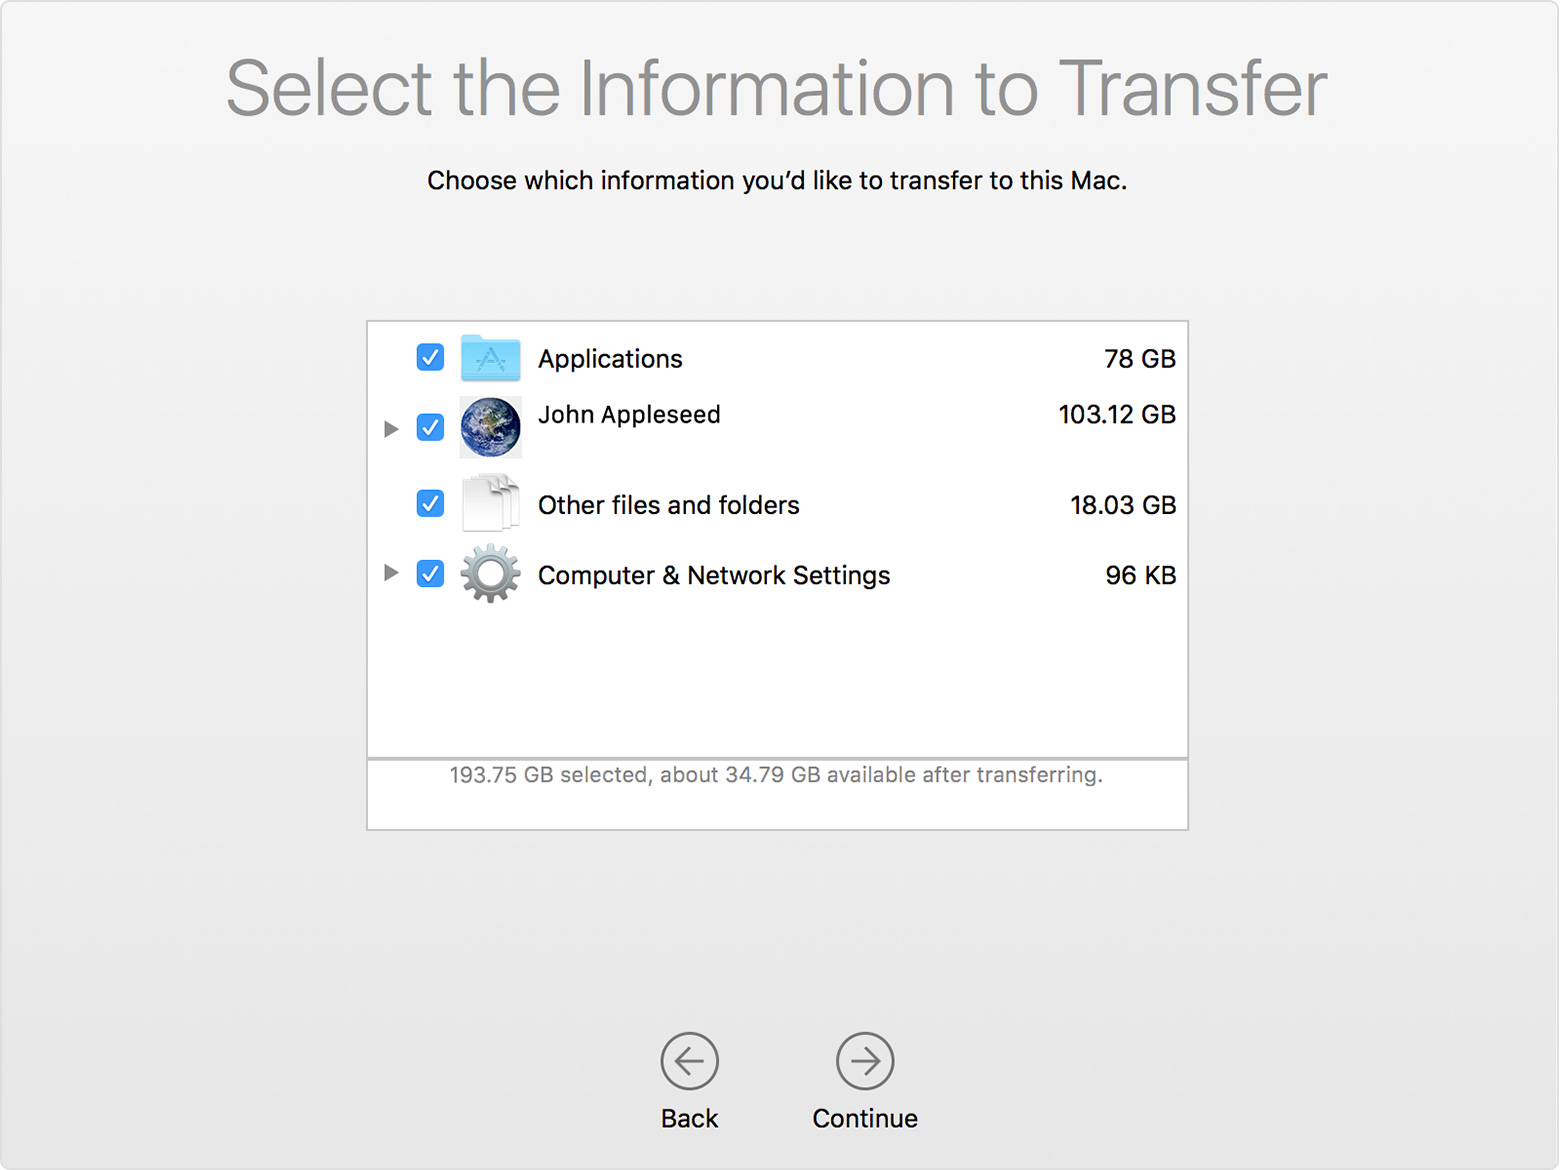
Select the information to transfer, then click Continue to start the transfer. If you have a lot of content, the transfer might take several hours to finish.
If you're transferring information from a Mac that is using OS X Server, Migration Assistant requires all items to remain selected.
In this example, John Appleseed is an OS X user account. If you transfer an account that has the same name as an account on your new Mac, you're asked to rename the old account or replace the one on your new Mac. If you rename, the old account appears as a separate user on your new Mac, with a separate home folder and login. If you replace, the old account overwrites the account on your new Mac, including everything in its home folder.
After Migration Assistant is done, log in to the migrated account on your new Mac to see its files. If you're not keeping your old Mac, learn what to do before selling it or giving it away.
6.3. The System Profiler
The information that the Apple System Profiler provides can be invaluable when trying to reproduce a particular problem. You should always include an Apple System Profiler report when submitting a bug report. Many times, software and hardware problems are specific to an exact configuration. The Apple System Profiler is the best way to get detailed information about the configuration you are testing with.
Opening the System Profiler
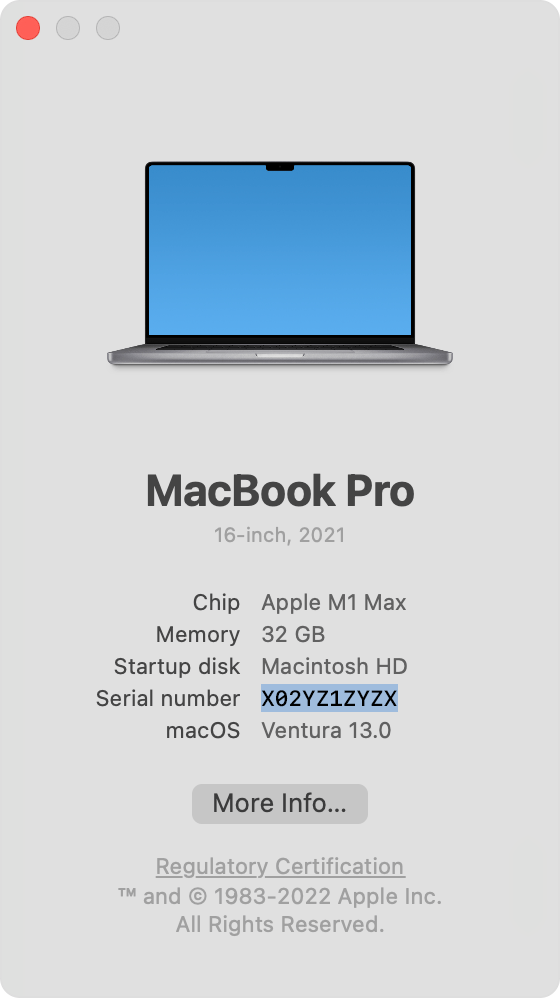
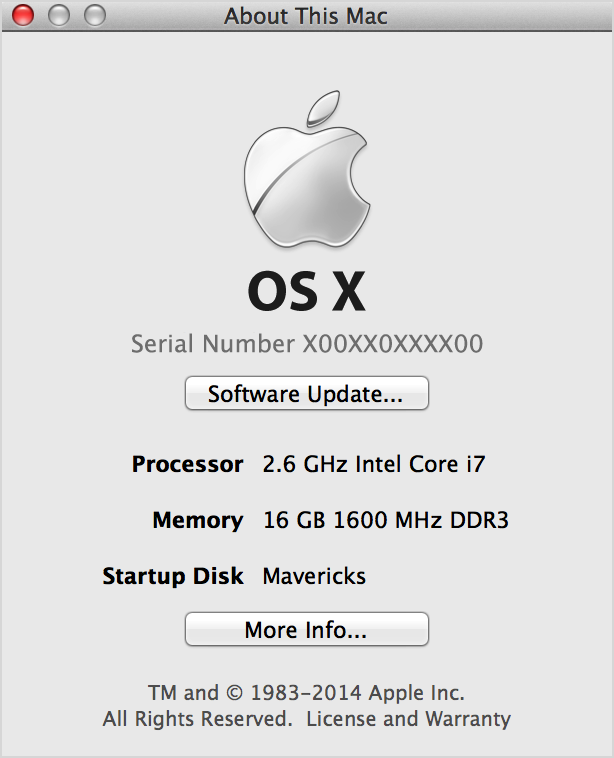
Open the Apple menu and choose About This Mac; it brings up the About This Mac box, as shown in Figure 1.
Figure 1:About This Mac Box
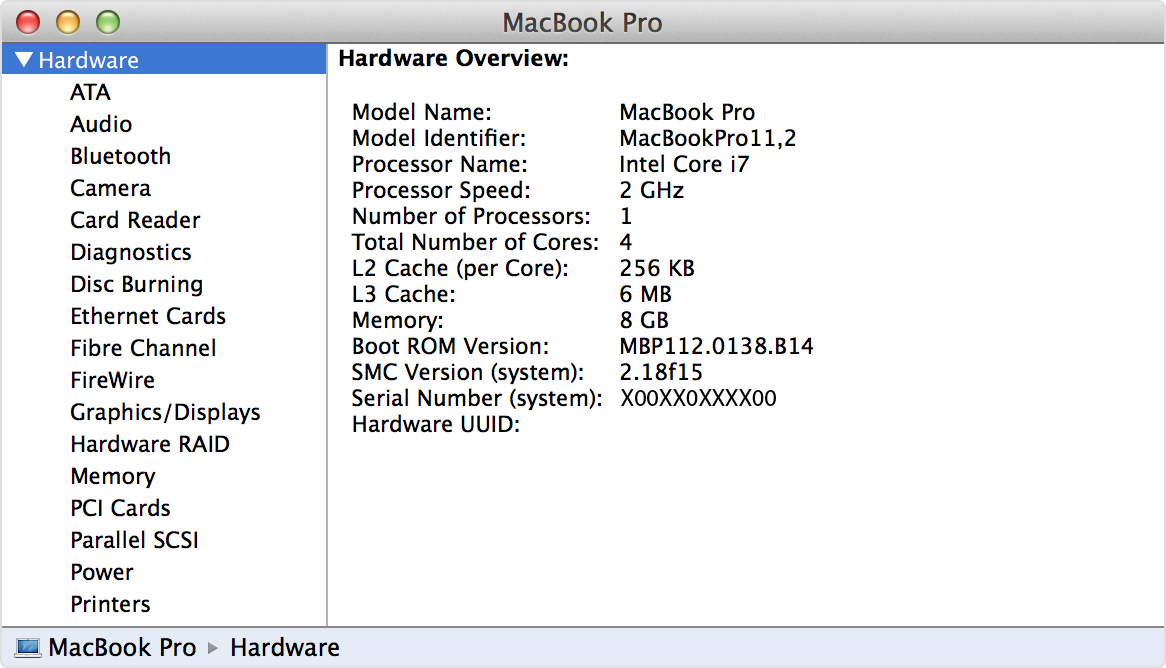
Click the More Info button. This brings up the System Profiler as shown in Figure 2.
Figure 2: System Profiler Window
Viewing different sets of Apple System Profiler information
The disclosure triangles will hide or show information related to the label of the triangle. Clicking on the triangle expands or collapses the information it contains.
Creating and saving a report
From the View menu, select Mini Profile, Basic Profile or Full Profile. If you've been asked for a system profile from a Central IT technician, then you need to send them a basic profile.
From the File menu, choose Save. The system generates a report based on your selection. Note that a full report can run hundreds of pages, depending on your configuration.
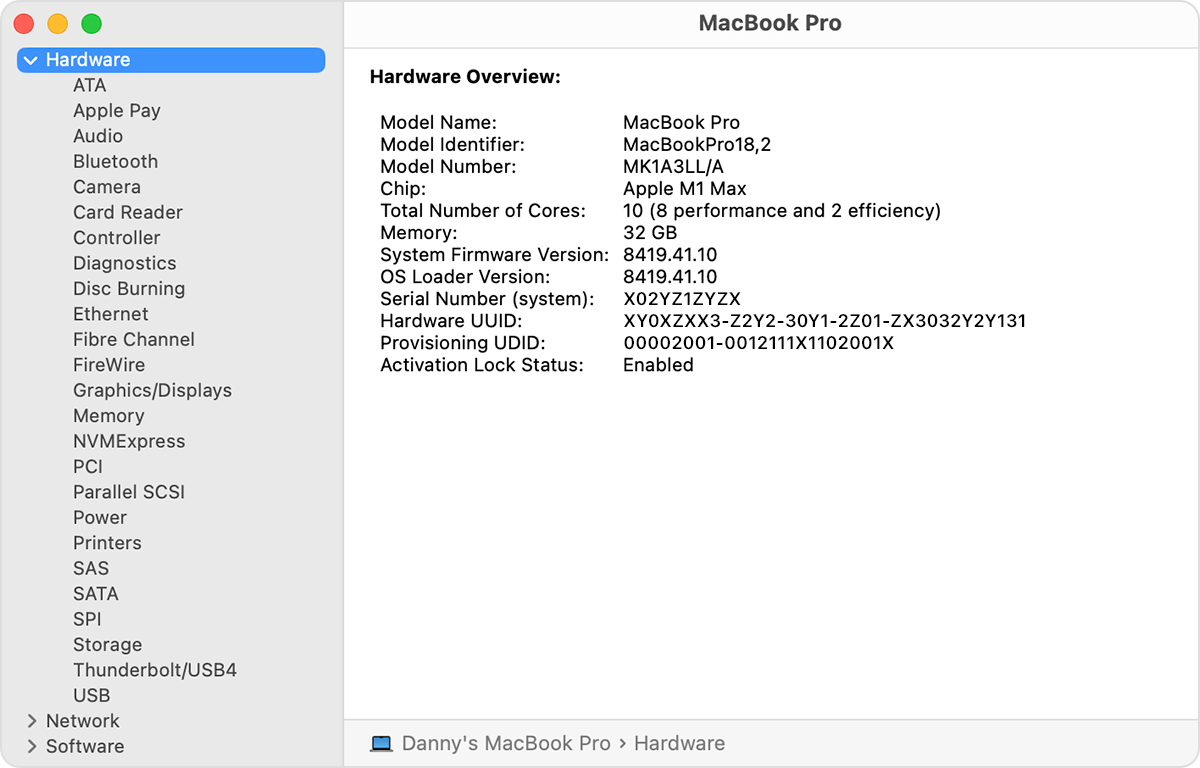
6.4. Find your Mac's serial number in About This Mac or System Information
Find your Mac model name and serial number
Use any of these ways to find the model name and serial number of your Mac.
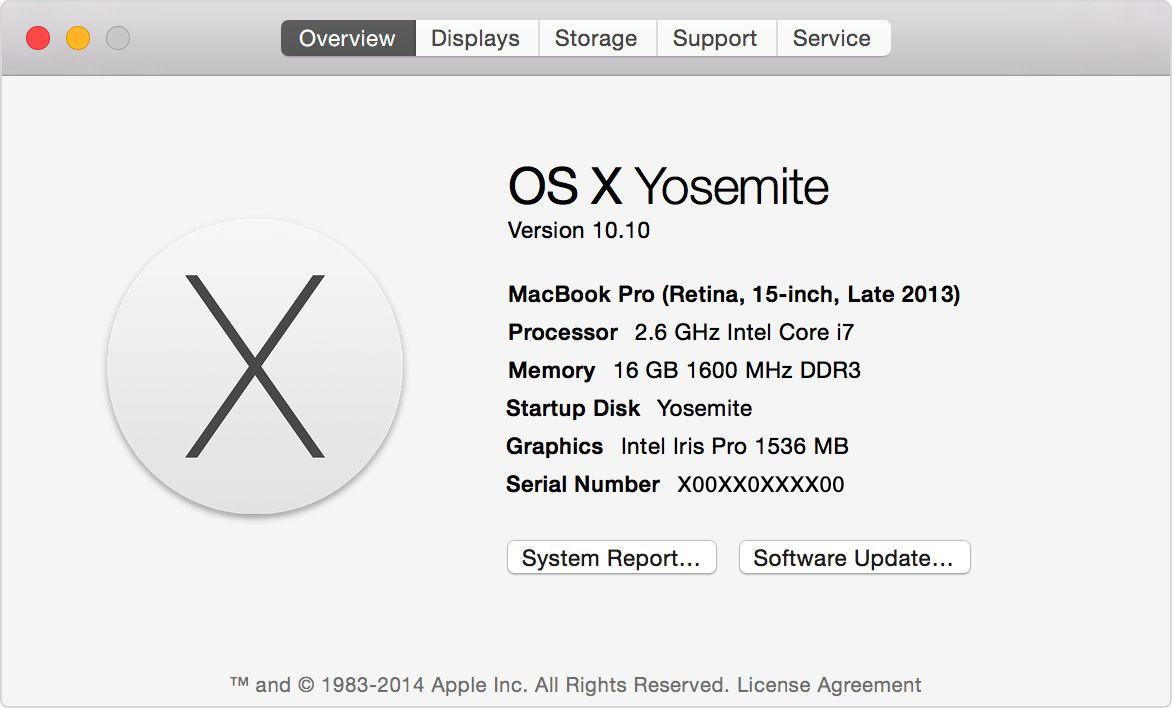
About This Mac
From the Apple menu in the corner of your screen, choose About This Mac. Then find the serial number in the information shown.
System Information
Press and hold the Option key on your keyboard while choosing Apple menu > System Information from the menu bar.
Select Hardware in the sidebar.
Find the model name and serial number on the right.
You can also have System Information read your serial number out loud. From the menu bar in System Information, choose File > Speak Serial Number. Or press Command-4.
Finding your Serial Number on older systems (Monterey or earlier)
You can find your Mac's serial number in the About This Mac window and in System Information.
Use these steps to locate the serial number of your Mac.
Choose About This Mac from the Apple menu.
The Serial Number appears above the System Report button.
OS X Mavericks or earlier
Choose About This Mac from the Apple menu.
Double-click the version number to reveal your computer's serial number.
Using System Information
You can also find your computer's serial number in the Hardware section of System Information. To hear your Mac speak its serial number, open System Information and press Command-4.
If you can't find your serial number
If your Mac isn't starting up, try using safe mode. You can view the serial number of your Mac in About This Mac or System Information even when your Mac is started in safe mode. You can also find the serial number of your Mac in these places:
Printed on the outside of your Mac
Printed on the original packaging that your Mac came in
On your original printed or emailed receipt (or invoice)
If you're using OS X Snow Leopard v10.6 or later and the serial number of your Mac isn't listed in About This Mac, contact CIT (UK) on 01530 272727.
7. macOS Recovery
7.1. How to reset your Mac password (recovery mode)
How to reset your Mac password
Apple provides a tool to replace Mac’s password by bypassing all of the previous steps. This is the best option if you don’t have a password hint, can’t log in via another account, and have completely forgotten your password.
For Intel-based Mac:
Go to Apple menu > Restart.
Immediately press and hold Command+R.
Don’t release the keys until you hear Mac’s startup sound or until the Apple logo appears.
For Mac with Apple silicon:
When turning on your Mac, press and hold the Power button.
Keep it pressed until you see startup options.
Click the Gears icon (Options) and hit Continue.
You may be asked to select a user and enter their administrator password. Follow on-screen instructions and click Next after any action you take.
Now, your Mac will boot into recovery mode — when you see the load bar appear, you can let go of the keys. The next thing to do is to select ‘Disk Utility’ and click Continue. Now, follow these steps:
Go to Utilities > Terminal.
Enter ‘resetpassword’ and press the Return key.
Select the main hard drive.
Select the User Account (the account you’d like to change).
Enter a new password and create a password hint.
Click Save: a warning will appear that the Keychain Password hasn’t changed. Click OK.
Shut Down your Mac and start it up again. Now, you can log in using the new password.
8. Troubleshooting
8.1. Shutdown Causes
In your console, you may see messages such as "Previous Shutdown Cause:" followed by a number. The number is a code representing the cause of the shutdown, which can be rather cryptic as to what it represents. Below are a list of shutdown causes on macOS and OS X with explanations for what the codes mean and some initial troubleshooting steps. The troubleshooting steps are by no means exhaustive, but should give you a good starting point for how to proceed with your investigation, if you suffer from the issue repeatedly.
Code
Description
Solution
5
Correct Shut Down.
Shutdown was initiated normally, from the OS X Shut Down menu or other shutdown command such as /sbin/shutdown. This does not indicate an issue with your system.
3
Hard shutdown.
Check the power button if you did not perform a hard shutdown yourself. It could be the case that the power button stuck down and forced a shutdown.
0
Power disconnected.
Check power supply/battery on a laptop, or the power supply for a Mac without a battery. On a laptop, the Mac should hibernate before the battery becomes so discharged it is unable to shutdown correctly, therefore if you see this shutdown cause on a laptop it may indicate a hardware issue with the battery or with the battery controller for reading the charge. Try resetting the SMC by connecting the switched off computer to power, holding ⌃control+⌥option+⇧shift and pressing power.
-3
Multiple temperature sensors exceeded the defined limit.
Hold D on boot to run Apple Diagnostics and follow the instructions if any errors are found. If the issue persists, make an appointment at an Apple Store. For Authorized Service Providers, Run Apple Service Diagnostics to check which sensor went beyond expected thermal limits.
-60
Bad master directory block (badMDBErr).
Back up your data, erase the disk and reinstall macOS. If you continue to run the system, data loss may ensue. Use Time Machine to keep a backup until you are able to erase and restore. A common symptom is being unable to repair with Disk Utility — as such, erasing the disk is required as mentioned.
-61
Watchdog timer detected unresponsive application, shutting down the system.
Troubleshoot for stuck application, startup item and any loading preferences. Boot to Safe Mode by holding ⇧shift on boot which disables most startup items and daemons. If the problem does not occur, try a new user account.
-62
Watchdog timer detected unresponsive application, restarting the system.
The system will automatically restart after this shutdown cause, unlike -61. Troubleshooting applies the same for cause -61. -61 is used where the system believes it cannot automatically recover from this, whereas -62 is used where the system determines it is likely to be resolved after restart.
-65
unknown
Potentially linked to operating system issue. Try reinstalling macOS as fresh or booting from clean install on an external drive.
-71
SO-DIMM Memory temperature exceeds limits.
If possible, swap memory module and check with known-good one to confirm issue is with memory. Check fans physically and with an app such as iStat Menus to determine whether the fans are rotating correctly and being reported correctly. Check air flow: open device and clean airways.
-74
Battery temperature exceeds limits.
Reset the SMC by connecting the switched off computer to power, holding ⌃control+⌥option+⇧shift and pressing power. Swap battery and check with known-good one to confirm issue is with customer battery.
-75
Communication issue with AC adapter.
Check power/MagSafe connector (plug), adapter and cable. Make sure the adapter in use is an official Apple power supply. On MacBook Pro with USB-C, connect power to opposite side of laptop to determine if issue is with specific ports.
-78
Incorrect current value coming from AC adapter.
Make sure the adapter is an official Apple power supply. Check AC adapter plug and cable. Confirm current at the wall where the adapter is connected to.
-79
Incorrect current value coming from battery.
Check battery statistics: check if cycles are excessive and may indicate the battery needs replacing. Check the battery connection to logic board.
-86
Proximity temperature exceeds limits.
Check thermal contact with heatsink, fan connection and physical/reported activity.
-95
CPU temperature exceeds limits.
Check thermal contact with heatsink, fans. Reset SMC by connecting the switched off computer to power, holding ⌃control+⌥option+⇧shift and pressing power.
-100
Power supply temperature exceeds limits.
Check fans and air flow. Confirm power supply is official Apple. If MagSafe, remove any MagSafe adapters in use (e.g. MagSafe 1 to 2).
-103
Battery cell under voltage detected.
Check battery and replace with known-good. Perform one charge cycle, then try again.
-104
unknown
Possibly linked to battery issue. Perform one charge cycle and try D-boot to run diagnostics.
-108
unverified
Likely memory issue. Commonly occurs when RAM is full and there was an issue with paging. Can occur when the system is sleeping.
-112
unverified
Memory issue. Almost always occurs around -128, another memory issue. Almost certainly hardware fault. See -128 for troubleshooting.
-127
PMU forced shutdown.
Check power button on your hardware. Potentially fine if you forced shutdown, otherwise may be hardware/SMC issue.
-128
unknown
Possibly linked to memory issue. If the issue is persistent, try replacing the RAM with known-good if your hardware has removable RAM.
8.2. OSX: Three Ways to Kill or Force Quit System Processes and Programs
OSX: Three Ways to Kill or Force Quit System Processes and Programs
There are at least three ways to restart crashed programs or faulty process that I know of. It doesn't happen very often, but right now I've got something that is causing one process to have a memory leak and I have to restart it once a day or so to get back that memory.
Force Quit Applications window
By pressing Cmd-Alt-Esc you will pop up this menu and you can select the program that has crashed and Force Quit.
This works OK for PROGRAMS that appear, but there are processes that you can't see in this list. But this is the best and first place to look for crashed processes.
Using the Activity Monitor
For more detail on which programs are running use the Activity Monitor.
The best way to open the Activity Monitor is to use Spotlight with the CMD-SpaceBar shortcut on your keyboard (most useful if the Dock has locked up). The select the thread that has crashed and select Quit Process.
On this window, you should Quit for a soft reset, but use Force Quit if that doesn't work. Note that you may be asked to login this is because you may be attempting to restart a system process that needs you to be authenticated as a superuser. If you are a novice computer person, then should probably consider rebooting your computer instead of killing processes. Of course, if you are attempting to save data before rebooting then, by all means, keep going.
Using the CLI / Terminal to Stop Process.
Open a Terminal windows using the Spotlight by
Cmd-Space
on the keyboard, then type
Terminal
into the Spotlight search box.
Terminal Commands for Restarting Crashed Programs
Software
Command
Description
The Finder
killall -KILL Finder
(you can also restart the Finder by option (=alt) + rightclicking the Finder icon in the Dock and selecting Relaunch. It doesn't always work though.)
The Dock
killall -KILL Dock
Doesn't happen often, but when it does.... Also use this if Spaces has crashed
MenuBar Locked
killall -KILL SystemUIServer
Some menu bar programs have system threads that aren't always perfect. You can't click on the menu bar. Most common use case
8.3. Managing locked files in OS X
In OS X there are several ways to prevent access to files, including putting them in locked disk images or changing their permissions setting so only select accounts on the system are permitted to read them.
In addition to these options, the OS X Finder supports another method of locking a file. When you open the information window for the file, you can check the Locked check box to prevent the file from being edited, even by people who otherwise have access to it. When this lock is enabled, the file's icon in the finder will have a small lock appended to its lower-left corner.
This option sets a lock flag for the file that is recognized system-wide and not just by the Finder or by applications that users generally interact with. So not only will applications like TextEdit and Pages not be able to edit the locked file, but command-line tools and other tasks should also be prevented from modifying it.
Not only will the lock prevent most tools from editing the file, but it also supersedes file permissions and extended attribute settings, so not even commands and programs run under the root account will be able to edit it with the lock enabled. This is significant for power users who make use of the Terminal, since if they cannot edit a file even when they try using "sudo," then the file may be locked. As an extra hurdle for those who use the Terminal, there is no obvious indicator such as the Finder icon that will show you the file is locked--it just will not be editable.
In addition to potential frustrations with locks when managing files in the Terminal, sometimes the Finder itself will provide obstacles when managing locked files. While you should be able to use the Finder's information window to set and remove file locks, sometimes the Finder will not allow you to do this. In most cases, the Finder will merely prevent the lock from being set in the first place; however, at times the file's lock setting may be set but will be grayed out so you cannot unlock it.
Luckily, if you do run into problems with a file that cannot be edited, either in the Terminal or in the Finder, you can unlock it by performing the following steps using the Terminal:
Open the Terminal.
Type the following command, followed by a single space (do not press enter yet).
sudo chflags nouchg
Drag the locked file from the Finder to the Terminal window to complete its full folder path.
Press Enter to run the command, supplying your password when prompted.
To remove locked files thing an entire folder or even volume, do the following:
Open the Terminal.
Type the following command, followed by a single space (do not press enter yet).
sudo chflags -R nouchg
Drag the chosen folder or drive from the Finder to the Terminal window to complete its full folder path.
Press Enter to run the command, supplying your password when prompted. Now every locked folder within that specified structure will be unlocked.
When run, this command will undo the lock flag for the file, regardless of whether you own the file. While an enabled lock will prevent the file from being edited, ultimately it is designed to be a temporary hurdle that can be undone by any user who has access to the file.


 The convenience of wireless networking is fantastic, but it doesn't compare to the solidity and dependability of a wired network connection.