1.1. How to permanently disable Windows Defender Antivirus on Windows 10
Windows Defender Antivirus is the free malware solution that Microsoft includes on every installation of Windows 10. It's a security software package meant to provide the first line of defense to protect your device and data against malware, including viruses, ransomware, rootkits, spyware, and other types of malicious programs.
Although the antivirus runs automatically, and it can disable itself as you install a third-party security software, the only caveat is that Windows 10 doesn't offer a way to disable it permanently. Perhaps the obvious reason is that Microsoft doesn't want you to use your device without any protection, which is a good thing.
However, there are still some cases where some users may prefer not to use Windows Defender Antivirus, such as on a kiosk device that isn't connected to a network and where peripheral connectivity isn't allowed.
How to disable Windows Defender Antivirus using Group Policy
On Windows 10 Pro, it's possible to use the Group Policy Editor to disable the Windows Defender Antivirus permanently.
Use the Windows key + R keyboard shortcut to open the Run command.
Type gpedit.msc and click OK to open the Local Group Policy Editor.
Browse the following path:
Computer Configuration > Administrative Templates > Windows Components > Windows Defender Antivirus
On the right side, double-click the Turn off Windows Defender Antivirus policy.
Select the Enabled option.
Click Apply.
Click OK.
Browse the following path:
Computer Configuration > Administrative Templates >
Windows Components > Windows Defender Antivirus > Real-time
Protection
On the right side, double-click the Turn on behavior monitoring policy.
Select the Disabled option.
Click Apply.
Click OK.
On "Real-time Protection," double-click the Monitor file and program activity on your computer policy.
Select the Disabled option.
Click Apply.
Click OK.
On "Real-time Protection," double-click the Turn on process scanning whenever real-time protection is enabled policy.
Select the Disabled option.
Click Apply.
Click OK.
On "Real-time Protection," double-click the Turn on behavior monitoring policy.
Select the Disabled option.
Click Apply.
Click OK.
Restart your computer.
Once you've completed the steps, Windows Defender Antivirus will no longer scan and detect malware on your device, even after restarting your computer.
At any time, you can enable the Windows Defender Antivirus using the same steps, but on step No. 5, 10, and 14, make sure to select the Not Configured option. Then just restart your device to apply the changes.
2. Operating System
2.1. How to determine Wi-Fi signal strength
On Windows 10, when you connect a device to the internet to work from home
or office using a Wi-Fi adapter, the quality of the signal will dictate
the overall performance of the connection. In part, it's because
wireless technology uses radio waves to connect a device to the access
point, and similar to other radio signals, it has limited range and
problems with interference as well as traveling through solid objects
(such as walls).
Understanding the signal strength of the Wi-Fi connection on your
laptop or desktop PC can help to determine if the slow connectivity is a
signal problem and not an issue with your Internet Service Provider
(ISP) or wireless access point (usually, your router).
You may be able to find many third-party tools, but Windows 10
includes several ways to check the signal strength of a wireless
connection from the taskbar and using the Settings app, Control Panel,
taskbar, Command Prompt, and even using PowerShell.
In this Windows 10 guide, you'll learn five ways to determine the signal strength of your Wi-Fi connection.
To determine the signal strength of a Wi-Fi connection on Windows 10, use these steps:
Click the network icon in the notification area of the taskbar.
See the wireless icon next to the network. (The higher the number of solid bars means the stronger the signal.)
When looking at the wireless icon, one solid bar indicates that the
signal is weak, two bars mean the signal is acceptable, and three and
four bars represent the best signal you can get.
How to check Wi-Fi signal strength using Settings
To find out the wireless signal strength using Settings, use these steps:
Open Settings.
Click on Network & Internet.
Click on Status.
Under the "Network status" section, the wireless icon will
indicate the current signal strength. (The higher the number of solid
bars, the stronger the signal.)
Alternatively, you can also check the signal strength from the Wi-Fi settings page.
Check signal quality from Wi-Fi settings
To check the wireless signal from the Wi-Fi settings, use these steps:
Open Settings.
Click on Wi-Fi.
Under the Wi-Fi section, the signal strength
will be represented on the wireless icon. (The higher the number of
solid bars, the stronger the signal.)
Once you complete the steps, you'll have a better understanding of wireless connection quality to the access point.
How to check Wi-Fi signal strength using Control Panel
To find out the signal quality of a wireless connection using Control Panel, use these steps:
Open Control Panel.
Click on Network and Internet.
Click on Network and Sharing Center.
Under the "View your active networks" section, the wireless icon next to "Connections" will indicate the signal quality.
(Optional) Click the connection name to check the signal quality as well as speed, SSID, and other information.
After you complete the steps, you'll know if you have a strong or weak Wi-Fi connection.
How to check Wi-Fi signal strength using Command Prompt
To check the signal strength of a Wi-Fi connection using Command Prompt, use these steps:
Open Start.
Search for Command Prompt and click the top result to open the app.
Type the following command to view the Wi-Fi signal strength and press Enter:
netsh wlan show interfaces
See the Signal field to determine the signal
quality. (If the output number is equal or higher than 80, then the
strength of the signal is good.)
Once you complete the steps, you'll quickly find out the quality of the Wi-Fi signal.
How to check Wi-Fi signal strength using PowerShell
To view the signal strength of a Wi-Fi connection using PowerShell, use these steps:
Open Start.
Search for PowerShell and click the top result to open the app.
Type the following command to view the Wi-Fi signal strength and press Enter:
(netsh wlan show interfaces) -Match '^\s+Signal' -Replace '^\s+Signal\s+:\s+',''
Quick tip: Similar to Command Prompt, in PowerShell, you can also run the netsh wlan show interfaces command to view signal quality.
See the signal quality output. (The percentage goes from 0 to 100, where 100 percent indicates excellent signal quality.)
Once you complete the steps, if you see a signal quality between 80 and 100 percent, then the connection is reliable. If you see a signal above 70 percent, it's still good for light web browsing and managing emails. Anything below 60
percent means that you have a weak signal, and you should consider
moving the device closer to the access point or relocating the access
point to the middle of the house or office.
If you're trying to determine the perfect placement on the house or
office for the best signal, run the above command where you typically
use your computer, then move around to another place or room, and re-run
the command to find out the signal strength in the new location.
In the case that you're viewing the Wi-Fi icon to find out the
performance of the connection, consider that each bar (including the
dot) represents around 25 percent of signal strength. This means that
three and four bars indicate a good signal quality and anything below
indicates a weak signal.
2.2. How to Turn On or Off Connect Automatically to Wireless Network in Windows 10
When you connect to a new wireless network, Windows will create a profile for the wireless network. A wireless (Wi-Fi) network profile contains the SSID (network name), password key, and security information to be able to connect to a wireless network.
This tutorial will show you different ways on how to turn on or off to connect automatically to a wireless network when in range in Windows 10.
Option 1
To Turn On Connect Automatically to Wireless Network when Connecting To
To Turn On or Off Connect Automatically to Wireless Network in Settings
1. Open Settings, and click/tap on the Network & Internet icon.
2. Click/tap on Wi-Fi on the left side, and click/tap on the connected wireless network (ex: "Brink-Router2") on the right side. (see screenshot below)
3. Turn on or off Connect automatically when in range for what you want for this wireless network. (see screenshot below)
4. You can now close Settings if you like.
Option 4
To Turn On or Off Connect Automatically to Wireless Network in Network Connections
1. Press the Win+R keys to open Run, type ncpa.cpl into Run, and click/tap on OK to open Network Connections.
2. Click/tap on the wireless network (ex: "Brink-Router2"). (see screenshot below)
3. Click/tap on the Wireless Properties button. (see screenshot below)
4. Check (on) or uncheck (off) Connect automatically when this network is in range for what you want, and click/tap on OK. (see screenshot below)
5. Click/tap on Close. (see screenshot below step 3)
6. You can now close Network Connections if you like. (see screenshot below step 2)
Option 5
To Turn On or Off Connect Automatically to Wireless Network in Command Prompt
2. Enter the command below into the command prompt, press Enter, and make note of the wireless profile name (ex: "Brink-Router2") that you want to turn on or off connect automatically. (see screenshot below)
netsh wlan show profiles
3. Enter the command below into the command prompt, press Enter, and see if the Connection mode of this wireless network is currently set to Connect automatically or Connect manually. (see screenshot below)
netsh wlan show profile "name"
Note
Substitute name in the command above with the actual name of the wireless network profile from step 2).
For example: netsh wlan show profile "Brink-Router2"
4. Enter the command you want to use below into the command prompt, and press Enter. (see screenshots below)
(To turn on connect automatically to wireless network)
netsh wlan set profileparameter name="name" connectionmode=auto
(To turn off connect automatically to wireless network)
netsh wlan set profileparameter name="name" connectionmode=manual
Note
Substitute name in the commands above with the actual name of the wireless network profile from step 2).
For example:
netsh wlan set profileparameter name="Brink-Router2" connectionmode=auto
netsh wlan set profileparameter name="Brink-Router2" connectionmode=manual
5. You can now close the command prompt if you like.
2.3. Accessing Shared Folders on a Mac
Accessing shared folders on a Mac OS X system from a Windows system
Follow the guidelines provided in this article to access shared folders on a Mac OS X system from a Windows system.
New Technology LAN Manager version 2 (NTLMv2).
For a Windows system to be able to access a Mac OS X system’s shared folders, the system must use NTLMv2 only and must also log in as the "Mac System name \ user" , Example: DCMACBOOK\dell.
How to connect the systems.
You can make a successful Windows to MAC file sharing session using the following steps:
Setting up sharing on the target system (MAC): (See Figure 1)
Figure 1 MAC File Sharing
If you attempt to connect without changing the default settings in NTLM you will get errors like the one below. (See Figure 2.)
Figure 2 Multiple NTLM Errors
To change the security level in NTLM, complete the following steps on the Windows system. Go to Group Policy Editor or run gpedit.msc. (See Figure 3.)
Figure 3. Changing Security level on NTLM completer
LAN Manager authentication level by default it is NTLMv1, it needs to be changed to NTLMv2 to access Mac File Sharing: (See Figure 4.)
Figure 4. Network Security LAN Manager authentication level
Default LAN Manager Setting NTLMv1 (See figure 5.)
Figure 5. Select NTLMv2 response only
Change LAN Manager Settings to NTLMv2 response only
Once the LAN Manager authentication level is changed to NTLMv2 you can access Mac File Sharing: (See Figure 6)
Figure 6 Accessing MAC file sharing
This last image shows the user browsing files on the Mac OS X system through Windows Explorer. (See Figure 7.)
Figure 7. Accessing MAC files in Windows Explorer
Article ID: SLN298092
Last Date Modified: 07/05/2018 09:54 AM
2.4. The network folder specified is currently mapped using a different user name and password first disconnect any existing mapping to this network share
The network folder specified is currently mapped using a different user name and password first disconnect any existing mapping to this network share
Method1:
Step1: Locate if there are any shared networks available from the command line using the
command: net use and locate the shared folders
Step2: If you locate the shared file then delete it by using the following
command: net use* /delete
Note: If you unable to locate any shared folder paths and if the issue persists then try to fix the issue using method2
Method2:
Step1: Open àFile explorer à check for network connections.
If you locate anything shared drive there delete it by using following the path:
Step2: Now try again to set up the network drive again it will work.
Method3:
Once after trying to map the drive if you are using it for different
users and trying to logging using different credentials earlier.
Now try connecting to it directly.
2.5. Network & Internet connection problems in Windows 10/8/7
If you find that your internet connection, in Windows 10, Windows 8, Windows 7 or Windows Vista, has suddenly stopped working or that you are facing certain Network and Internet connectivity problems, here are a few troubleshooting steps you may want to try.
Network & Internet connection problems
1] IPConfig is a tool built into Windows, that displays all current TCP/IP network configuration values and refreshes Dynamic Host Configuration Protocol DHCP and Domain Name System DNS settings. You can access this tool via the command line. If you have a bad IP address, then renewing your IP address this way may help solve your internet problems.
Type cmd in start search and press Ctrl-Shift-Enter. If you wish, just out of curiosity, you may type ipconfig and hit Enter, to view the status of the computer's Internet Protocol or IP address.
Type ipconfig /release to let go of the current IP address.
Next, type ipconfig /renew to obtain a new IP address.
If you get an error message when you Run the "Ipconfig /Renew" command see KB810606.
If you recurrently face this problem, then you can have it renewed on every start-up, by creating the following .bat file and placing it in your startup folder.
2] Frequently, internet connection problems can also be traced to a corrupted DNS cache. Resetting or Flushing this cache is an easy fix to many of these problems. This is how you can flush Windows DNS cache in Windows 10, Windows 8/7 or Windows Vista.
Start > All Programs > Accessories > Command Prompt. Right click on it and 'Run As Administrator'. Type the following and hit enter:
ipconfig /flushdns
You should be able to see a confirmation dialog window:
Windows IP Configuration. Successfully flushed the DNS Resolver Cache.
Next, type ipconfig /registerdns and hit Enter.
This registers any DNS records that you or some programs may have recorded in your Hosts file.
Just in case you are interested, to view the complete syntax for this command type ipconfig /help and hit Enter!
3] The Network & Internet Diagnostic & Repair Tool in Windows 10/8/7/Vista will help you identify the potential issues preventing network connectivity, and it automatically takes appropriate steps toward correcting them. If a computer on the network loses Internet connectivity, you can graphically see which connection is down and then use Network Diagnostics to help determine the cause of the problem and find possible solutions.
To access it, open Control Panel > Network & Sharing Center. In the lower part, click on Troubleshoot Problems. From the window which opens, you can select Internet Connections or any other issue you want to troubleshoot and repair.
Type the following commands in Run box and hit Enter to open the required Troubleshooters directly:
2.6. How to: Allow USB Printers to Forward using remote desktop
If you're a user of windows remote desktop (like me), you might find that, even after ticking printing forwarding, your shiny new USB printer doesn't show up This will run you through adding an entry into the registry to fix it Bear in mind that the registry can be a mystical place of wondrous danger, so put your careful hat on.
5 Steps total
Step 1: Double check you've got printer forwading ticked on within Remote Desktop
If you've got a .RDP file, right click on it and go edit. If not, just crack open RD as per usual Ensure options is expanded and go to the local resources tab If the box labeled printers isn't ticked, tick it. Do not connect just yet..
Step 2: Crank open the Registry editor
Go start -> Run, type regedit and click ok
Step 3: Browse to the following..
HKEY_CURRENT_USER -> Software -> Microsoft -> Terminal Server Client -> Default -> Addins -> RDPDR
Step 4: Within the Key RDPDR, add a new DWORD Value
Call it FilterQueueType (I'm pretty sure it's CAsE sENsiTiVE), and give it a value of ffffffff (8 f's) Click ok and close down the registry editor
Step 5: Ensure driver is installed on the remote Computer
Your printer is only going to forward itself to a PC that has a driver installed on it, so download/copy the driver across and install it
Hint: To install a printer driver on a computer without it showing up in the printer list, open up the printers and faxes window, go file -> server properties, go to the drivers tab and then add your printer
Map a network drive to get to it from File
Explorer in Windows without having to look for it or type its network
address each time.
Open File Explorer from the taskbar or the Start menu, or press the Windows logo key + E.
Select This PC from the left pane. Then, on the Computer tab, select Map network drive.
In the Drive list, select a drive letter. (Any available letter will do.)
In the Folder box, type the path of the folder or computer, or select Browse to find the folder or computer. To connect every time you sign in to your PC, select Reconnect at sign-in.
Select Finish.
Note: If you can't
connect to a network drive or folder, the computer you're trying to
connect to might be turned off, or you might not have the correct
permissions. Try contacting your network administrator.
2.9. How to connect L2TP/IPsec VPN on Windows 10
This article will describe how you can configure L2TP/IPsec VPN on Windows 10.
Prerequisites
Windows 10
Access to your Windows 10 as Administrator or a user with administrator permissions
Step 1 – Log in to Windows 10
Click on the search icon in the Windows menu bar and search for control panel. You should see the Control Panel icon and click on it.
Open Network and Internet
Open Network and Sharing Center
Step 2 – Configure VPN
Click on Set up a new connection on a network
Select Connect to a workplace and click on Next
Click Use my Internet connection (VPN)
Enter your IP address in the Internet Address field. In our example, we use this IP, 193.33.61.185, click on Create
After you have clicked on Create the set up wizard will be closed.
Click Change adapter settings on the left side menu.
You will now see all available interfaces. Open Properties of the VPN connection interface
Open Security tab
Open dropdown of Type of VPN and select Layer 2 Tunneling Protocol with IPsec (L2TP/IPsec)
Click on Advanced settings. Select Use preshared key for authentication and fill in the preshared key which you created on the Windows Server. Apply it by clicking on OK.
Return back to the Security tab. Select Allow these protocols and check the following values:
Open Network icon in the right bottom and click on VPN Connection
After you have clicked on VPN Connection a Connect button will be visible. Click on Connect
You will be asked to enter a User name and Password
Trying to connect.
Your VPN connection is established.
Step 4 – Check IP address
If you are routing all the traffic through VPN you see the VPN IP address of your VPN server. You can find your IP address by visiting whatismyip.com .
Conclusion
Congratulations, you have configured a VPN client on a Windows 10.
2.10. How to update the VPN shared secret (for L2TP/IPSEC)
Configure a preshared key on a VPN (for Windows 10)
In the search box next to Start on the taskbar, type control panel. Select Control Panel from the list of results.
In Control Panel, double-click Network Connections.
Under the Virtual Private Network section, right-click the connection for which you want to use a preshared key, and then click Properties.
Click the Security tab.
Click IPSec Settings.
Note
IPSec Settings may be shaded if on the Networking tab, Type of VPN is set to PPTP VPN. A preshared key can only be configured if this option is set to L2TP IPSec VPN or Automatic.
Click to select the Use preshared key for authentication check box.
In the Key box, type the preshared key value. This value must match the preshared key value that is entered on the VPN-based server.
Click OK two times.
2.11. Setting Up WebDAV on Windows 10
In this article, you will learn how to set up a network drive on Windows 8 and Windows 10 using WebDAV.
WebDAV is a communication protocol with which you can easily copy data that is on your webspace to your PC or vice versa.
You can also use a WebDAV network drive in Windows like a normal hard drive.
Please Note
To set up a WebDAV network drive under Windows 8 or Windows 10, you will have to edit the Windows registry.
Performing changes to the Windows registry is done at your own risk.
To set up a network drive under Windows 8 or Windows 10 using WebDAV, simply follow these steps:
Requirement
You have logged in to Windows 8 or Windows 10 as an administrator.
Customizing the Windows Registry
To adjust the Windows registry:
Windows 8: Press the Windows key + R. Then, in the Run window, type regedit and click OK.
Windows 10: In the search box located on the Windows 10 taskbar, type regedit and click the Registry Editor in the results.
In the Registry Editor, locate the following registry subkey: HKEY_LOCAL_MACHINE\SYSTEM\CurrentControlSet\Services\WebClient\Parameters.
Double-click the BasicAuthLevel entry.
Check the value specified in the Value data field and change it to 2 if necessary.
Click OK.
Restart your computer.
Mounting a WebDAV Network Drive in Windows 8/10
Open the Windows Explorer.
Windows 8: Click Add Network Location at the top of the menu bar on the Computer tab.
Windows 10: Right-click Network on the left menu bar. Then click Map network drive...
Select the desired drive label (letter).
Click the link Connect to a Web site that you can use to store your documents and pictures, and the Add a network address window opens.
Click Next.
Click Choose a custom network location.
Click Next and the Add Network Location window will open.
In the Internet or network address field, enter your domain in the following format:
2.12. How to Set Up a Homegroup Network in Windows 10
A simpler way of networking, a Homegroup in Windows 10 lets every Windows PC in the house share the things nearly everybody wants to share: music, photos, movies, and the household printer. Set up a Homegroup, and Windows automatically begins sharing those items. The Homegroup strategically leaves out the folder you probably don't want to share: your Documents folder.
Homegroups work with any Windows 7, 8, and 8.1 computers on your network, as well. (Homegroups don't work with Windows Vista or Windows XP, unfortunately.)
Depending on your network, you may be invited to join a Homegroup as soon as your computer connects with your router. If so, jump to Step 2.
Here's how to set up a new Homegroup on your Windows PC as well as how to let Windows join a Homegroup you may have already set up with your other networked computers:
Right-click the Start button and choose Control Panel from the pop-up menu.
When the Control Panel appears, click the Network and Internet icon. When the Network and Internet page appears, click HomeGroup from the right pane.
Can't find the Homegroup setting? Then type homegroup into the Settings' window's Search box, located in the window's upper-right corner. When the word HomeGroup appears in the Search Results, click it to open the Homegroup window.
In the Homegroup window, click the Change Network Location link, and click the Yes button in the pane that appears on the right.
When you first connect to a wireless network, Windows assumes it's a public network, perhaps at a coffee shop. Naturally, Windows also assumes you don't want anybody to snoop through your computer, so it leaves your PC "undiscoverable." That means nobody can find it on the network, and, you won't be able to find anybody else's computer.
Choosing Yes, shown here, tells Windows that you're on a private network where you want to share things like files and printers.
Click Yes to make your wireless network private and allow sharing.
Click either the Create a Homegroup or Join Now button.
If you see a Create a Homegroup button, click it to create a new Homegroup.
If you see a Join Now button (as shown here), somebody has already created a Homegroup on your network. To join it, click the Join Now button.
Click Join Now to join an existing Homegroup. Click Create to create a new Homegroup.
Whether you click the Join Now or Create a Homegroup button, Windows asks what items you'd like to share.
If you're asked to change the network privacy settings on your computer, be sure to choose Private rather than Public.
Choose the items you'd like to share, click Next, and, if joining an existing Homegroup, type in your network's Homegroup password.
Shown in the following figure, the window lets you select the folders you want to share with your Homegroup family. To share an item, choose Share from its adjacent drop-down menu. To keep items private, choose Not Shared.
Most people want to share their Music, Pictures, Videos folders, as well as their printer and media devices. Because the Documents folder contains more private material, it's usually left unshared.
Most people share only their Music, Pictures, and Videos folders, as well as their printers and media devices.
Sharing a folder simply lets other people access that folder's files to view the pictures or watch a video, for example. They can neither change nor delete those files, nor can they create or place any files in your folder.
Finally, if you're joining an existing Homegroup, type in the Homegroup's existing password. Don't know the password? On a Windows 7, 8, or 8.1 computer, find the password by opening any folder, right-clicking the word HomeGroup in the folder's left pane, and choosing View the Homegroup Password. (The password is case sensitive, so make sure you capitalize the correct letters.)
If you're joining an existing Homegroup, you're finished.
If you clicked the Create a Homegroup button, take note of the password listed at the closing screen.
You must enter that same password into each computer you want to include in your Homegroup. Leave your computer turned on and follow these steps on your other computers to join the Homegroup you've just created.
When you're through with these steps, you've created or joined a Homegroup that's accessible from every Windows 8.1, 8, and 7 PC on your network. You've also set up your PC to allow its Music, Photos, and Videos folders to be shared, something I describe in the next section.
Hailing strictly from the world of Windows, Homegroups won't allow you to share items with iPads, or smartphones. For sharing files between those devices, download their OneDrive app.
When you create or join a Homegroup, you're choosing which folders to share only from your own account. If other account holders on that PC also want to share their folders, they should do this while logged on with their account: Open any folder, right-click Homegroup in the Navigation Pane, and choose Change HomeGroup Settings. There they can add check marks to the items they want to share and then click Save Changes.
Changed your mind about your Homegroup settings? Follow the preceding steps to change which items you'd like to share.
After choosing to join a Homegroup, you may need to wait a few minutes until you're able to share files or printers with your networked computers.
Forgot the all-important Homegroup password? Open any folder, right-click the word Homegroup in the Navigation Pane, and then choose View the HomeGroup Password.
2.13. How to enable and disable SMBv1, SMBv2, and SMBv3 in Windows Vista, Windows Server 2008, Windows 7, Windows Server 2008 R2, Windows 8, Windows 10, and Windows Server 2012
This article describes how to enable and disable Server Message Block (SMB) version 1 (SMBv1), SMB version 2 (SMBv2), and SMB version 3 (SMBv3) on the SMB client and server components.
Warning: We do not recommend that you disable SMBv2 or SMBv3. Disable SMBv2 or SMBv3 only as a temporary troubleshooting measure. Do not leave SMBv2 or SMBv3 disabled.
In Windows 7 and Windows Server 2008 R2, disabling SMBv2 deactivates the following functionality:
Request compounding - allows for sending multiple SMB 2 requests as a single network request
Larger reads and writes - better use of faster networks
Caching of folder and file properties - clients keep local copies of folders and files
Durable handles - allow for connection to transparently reconnect to the server if there is a temporary disconnection
Improved scalability for file sharing - number of users, shares, and open files per server greatly increased
Support for symbolic links
Client oplock leasing model - limits the data transferred between the client and server, improving performance on high-latency networks and increasing SMB server scalability
Large MTU support - for full use of 10-gigabye (GB) Ethernet
Improved energy efficiency - clients that have open files to a server can sleep
In Windows 8 and Windows Server 2012, disabling SMBv3 deactivates the following functionality (and also the SMBv2 functionality that is described in the previous list):
Transparent Failover - clients reconnect without interruption to cluster nodes during maintenance or failover
Scale Out concurrent access to shared data on all file cluster nodes
Multichannel - aggregation of network bandwidth and fault tolerance if multiple paths are available between client and server
SMB Direct adds RDMA networking support for very high performance, with low latency and low CPU utilization
Encryption Provides end-to-end encryption and protects from eavesdropping on untrustworthy networks
Directory Leasing - Improves application response times in branch offices through caching
Performance Optimizations - optimizations for small random read/write I/O
More Information
The SMBv2 protocol was introduced in Windows Vista and Windows Server 2008.
The SMBv3 protocol was introduced in Windows 8 and Windows Server 2012.
For more information about the capabilities of SMBv2 and SMBv3 capabilities, go to the following Microsoft TechNet websites:
How to enable or disable SMB protocols on the SMB server
Windows 8 and Windows Server 2012
Windows 8 and Windows Server 2012 introduce the new Set-SMBServerConfiguration Windows PowerShell cmdlet. The cmdlet enables you to enable or disable the SMBv1, SMBv2, and SMBv3 protocols on the server component.
Notes When you enable or disable SMBv2 in Windows 8 or in Windows Server 2012, SMBv3 is also enabled or disabled. This behavior occurs because these protocols share the same stack.
You do not have to restart the computer after you run the Set-SMBServerConfiguration cmdlet.
To obtain the current state of the SMB server protocol configuration, run the following cmdlet:
Windows 7, Windows Server 2008 R2, Windows Vista, and Windows Server 2008
To enable or disable SMB protocols on an SMB Server that is runningWindows 7, Windows Server 2008 R2, Windows Vista, or Windows Server 2008, use Windows PowerShell or Registry Editor.
Windows PowerShell 2.0 or a later version of PowerShell
To disable SMBv1 on the SMB server, run the following cmdlet:
Note You must restart the computer after you make these changes.
Registry Editor
Important This article contains information about how to modify the registry. Make sure that you back up the registry before you modify it. Make sure that you know how to restore the registry if a problem occurs. For more information about how to back up, restore, and modify the registry, click the following article number to view the article in the Microsoft Knowledge Base:
322756 How to back up and restore the registry in Windows
To enable or disable SMBv1 on the SMB server, configure the following registry key:
How to enable or disable SMB protocols on the SMB client
Windows Vista, Windows Server 2008, Windows 7, Windows Server 2008 R2, Windows 8, and Windows Server 2012
Note When you enable or disable SMBv2 in Windows 8 or in Windows Server 2012, SMBv3 is also enabled or disabled. This behavior occurs because these protocols share the same stack.
To disable SMBv1 on the SMB client, run the following commands:
Click the Windows \"Start\" button and type the \Run\ option – in the box then type regedit
HKEY_LOCAL_MACHINE\Software\Policies\Microsoft\Windows\WindowsUpdate – right click create new DWORD (32 BIT)
Key: DisableWindowsUpdateAccess
Run msconfig and disable update service to run on startup
How to Disable Windows 10 Update
Follow the methods below to disable Windows 10 update correctly.
Solution 1. Disable Windows Update Service
Understand the limitations of this method. While disabling the automatic update service will temporarily halt any Windows 10 cumulative updates, the service will re-enable itself after a certain amount of time. Here are the directions:
1. Press the Windows logo key + Rat the same time to invoke the Run box.
2.Type services.msc and press Enter.
3. Scroll down to Windows Update, and double-click it.
4. In Startup type, select "Disabled". Then click "Apply" and "OK" to save the settings.
Solution 2. Change the Setting of the Group Policy Editor
The Group Policy feature is not available in the Home edition. So, only when you run Windows 10 Professional, Enterprise, or Education, you can use the Group Policy Editor to change the settings to prevent Windows 10 from automatically updating. The group policy editor will notify you of new updates without automatically installing them.
Press the Windows logo key + R then type gpedit.msc and click OK.
Go to "Computer Configuration" > "Administrative Templates" > "Windows Components" > "Windows Update".
Double-click "Configure Automatic Updates".
Select "Disabled" in Configured Automatic Updates on the left, and click Apply and "OK"to disable the Windows automatic update feature.
Note: If you need to update your Windows version later, you can repeat the steps above, then select Enabled to turn on this feature, so that you can continue to download the updates.
Solution 3. Meter Your Network Connection
Understand that this method won't work for Ethernet connections. You can only disable automatic updates by using this method on a Wi-Fi connection. If your computer is connected to WiFi, you can try this to stop Windows 10 automatic updates.
1. Click the Start button at the bottom left on your desktop, then click the "Settings" app.
2. Click "Network & Internet".
3. Click WiF in the left pane, then click the name of your Wi-Fi connection.
4. Click to turn on Set as metered connection.
Solution 4. Change the way of Windows 10 Updates Using Registry
Extra Tips: Editing the registry is risky, and it can cause irreversible damage to your installation if you don't do it correctly. It's recommended that you make a full backup of your computer before proceeding. All you need to do is use this free backup software to back up your data in three steps:
You'd better create the backup file on some other storage media or in some other drive. If not, there may be a risk of the backup file getting corrupted or destroyed.
Step 1: Launch EaseUS Todo Backup software and then choose "File Backup", "Disk/partition Backup" or "System Backup" for different backup purpose.
Step 2: Choose the system, disk partition, files or apps that you want to back up. Then select a destination where you want to store the backup file.
Step 3: Click "Proceed" to start the data backup process.
With a backup at hand, now it's safe to customize a Windows 10 update without receiving any forced updates on your computer. Here's how to make the change in Registry:
1. Use the Windows key + R keyboard shortcut to open the Run command.
2. Type regedit, and click OK to open the Registry. Browse the following path:
3. Right-click the Windows (folder) key, select "New" and then click "Key".
4. Name the new key "WindowsUpdate" and press "Enter".
5. Right-click the newly created key, select "new", and click "Key".
6. Name the new key AU and press Enter. Inside the newly created key, right-click on the right side, select "New", and click on "DWORD (32-bit) Value".
7. Name the new key AUOptions and press Enter. Double-click the newly created key and change its value to 2. It's for "Notify for download and notify for install". Click "OK".
8. Close the Registry to complete the task.
Using this value prevents Windows 10 from downloading updates automatically, and you'll get a notification when new updates are available. By this way, you can avoid any auto Windows 10 update effectively.
That's how you could make an attempt to disable Windows 10 update in every way. Each method has been proved to work as long as you wish to turn off all the automatic updates in Windows 10.
In the end, we're also asked to address another similar Windows 10 update issue which frequently bothers users for a long time, if you're the one who is looking for a way to stop a Windows 10 update in progress, leave this page and move to the linked page for help.
2.15. How to Prevent Windows 10 from Downloading Feature Updates
How can I stop or defer Windows 10 feature updates only? Feature updates are also known as major updates that are actually a new version of Windows 10, while cumulative updates are traditional security patches we’ve known over the years. In this tutorial we’ll show you 2 methods to prevent Windows 10 from automatically downloading the next feature updates, without blocking cumulative updates.
Method 1: Prevent Windows 10 Feature Updates via Group Policy
Open Local Group Policy Editor and navigate to: Computer
Configuration > Administrative Templates > Windows Components
> Windows Update > Windows Update for Business.
In the right pane, double-click the “Select the target Feature Update version” policy.
Select the Enabled option. Enter a version number (for example, “2004”) you want to stay on or upgrade to, and then click OK.
If you’re running Windows 10 1909 and set the version ‘1909’, it will stop Windows 10 from installing any later version including Windows 10 v2004.
When it’s done, close Local Group Policy Editor and reboot your computer.
Method 2: Prevent Windows 10 Feature Updates via Registry Editor
Open Registry Editor and browse to: HKEY_LOCAL_MACHINE\SOFTWARE\Policies\Microsoft\Windows\WindowsUpdate. In the right pane, right-click the blank area and select New -> DWORD (32-bit) Value.
Name the DWORD TargetReleaseVersion and then double-click it to set the value to 1.
Use the similar way to create a string named TargetReleaseVersionInfo and set the value to the Windows 10 version number that you wish to stay on. If want to stick to Windows 10 2004 and block newer feature updates, then set it to “2004”.
Close Registry Editor and restart the system to apply the changes.
2.16. How to stop Windows 10 from performing automatic restarts after installing updates
How to stop Windows 10 from performing automatic restarts after installing updates
You can stop Windows 10 from automatically restarting after updates, and in this guide, we'll show you how to do it.
Windows
10 is an advanced OS that includes an extensive list of great features,
but its tendency to reboot automatically to apply new updates is not
one of them.
Although updates are necessary to ensure your device are in line with
the latest improvements and security patches, if you don't restart soon
enough, Windows 10 will eventually reboot automatically to finish
applying updates. It simply isn't a good user experience.
In an attempt to mitigate this issue, in the Anniversary Update, Windows 10 introduced Active Hours
to prevent installing updates while you're actively working on your
computer. However, this won't stop Windows 10 from restarting during off
hours, which can be a problem if you typically leave your computer in
the middle of a task for an extended period.
Fortunately, there is a workaround that can be traced to Winaero, which allows you to take full control and prevent Windows 10 to reboot on its own everytime a new update installs.
In this Windows 10 guide, we'll walk you through the steps to prevent Windows 10 from rebooting after downloading and installing an update.
How to stop your PC from automatically restarting after installing updates
Important: Before proceeding note that this is a
workaround not supported by Microsoft, and it can stop working at any
time. You should use it at your own risk.
Open Start.
Search for Task Scheduler and click the result to open the tool.
Right-click the Reboot task and select Disable.
Once you completed the steps, your device will no longer restart
after downloading and installing new updates. However, new updates
won't apply, and future updates won't install until you manually reboot
your computer.
Additional steps (if needed)
In the case, Windows 10 automatically re-enables the Reboot task; you can stop this behavior by doing the following:
Use the Windows key + R keyboard shortcut to open the Run command.
Select the Reboot file without an extension, right-click it, and select Rename.
Rename the Reboot file to Reboot.old.
Right-click inside the folder, select New, and click on Folder.
After you've completed the steps, Windows 10 will no longer be able to re-create the task to reboot your computer automatically.
If you want to revert the changes, go back to the UpdateOrchestrator folder and delete the Reboot folder and rename the Reboot.old file back to Reboot.
Then follow the Task Scheduler steps mentioned above but on Step 3 select Enable.
Note: We're not saying that you should skip
installing updates, as they're important to keep your device secure and
up to date. However, there are scenarios where you make want to take
full control and decide exactly when to restart your computer to apply
new updates, and this is when knowing how to stop automatic reboots
comes in handy.
2.17. How to See Which Group Policies Are Applied to Your PC and User Account
How to See Which Group Policies Are Applied to Your PC and User Account
We have shown you a lot of tips and tricks over the years that
involve modifying Local Group Policy. If you would ever like to see all
the Group Policy settings in effect on your PC, here’s how to do it.
In the Windows world, Group Policy
provides a way for network administrators to assign specific settings
to groups of users or computers. Those settings then get applied
whenever a user in the group logs in to a networked PC or whenever a PC
in the group is started. Local Group Policy is a slightly more limited
version that applies settings only to a local computer or users—or even a group of local users.
We’ve featured a number of tricks here in the past that use Local Group
Policy to change settings that you can’t change anywhere else—except by
editing the Windows Registry. If you’re in the habit of changing Local
Group Policy settings, you might find it useful to see all the changes
you’ve made in one place, rather than digging through the Local Group
Policy Editor.
Note: Local Group Policy is only available in the
Professional and Enterprise versions of Windows. If you’re using a Home
edition, you won’t have access to the Local Group Policy Editor.
View Applied Policies with the Resultant Set of Policy Tool
The easiest way to see all the Group Policy settings you’ve applied
to your PC or user account is by using the Resultant Set of Policy tool.
It doesn’t show every last policy applied to your PC—for that you’ll
need to use the Command Prompt, as we describe in the next section.
However, it does show pretty much all the policies you will have set for
regular use. And it provides a simple, graphical interface for browsing
through the Group Policy settings currently in effect on your
PC—whether those settings come from Group Policy or Local Group Policy.
To open the tool, hit Start, type “rsop.msc,” and then click the resulting entry.
The Resultant Set of Policy tool starts by scanning your system for applied Group Policy settings.
After it’s done scanning, the tool shows you a management console
that looks very much like the Local Group Policy Editor—except that it
only displays enabled settings along with a few unconfigured security
settings.
This makes it easy to browse through and see what policies are in
effect. Note that you can’t use the Resultant Set of Policy tool to
change any of these settings. You can double-click a setting to view
details, but if you want to disable or make changes to a setting, you’ll
have to use the Local Group Policy Editor.
View Applied Policies with the Command Prompt
If you’re comfortable using the Command Prompt, it does provide a
couple of advantages over using the Resultant Set of Policy tool. First,
it can show every last policy in effect on your PC. Second, it will
show some additional security information—like what security groups a
user is part of or what privileges they have.
To do this, we’ll be using the gpresult command. You
must specify a scope for the results, and valid scopes include “user”
and “computer.” This means that to see all the policies in effect for
the user and the PC, you’ll have to run the command twice.
To view all the policies applied to the user account you’re currently logged in with, you would use the following command:
gpresult /Scope User /v
The /v parameter in that command specifies verbose
results, so you’ll see everything. Scroll down a bit and you’ll see a
section named “Resultant Set Of Policies for User,” which contains the
information you’re after.
If you’re looking for all policies applied to your Computer, all you need to do is change the scope:
gpresult /Scope Computer /v
If you scroll down, you’ll see that there is now a Resultant Set Of Policies for Computer section.
And there are other things you can do with the gpresult command. For
example, if you’d like to save the report instead of viewing it at the
Command Prompt, you could switch out the /v parameter in either of those commands and instead use /x (for XML format) or /h (for HTML format). Of course, you could also just use the /v version of the command and pipe it to a text file, if you prefer.
2.18. 8 Free Ways to Reset Windows 10 Admin Password without Logging in
Forgot Windows 10 password and unable to log into the computer? This is a common scenario we may come across multiple times in our life, especially for those PCs or laptops being used less frequently.
It could be a big trouble in the past. But now it is not any more thanks to the enormous contributions from various talented developers. Here are 8 free ways to reset Windows 10 admin password when you are unable to login to that account.
Some of them are super easy and some of them are more suitable for people who are technically sound. Choose the one that suits you best and unlock Windows 10 computer with the least effort.
[Notice]: For those Windows 10 users that log in computer with Microsoft account, please go straight to Microsoft.com and reset Windows 10 password online. To do this, you should know the recovery email or the phone number connected to the Microsoft account. The process is straightforward and we won’t list steps for this. Just follow the prompts to complete the job.
[Update June 22]: The following method won’t work if the system drive was encrypted by BitLocker. No user account could be detected by those software (except for Elcomsoft System Recovery) when BitLocker is enabled. You have to boot the computer in Safe Mode and remove BitLocker encryption first.
#1 Reset Windows 10 Password with Another User Account
One of the easiest methods to reset Windows 10 admin account password is through another administrator account on that same PC. Usually, there are more than one administrator accounts on a shared or office computer. If one of the users left the company without telling the login password, his or her password can be reset or changed by another user account with administrative privilege.
Another case is that the built-in Administrator is activated on some computer. And you can use it to reset password of other users.
Here’s how to reset Windows 10 admin password with another administrator account.
First thing you need to do is to login to Windows 10 using the second admin account that you have access to.
Next, press Start icon to bring up the menu and search for Control Panel, press Open button at the right section to launch it.
Once you are in the Control Panel, select Change accounttype under User Accounts (it’s the top right option in the screenshot below).
Now you will see a list of user accounts on this Windows 10 PC, including the admin account that has been locked.
From here, select the locked user account, and then select Change the password on the next screen.
Now you will be asked to enter a new passwords for this locked Windows 10 account. Enter the new password twice, and be sure to save it somewhere. Also, type in a hint for the new password, this will help you remember it in case you forget Windows 10 password once again. Finally, click on Change password button to complete the entire task.
Once done, you can close all the windows and restart your PC. Now you can login the locked admin account with new password. This means you have successfully reset Windows 10 password.
#2 Reset Windows 10 Password with Command Prompt (Install Disk)
Windows 10 installation DVD or USB is a type of bootable media that helps you install OS and fix system issues, including password reset. This could be a great help when you don’t have access to another admin account on that computer.
In this part, we will use command prompt utility contained in Windows 10 install disk to reset Windows 10 password.
To get started, you have to prepare for a Windows 10 install USB or DVD. After that, boot the locked Windows 10 PC from Windows 10 installation disk. You need to go into the BIOS to change the system boot order.
Once the Windows 10 PC boots up using install disk, you will be able to see a Windows Setup screen. On this screen, hit Shift+F10 on your keyboard. This will bring up Command Prompt utility. Don’t be scared if you haven’t seen a Command Prompt before, it’s a powerful tool which is pretty easy to use when you know how.
In the black Command Prompt window, type in the following commands. Remember to press Enter after typing each line. This will simply change the Utility Manager to Command Prompt (similar to this one) on the Windows 10 login screen
Now, remove Windows 10 install disk from computer, and restart the device as usual.
Once the PC restarts and you can see the login screen, press the Ease of Access button (the second one ) as shown at the bottom of login window. This should normally open the Ease of Access menu, but remember that you have changed it to Command Prompt.
Once you have the Command Prompt open here, type the below commands to reset the password to your Windows 10 Admin account. Remember to replace <username> with the actual username of the locked Windows 10 account, and <password> with a new password.
net user <username> <password>
Once done, close the black Command Prompt windows and login to Windows 10 with new password.
#3 Reset Windows 10 Admin Password with Ubuntu LiveCD
We all know Ubuntu LiveCD is a bootable media for installing or testing Ubuntu OS on a target device. You can directly run Ubuntu from external USB without installing it to a physical drive, which is more safe and risky free. So this is one of the most reliable ways to reset Windows 10 admin password.
However, I would recommend normal users avoiding this if you are not technically sound when it comes to working with Linux OS (full of text commands). This is an ideal solution if you are a Linux user and trying to help someone out.
At the beginning, download Ubuntu Live CD ISO from their website (https://ubuntu.com/download/desktop), and burn it on a DVD or a USB drive. In our case, we have burnt it on a USB drive, however, the instructions would remain the same for DVD.
Boot Windows 10 PC from Ubuntu Live CD USB and you will see Ubuntu welcome screen. However, do not click on Install Ubuntu, we don’t want to do that. Rather, press Try Ubuntu. This will let you use Ubuntu on your Windows 10 (for the time being) without actually installing it.
Now, go to System Settings, and then select Software and Updates. In the new window, enable Community-maintained free and open-source software option and close the window afterwards.
At this point a dialog might appear saying that the repository information is out of date. Click Reload to update it.
Once done, open Terminal app on Ubuntu and execute the below command to install a utility for resetting Windows 10 password. Make sure a Wired or WiFi connection is established.
sudo apt-get install chntpw
Now browse to the following directory on Windows 10 partition from Ubuntu:
Windows\System32\Config
In this directory, click on a blank space with the right-button on of your mouse and select Open in Terminal.
In the terminal that opens up, use the below command to options to reset the password for the locked Windows 10 Admin account. Make sure you replace the <username> with the actual username of the Windows 10 admin account you forgot the login password.
chntpw -u <username> SAM
Once done, and you see a list of options, press 1 and hit Enter to reset the password to blank.
Now press q and hit Enter to quit the menu, and then press y and Enter to save the changes you just made.
Finally, take out the Ubuntu Live CD disk and restart the PC. Now you will be able to login Windows 10 without entering a password.
#4 Reset Windows 10 Password without Losing Data (LabWin Software)
If you prefer an easy and safe solution, then PassMoz LabWin is could be your best fit, This is one of the easiest utilities to reset Windows 10 password for local account. Within five clicks, a bootable password reset is ready and you can use it to reset password for locked Windows PCs and laptops. Most important, there is no data loss during this process. All your data are intact!
LabWin has an intuitive and user-friendly GUI, and support multiple platforms including Windows and MacOS. So, even if you do not have another Windows PC handy to create the bootable media using this tool, you can use a a Mac for this purpose. Here’s how you can use this utility.
Please grab a copy of PassMoz LabWin from this link and install it on a second PC that you use to complete the password reset task.
Once the program is opened, press Burn USB button to create a bootable password reset USB. Click on Yes on the small dialog box that pops-up. This basically tells you that the USB will be formatted, so any existing data will be lost. Ensure that you do not have any data in the media.
Once the process of creating reset USB is completed, it will show on a small dialog box as shown below. You can click Yes to close this and exit the LabWin utility.
Now boot the Windows 10 PC using this USB, you will a screen which lists all the accounts along with the locked Admin account.
Here, select the Windows 10 installation, then select the locked Admin account, and finally choose Reset Password button. This will reset the password to blank.
Once the password has been reset, it will show the same with a message on a small dialog box. Take out the USB, and click on Reboot button on the previous screen. The computer will reboot and will go directly to the desktop of the locked account.
#5 Recover Windows 10 Admin Password Free Using Ophcrack
Ophcrack is another utility which will let you reset the password for your Windows 10 Admin account. It runs on all platforms, i.e., Windows, Linux, and macOS. However, the UI can be a bit challenging to understand if you are not a technical person, and it may be blocked by many anti-viruses. Here’s how you can use Ophcrack to reset the password for your Windows 10 Admin account:
Get Ophcrack Live CD from their website (https://ophcrack.sourceforge.io/) and burn this ISO file onto a USB drive using a new PC. You can use any tool like Rufus or ISO2Disk for this purpose.
Now, boot your PC using this USB. It will show a window with 4 options, be sure to select the Ophcrack Graphic mode — automatic option on this screen as shown below. Your mouse might not work on this screen, so use the up and down arrow key to highlight the option, and then press the Enter key to select it.
This will automatically start process of collecting the information about all the user accounts on this Windows 10 PC. In case of a lengthy and complex password, Ophcrack may take a long time to recover it. By long time I mean it may even take several days to find the password. So, please be patient.
Once the process completes, it will show the cracked password on your screen under a column named NT PwD.
Note down this password, take out Ophcrack USB from the device, and reboot the PC. After Windows 10 PC boots normally, enter the recovered password to login to locked administrator account.
#6 Reset Windows 10 Password via OS Reinstall
OS Reinstall is one of the most drastic methods you can take to reset Windows 10 forgotten password. Why? That is because you would lost all data on C drive. Make sure you are aware of the potential risk before trying out the following steps.
Insert the Windows 10 installation disk (USB or DVD) on Windows 10 computer that you forgot the login password. Now, Boot the computer from installation disk, and you will view the Windows 10 setup screen where you need to press Next.
On the next windows, press Install Now button. You will be asked to input Windows 10 product key at this point, please do so and click on next. In case you do not have a Windows 10 product key currently, you can press I do not have a product key and activate Windows 10 once it has been installed.
Now follow the instructions on the screen and go on clicking Next till you come across a window where you need to choose from the options of Upgrade or Custom Install. Here you need to opt for later option.
Next, select the drive where you want to install Windows 10 and press Next.
Now, Windows 10 installation setup with wipe all the data from C drive and reinstall Windows 10.
Once the process completes, you can remove the installation USB from the drive and reboot your PC and finally, login to Windows 10 PC using a new admin account that you created during Windows 10 installation.
#7 Reset Windows 10 Admin Password from Encrypted BitLocker Drive
Elcomsoft System Recovery is particularly useful when you forgot Windows 10 password and the drive is encrypted by BitLocker. Although the case is rare, we do receive a couple of request on this matter. BitLocker is turned on by default on Microsoft Surface devices.
Unfortunately, most of the password reset software you could try out are not able to reset password on an encrypted BitLocker drive. They don’t have the capability to detect the password and user account because of data encryption. The only working software is Elcomsoft System Recovery. However, it is pretty expensive, starting at 299 USD. The full tutorial is covered in below section.
The first step is to create a bootable disk from Elcomsoft System Recovery software using another PC.
After that, Boot your locked PC using this bootable media, which can be anything from USB to CD/DVD. Once booted, it will automatically scan all disks including the encrypted one.
You have to input the BitLocker password or recovery key to unlock the encrypted drive.
Next, select the drive where Windows 10 is installed on your PC and press Next. In the Database Source screen, select SAM which refers to your local account and press Next.
In the next screen, choose the option to automatically search SAM source files and press Next. You will get to see all of the accounts on this Windows 10 PC including the locked admin account. Choose that account and press Next.
On the next screen, you will be presented with the option to reset the password. Choose a new password and press Apply. This should do the trick.
Remember, to remove the password from a BitLocker encrypted hard drive, you may have to unlock it and then mount it first. However, good news is you can do all that from this utility itself.
#8 Get Windows 10 Password Reset at Computer Repair Shop
This should be the last choice on your list. There are a variety of native repair outlets that would assist you to reset Windows 10 admin password. Usually, they have the right tool to get the task done and they may have done the same tasks for many people.
There is no doubt you will get the password reset successfully with this service. However, you’ll have to leave your PC with them, which cannot be a viable choice if you’ve sensitive data stored in it. Also, there is always a chance that you would may end up losing all your data.
Make a phone call first and check all details with them before sending the device to them. So, think twice before using this option.
Final Thought
Out of all the above options, resetting Windows 10 password using another admin account is the easiest. However, in case you do not have another admin account on that PC, Passmoz LabWin would be your next best bet. It is easy to use, has a user-friendly GUI, and has a free version available on their website. Also, there are free software you can try out and it is your own decision.
Finally, Elcomsoft System Recovery is the only option for resetting Windows 10 password with a BitLocker encrypted drive.
Original URL for this article: https://williamhartz.medium.com/8-free-ways-to-reset-windows-10-admin-password-without-logging-in-beeb4a852dbe
3. Printers
3.1. How To Force Clear All Jobs From A Printer Queue
Clear Printer Queue using Task Manager
To open Task Manager, simultaneously press the “CTRL + ALT + Delete” keys.
Once open, click the “Services” tab found between the “Processes” and “Performance” tabs.
Scroll through all of the services until you find the “Spooler” service. Right-click it and select “Stop Service.”
Launch “Windows File Explorer.” In the address bar, type “C:Windows\system32\spool\PRINTERS” and press “Enter.”
You may experience a pop-up box prompting you to continue as administrator. Select “Continue.”
DO NOT delete the “PRINTERS” folder! Select all entries within the folder by pressing “CTRL + A” followed by “Delete.”
Once all entries get removed, head back to the “Task Manager -> Services” and right-click “Spooler.” This time, select “Start Service.”
You can now exit out of Task Manager. Your queue should now be clear.
Force-Delete Printer Queue using Command Prompt
1. Click the “Start” icon (Win 7) or the “Cortana search bar” (Win 8 and 10) in the lower-left area of your screen.
2. ype “Command” in the box that appears 3. Right-click on “Command Prompt” and select “Run as Administrator. 4. Next, you’ll want to type “net stop spooler” and then press “Enter.” You’ll see the prompt “The Print Spool service is stopping” followed by “The Print Spooler service was stopped successfully.” 5. At this point, type in “del %systemroot%\System32\spool\printers* /Q” and press “Enter.” 6. To get the system rolling once again, type in “net start spooler” and press “Enter.” You’ll get prompted with “The Print Spooler service was started successfully.” 7. You can now close the Command Prompt as your printer queue should now be clear.
Force-Delete Printer Queue using the GUI
Bring up the “Run” dialog by pressing “Windows key + R,” type “services.msc” in the box, and press “Enter.”
Scroll down and right-click on “Print Spooler” within the list, then select “Stop.” This function will bring the printing queue to a halt.Leave this window open.
Press “Windows key + R” again, type “%systemroot%\System32\spool\printers\” followed by pressing “Ctrl + A” to select all files, if any, then tap “Delete” to remove them.If there are some entries you don’t wish to remove, for whatever reason, hold the “CTRL” key while left-clicking those entries.
Go back to the “Services” window that you left open, right-click on “Print Spooler” once again, then select “Start.”
Close the “Services” window, and your print queue should now be clear.
4. Microsoft Outlook
4.1. How to Set an Ethernet Connection as Metered in Windows 8 and 10
Windows 8 and 10 both allow you to set certain types of connections as metered so that you can limit the amount of data Windows (and certain apps) can use without asking. You can use the regular Settings interface to set mobile and Wi-Fi connections as metered, but for some reason Windows assumes you won't need to do this with wired Ethernet connections. If you use an ISP that has monthly data caps, you know better. The good news is that a quick Registry edit will fix you right up.
Set an Ethernet Connection as Metered by Editing the Registry
To set your Ethernet connection to metered, you'll have to dive into the Windows Registry to make a quick edit.
Standard warning: Registry Editor is a powerful tool and misusing it can render your system unstable or even inoperable. This is a pretty simple hack and as long as you stick to the instructions, you shouldn't have any problems. That said, if you've never worked with it before, consider reading about how to use the Registry Editor before you get started. And definitely back up the Registry (and your computer!) before making changes.
To get started, open the Registry Editor by hitting Start and typing "regedit." Press Enter to open Registry Editor and give it permission to make changes to your PC.
In the Registry Editor, use the left sidebar to navigate to the following key:
Before you go any further with the edit, you're going to have to take an additional step. The DefaultMediaCost key you just navigated to is protected, meaning that you don't by default have the permissions necessary to edit it. You're going to have to take ownership of and set some permissions on the key before you can edit it for the first time. It's quick and you'll only have to do it once. After you set the permissions, you'll be able to edit the key freely in the future.
Once you've set those permissions on the DefaultMediaCost key, you're going to edit one of the values inside it. Click the DefaultMediaCost key to select it and then in the right pane, double-click the Ethernet value to edit it.
On the Ethernet value's properties window, change the number in the "Value data" box from 1 to 2 and then click OK.
You can now close Registry Editor. Your Ethernet connection is now set to metered, meaning that data-intensive Windows services like Windows Update and automatic app downloads won't happen without asking your permission first. You might also find that some apps behave differently, as certain apps from the Windows store might be designed to respect this setting.
Unfortunately, the Settings interface in Windows won't update to show you that the connection is metered, as it does when you enabled metered connections for mobile and Wi-Fi connections. To verify, you'll need to return to Registry Editor and check the settings. Just remember that a setting of 2 means metered, and 1 means unmetered.
If you need to reverse the setting and change your Ethernet connection back to unmetered, just return to the DefaultMediaCost key and set the Ethernet value from 2 back to 1.
Download Our One-Click Registry Hacks
If you don't feel like diving into the Registry each time to set your connection as metered or unmetered, we've created two downloadable registry hacks you can use. One hack enables a metered connection for Ethernet and the other hack changes it back to an unmetered connection, restoring the default setting. Both are included in the following ZIP file. Before you can use these hacks, though, you will have to fire up Registry Editor once to take ownership of and set permissions for the DefaultMediaCost key, as we discussed in the previous section. After you've done that, you can then use our Registry hacks whenever you want. Double-click the one you want to use and click through the prompts to give it permission to make changes.
These hacks are really just the DefaultMediaCost key, stripped down to the Ethernet value we described above, and then exported to a .REG file. Running the "Enable Metered Ethernet Connection" hack sets the Ethernet value to 2. Running the "Restore Unmetered Ethernet Connection (Default)" hack sets the value back to 1. And if you enjoy fiddling with the Registry, it's worth taking the time to learn how to make your own Registry hacks.
And that's it. If you're using an Ethernet connection, but still have an ISP that limits data, setting the Ethernet connection to metered can prevent Windows and some apps from using that data up when you're not paying attention.
RELATED ARTICLES
4.2. Outlook can't send after upgrading to Windows 10
I just upgraded to Windows 10 and now Outlook can't send anymore. All the mail server settings are correct and interestingly enough, the test message is successful as well. The error message I get it;
Error message: 'Robert Sending' reported error (0x800CCC13): 'Cannot connect to the network. Verify your network connection or modem'
How can I get sending back to work again?
This issue seems to be common for some specific configurations although the actual cause isn't clear at this point. It can happen with any version of Outlook.
However, recovering from this is relatively easy but of course still annoying.
Windows Resource Checker sfc /scannow
To recover from the issue, you must run the Microsoft Windows Resource Checker tool, also know as "System File Checker" or "sfc". This tool scans and verifies the integrity of all protected system files and replaces incorrect versions with correct versions.
Right click on the Start button of Windows and choose: Command Prompt (Admin).
If you don't see this, instead choose: Windows PowerShell (Admin)
Behind the prompt type: sfc /scannow (note the space in the command)
Wait until the process completes. This usually doesn't take longer than 20 minutes with a regular hard disk and takes much shorter when you have a fast SSD drive.
Restart your computer.
With sfc /scannow some critical Office files are being put back where they needed to be after upgrading to Windows 10.
4.3. How to Scan & Fix Hard Drives with CHKDSK in Windows 10
Microsoft's hard disk scanning and repair utility, CHKDSK ("check disk"), was introduced over 30 years ago but still has a useful place today. Users running even the latest Microsoft operating system can still use the command to examine their hard drives for errors and repair them if necessary. Here's how to run CHKDSK in Windows 10.
Want to watch your iTunes movies and TV shows on a non-Apple device? Convert your purchased iTunes video files to a universal format with TunesKit DRM Media Converter for Mac and Windows.
Even in Windows 10, the CHKDSK command is run via the Command Prompt, but we'll need to use administrative privileges to properly access it. To launch a Command Prompt as an Administrator, press the keyboard shortcut Windows Key + X to bring up the power users menu, then let go of those two keys and tap the A key. Alternatively, with the power users menu open you can use your mouse or trackpad to select the Command Prompt (Admin) option.
You'll be presented with a UAC window requesting permission to launch the Command Prompt as Administrator. Click Yes to proceed and you'll see a new Command Prompt window. You can verify that you've successfully granted the Command Prompt administrative privileges by ensuring that "Administrator: Command Prompt" is present in the window's title bar.
From the Command Prompt, type the command "chkdsk" followed by a space, then the letter of the drive you wish to examine or repair. In our case, it's internal drive "C."
Simply running the CHKDSK command in Windows 10 will only display the disk's status, and won't fix any errors present on the volume. To tell CHKDSK to fix the drive, we need to give it parameters. After your drive letter, type the following parameters separated by a space each: "/f /r /x".
The "/f" parameter tells CHKDSK to fix any errors it finds; "/r" tells it to locate the bad sectors on the drive and recover readable information; "/x" forces the drive to dismount before the process starts. Additional parameters are available for more specialized tasks, and are detailed at Microsoft's TechNet site.
To summarize, the full command that should be typed into the Command Prompt is:
chkdsk [Drive:] [parameters]
In our example, it's:
chkdsk C: /f /r /x
Note that CHKDSK needs to be able to lock the drive, meaning that it cannot be used to examine the system's boot drive if the computer is in use. If your target drive is an external or non-boot internal disk, the CHKDSK process will begin as soon as we enter the command above. If, however, the target drive is a boot disk, the system will ask you if you'd like to run the command before the next boot. Type "yes" (or "y"), restart the computer, and the command will run before the operating system loads, allowing it to gain full access to the disk.
A CHKDSK command can take a long time, especially when performed on larger drives. Once it's done, however, it will present a summary of results including total disk space, byte allocation, and, most importantly, any errors that were found and corrected.
The CHKDSK command is available in all versions of Windows, so those on Windows 7, 8, or XP can also perform the steps above to initiate a scan of their hard drive. In the case of older versions of Windows, users can get to the Command Prompt by going to Start > Run and typing "cmd". Once the Command Prompt result is displayed, right-click on it and select "Run as Administrator" to grant the program the necessary privileges to execute CHKDSK successfully.
A final note: we've covered how to run CHKDSK in previous versions of Windows, and some users who followed the suggested steps were alarmed to find that their hard drive space was significantly reduced after running the command. This result is due to a failing hard drive, as one of the crucial functions that CHKDSK performs is to identify and block bad sectors on the drive. A few bad sectors on an old drive will typically go unnoticed to the user, but if the drive is failing or has serious problems, you could have huge numbers of bad sectors that, when mapped and blocked by CHKDSK, appear to "steal" significant portions of your hard drive's capacity.
Dramatization: actual failing hard drive may not spontaneously combust. Image: Sandra.Matic / Shutterstock
This is expected behavior, and it means that those sectors, and any data potentially stored on them, have failed, even if you or your operating system didn't realize it yet. CHKDSK will attempt to recover data from bad sectors when using the /r parameter, but some data may be corrupted and unrecoverable. Therefore, make sure to always keep good backups of all of your important data, and don't blame CHKDSK (i.e., kill the messenger) for confirming that your PC's hard drive is about to kick the proverbial bucket.

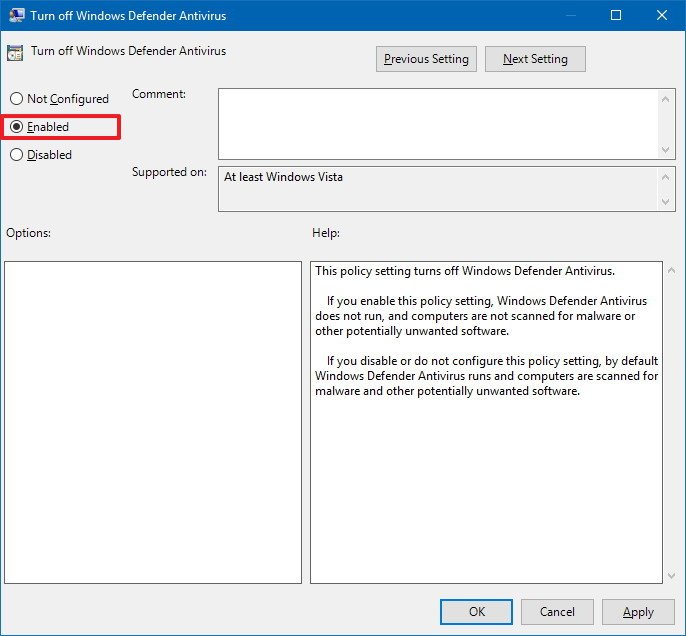
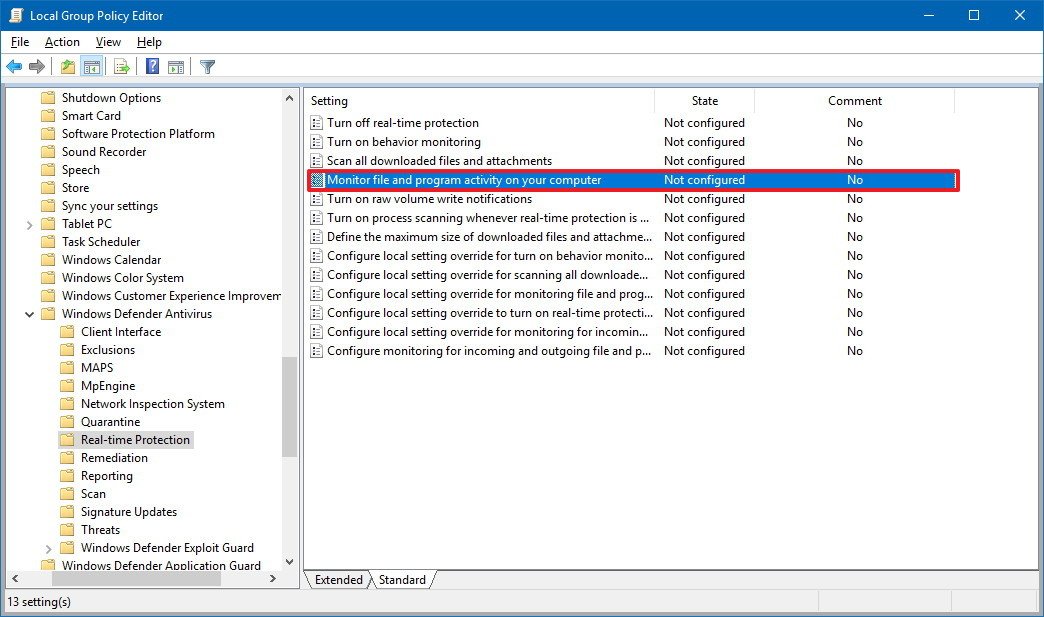
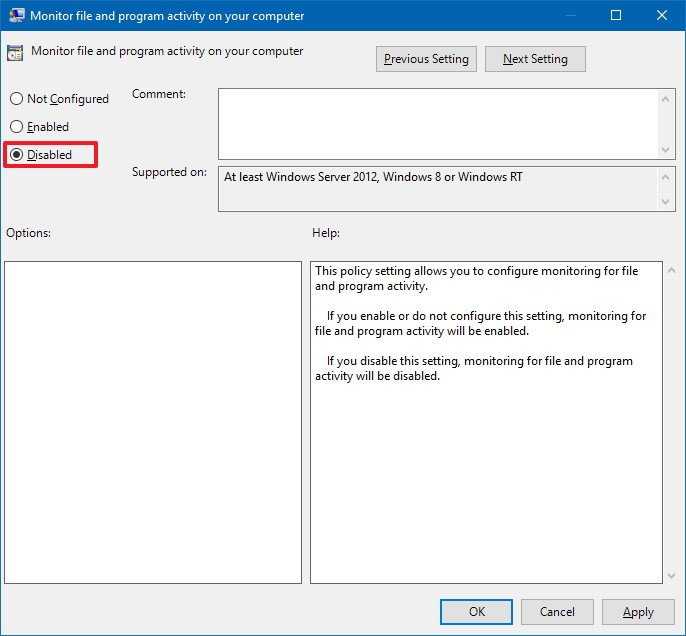
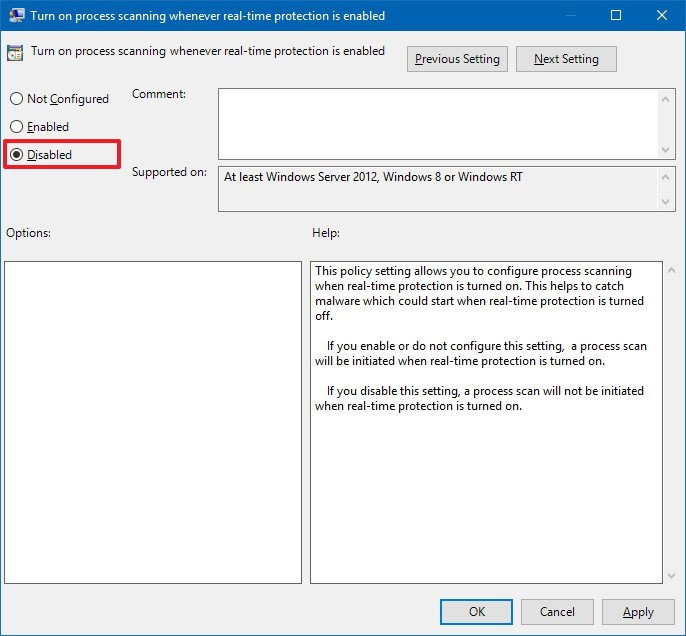


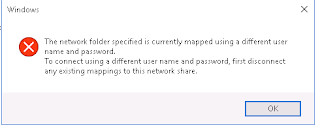


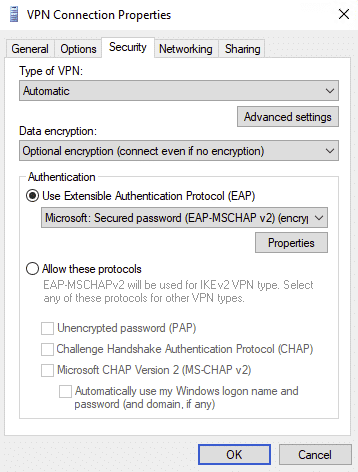
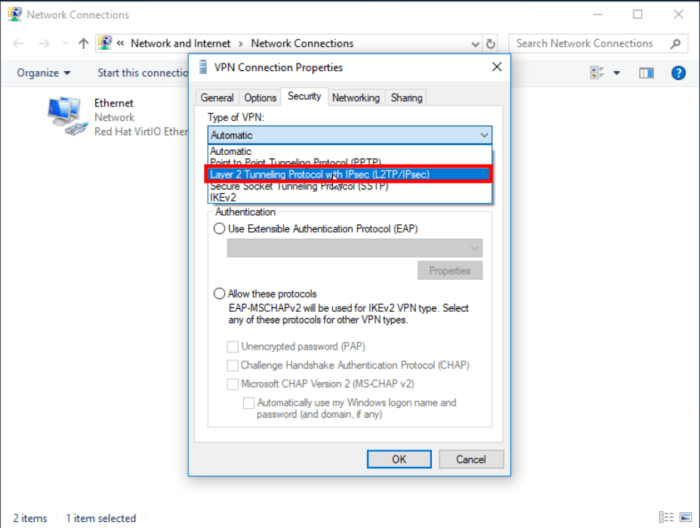

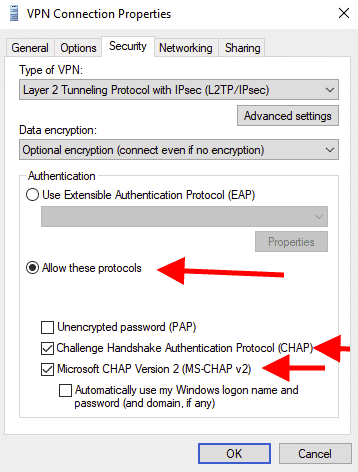
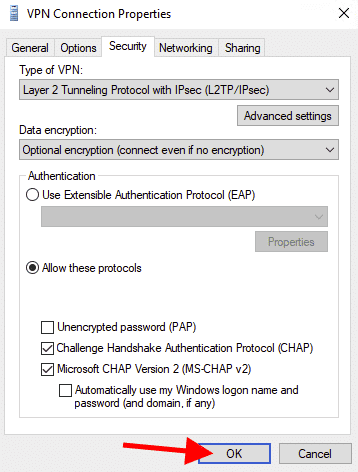


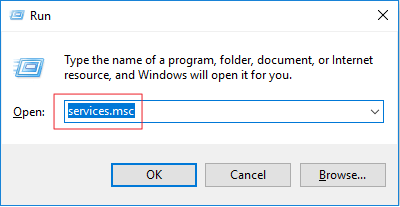
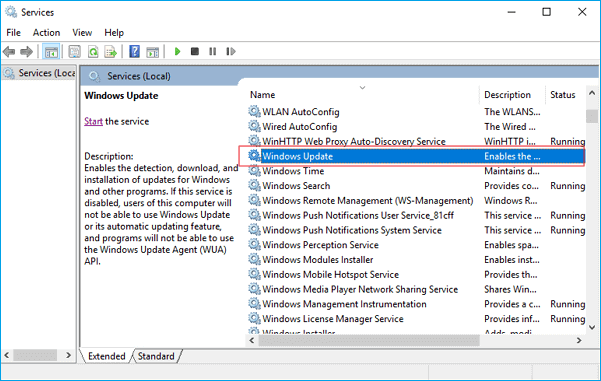
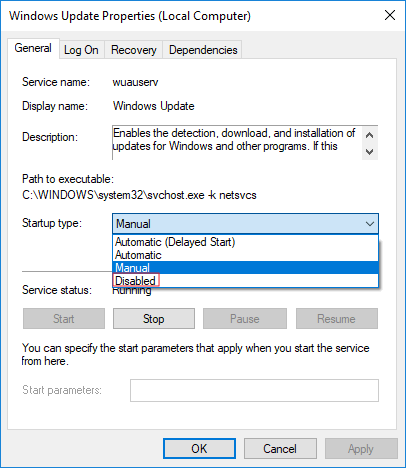
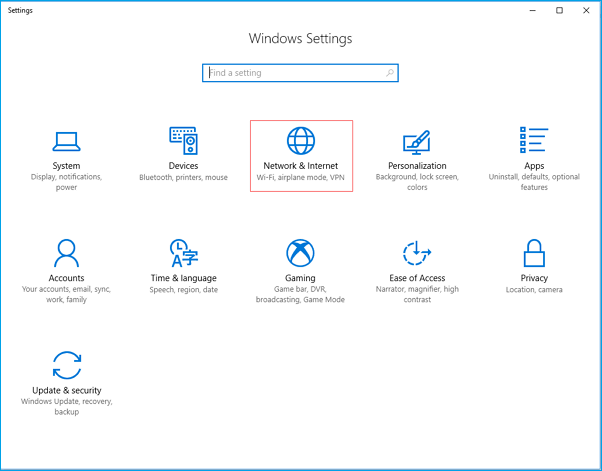
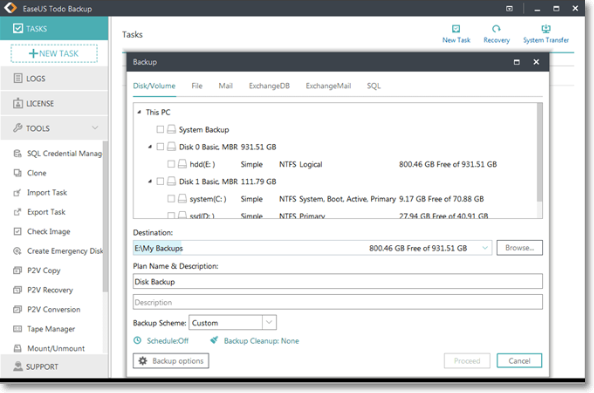
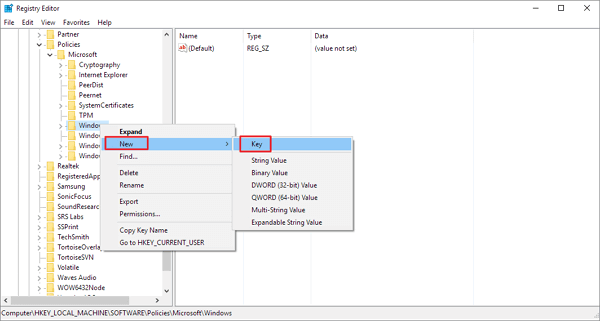
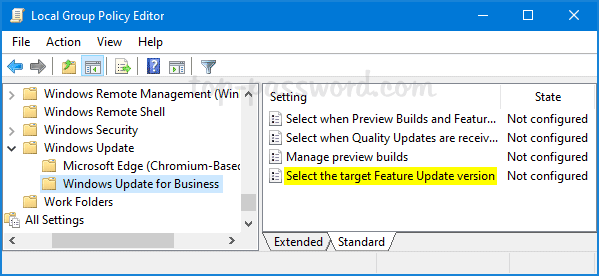
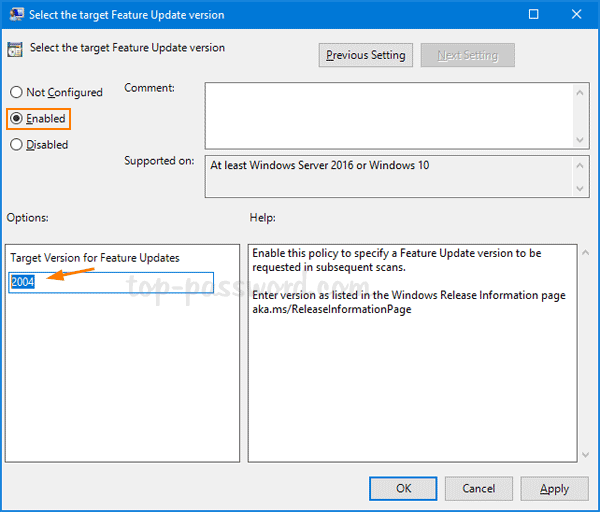
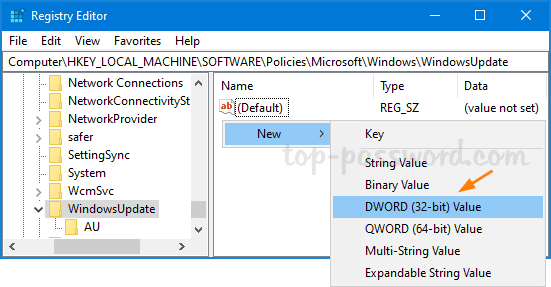

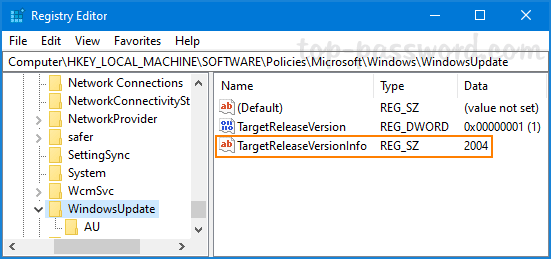

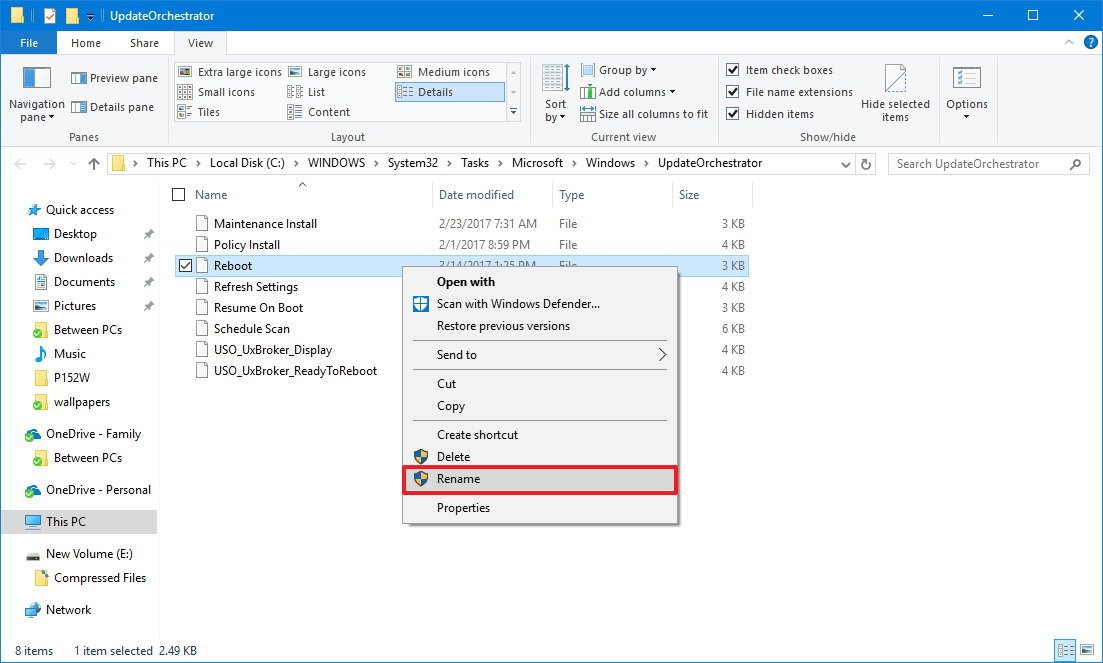
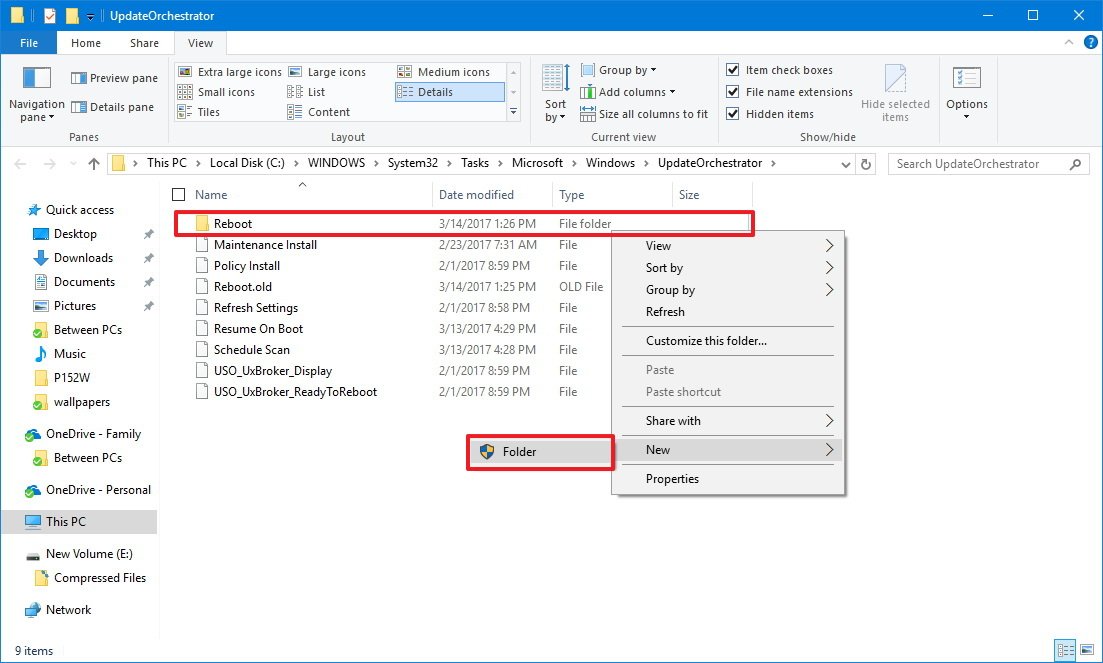


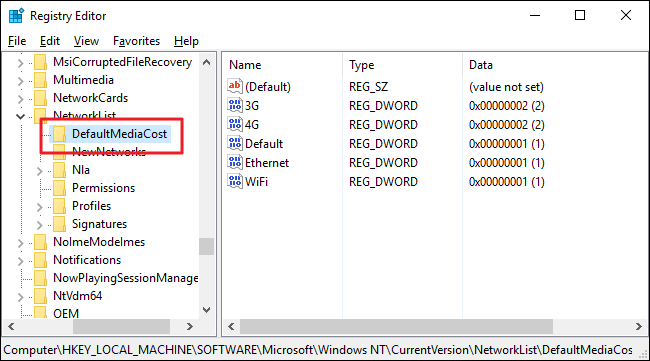


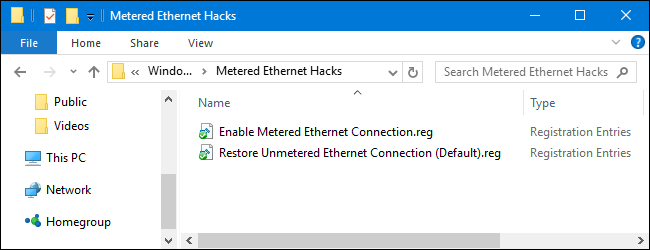
 This issue seems to be common for some specific configurations although the actual cause isn't clear at this point. It can happen with any version of Outlook.


